Table of contents
- Home page
General information about the app. - Settings
Recommended before content generation. - Products
Generate product descriptions and metadata.- Mass Generation
Generate descriptions or metadata for multiple products at once. - Individual Generation
Generate descriptions or metadata for products individually.
- Mass Generation
- Categories
Generate categories descriptions and metadata. - Blog Posts and Thumbnails
Generate blog posts - individually only. - Custom prompt templates
Save your prompts in templates and access default ones - for more precise content. - History
Check content generation history and restore previous version. - Pricing
Learn how pricing is built and how to buy extra credits.
When you open ChatGPT AI Content Master, you'll land on the Home page, where you can find your subscription details, Changelog, and email support form.
To start using the app, click the three-bar menu in the top left corner.
Settings
Before you start generating content, we recommend customizing the app to fit your preferences on the Settings page.
Note
These settings are used to generate both individual and bulk content. If needed, you can adjust them for specific products or categories by opening the item and modifying the settings in the right section.

Preview before publishing - enable the preview functionality to review the generated content during mass action before publishing.
Generation strategy - choose how the app should handle errors when OpenAI’s service is overloaded.
Model - two distinct language models with its own set of capabilities, select the one that best suits your specific language requirements:
- GPT-5 - next-gen AI with enhanced reasoning and creativity.
- GPT-4o - high-intelligence model for complex tasks.
Length - choose the size of the generated text: short, standard or long.
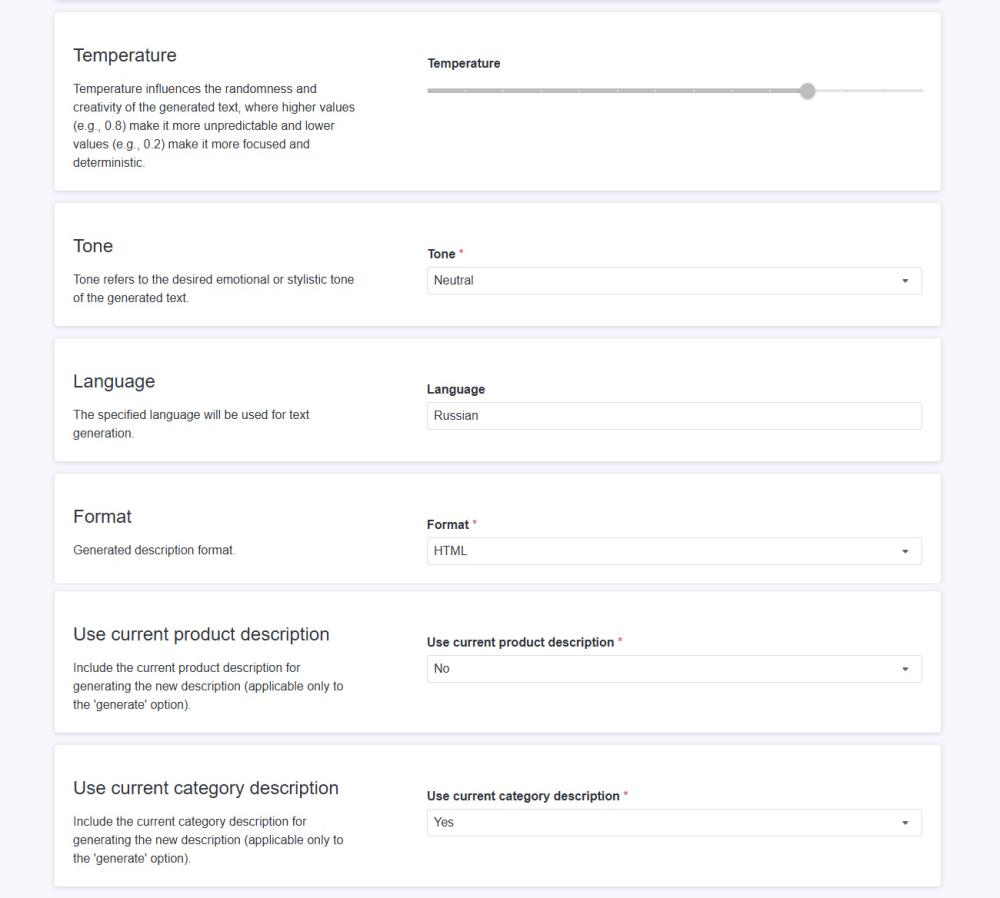
Temperature - influences the randomness and creativity of the generated text, where higher values (e.g., 0.8) make it more unpredictable, and lower values (e.g., 0.2) make it more focused and deterministic.
Tone - refers to the desired emotional or stylistic tone of the generated text.
Language - specify the language for text generation.
Format - this parameter allows you to select the desired format for the generated content.
- By selecting the "HTML" option, the content generator will create text that adheres to the HTML markup language. This enables the creation of structured content, including headings, paragraphs, lists, links, and other web page elements.
- By selecting the "Plain text" option, the content generator will produce unformatted text without any styling or markup. This simple text format does not include styles, fonts, or external elements.
Use current product description - set to "Yes" if you want to include the current product description when generating a new one.
Note: This option only applies to the 'Generate' action.
Use current category description - set to "Yes" if you want to include the current category description when generating a new one.
Note: This option only applies to the 'Generate' action.
Save your settings.
After configuring the settings, in Menu open the necessary object grid: Products, Categories or Blog Posts.
Products content generation
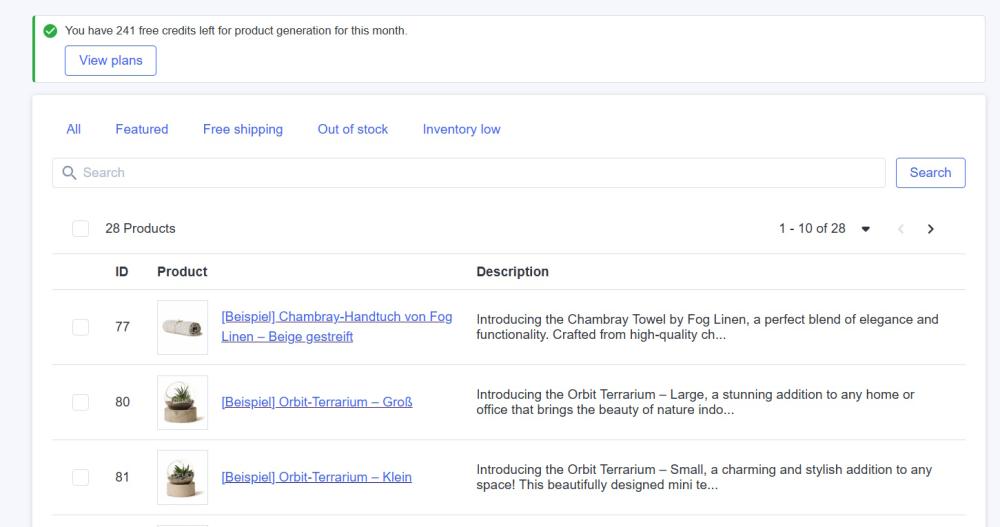
The grid provides a search function and filters to easily find the product you want to generate content for.
Mass Generation
To generate content for your products in bulk, please select the desired products and click the desired action button:

- Generate Description - create descriptions for selected products.
- Generate title - create new titles for selected products.
- Generate SEO - produce meta titles and descriptions for selected products (available from Basic plan).
- … > Refine - improve the grammar, syntax, and wording of your existing product descriptions.
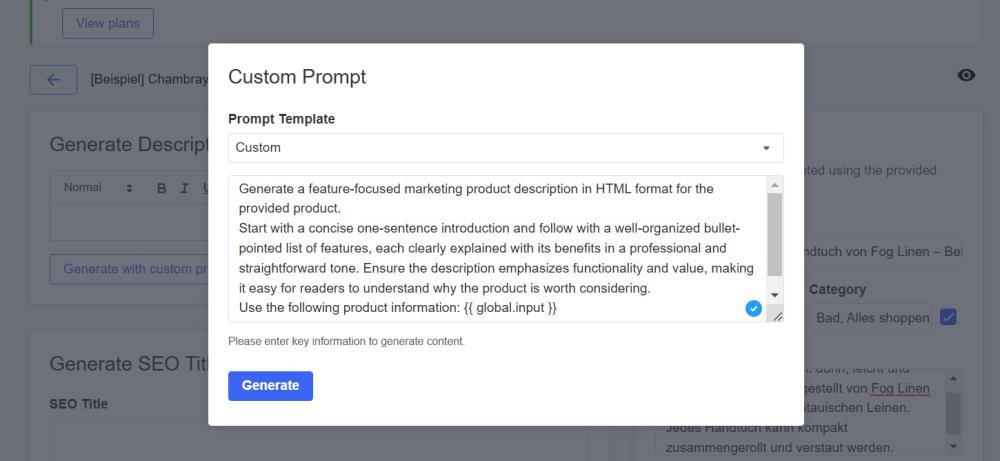
- … > Generate description with custom prompt - use this option to provide your specific instructions to ChatGPT for product description generation - either add your own prompt manually or select custom prompt template from the dropdown.
- … > Generate title with custom prompt - use this option to provide your specific instructions to ChatGPT for product title generation - either add your own prompt manually or select custom prompt template from the dropdown.
When using a custom prompt, make sure to use the all.product.data variable. Learn more. This step ensures that ChatGPT accesses information about your product from your product settings. If you're looking for ideas for custom prompts, check out our blog post.
Note
Here’s how credit usage is calculated for generation:
1 product description = 1 credit
1 SEO = 2 credits (1 for SEO title and 1 for SEO description)
1 refine = 2 credits
You can Stop generation whenever required.
Individual Generation
For more advanced generation experience, open product customization page.

The page has two columns: left for content generation, right for product details and settings.
On the right, you can view and edit product details like the title, type, and category, which ChatGPT uses to create more accurate descriptions. You can also add additional information and keywords to help the AI generate better product descriptions and SEO content. Here you can also adjust the settings for this specific product - these settings override the general ones.
On the left, you can generate product titles, descriptions, SEO titles, and SEO descriptions by clicking the desired action:
- Generate - create content with default prompt. Click the label icon if you want AI to consider the current product description. This is especially helpful if you're using supplier descriptions and want a more appealing variant while preserving important details.
![]()
- Refine - improve the grammar, syntax, and wording of your existing content.
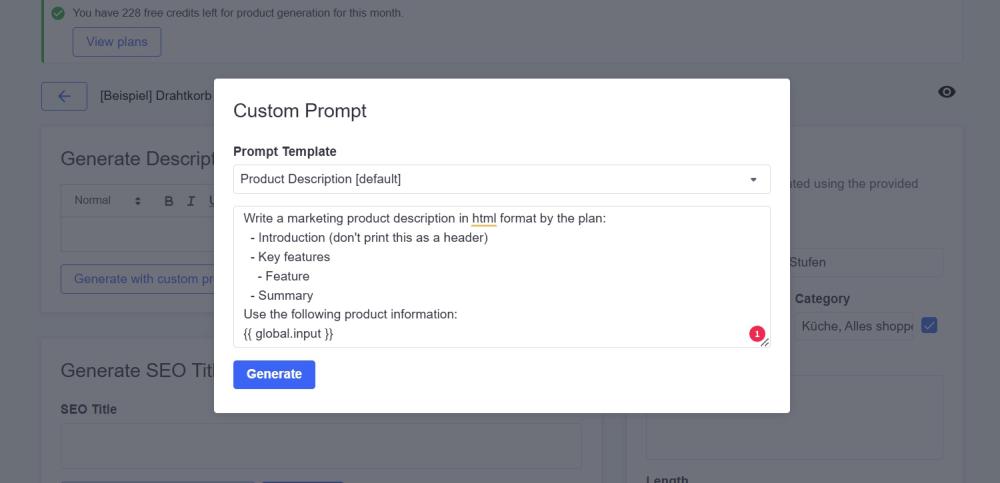
- Generate descriptions with custom prompt - use this option to provide your specific instructions to ChatGPT for content generation - either add your own prompt manually or select custom prompt template from the dropdown.
Note
When using a custom prompt, make sure to use the all.product.data variable. You can find and copy it by going to Prompts > Add new prompt in the app’s admin panel. This step ensures that ChatGPT accesses information about your product from your product settings. If you're looking for ideas for custom prompts, check out our blog post.
Note
When using a custom prompt, make sure to use the global.input variable. You can find and copy it by going to Prompts > Add new prompt in the app’s admin panel. This step ensures that ChatGPT accesses information about your product from your product settings. If you're looking for ideas for custom prompts, check out our blog post.

After receiving the content, it can be regenerated or edited using an advanced HTML editor and then published.
Upon publishing, you can directly access the product page on your online store by clicking an eye icon in the top right corner.
Categories content generation
In the Menu, go to the Categories page and select the category you want to generate content for.
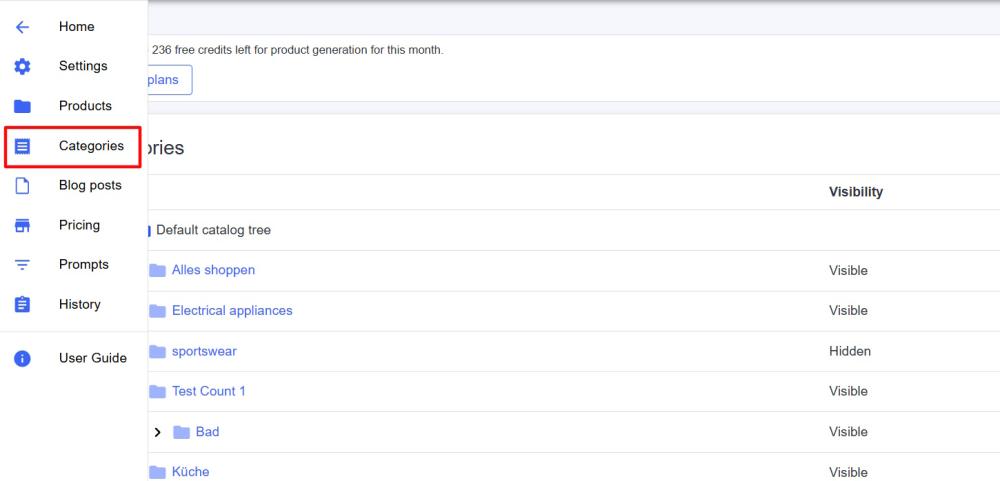
You can generate descriptions or SEO content for categories just the same way as for the products content.
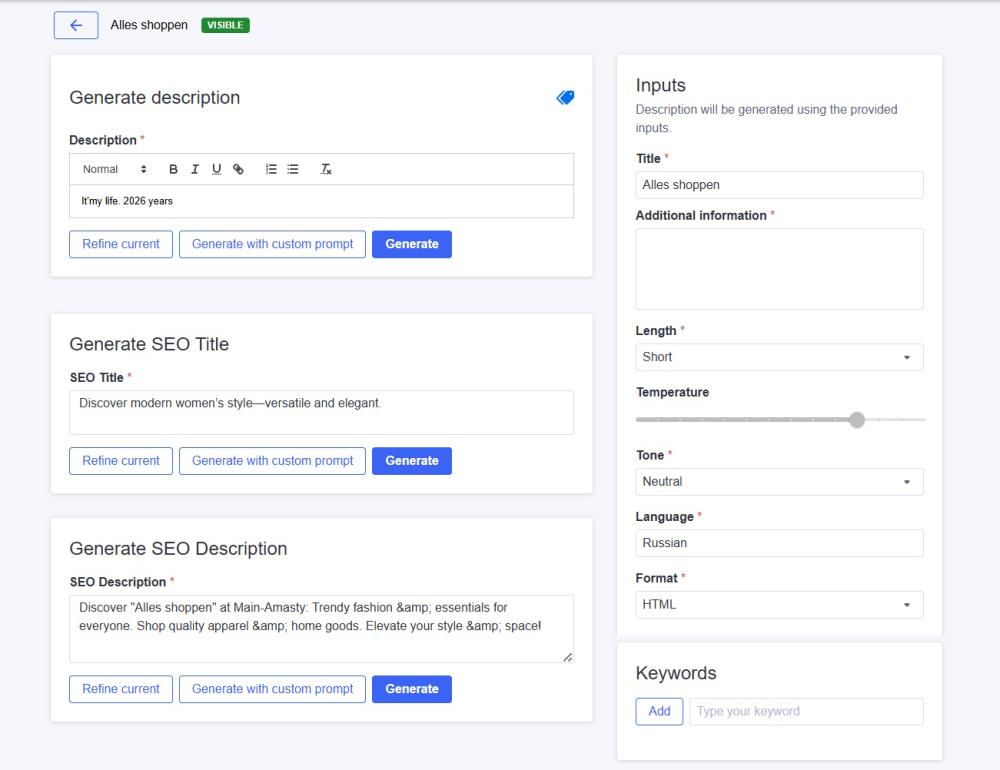
If needed, adjust category-specific settings in the right column and add keywords or additional details for the AI to use in the generated content.
On the left, you can generate category descriptions, SEO titles, and SEO descriptions by clicking the desired action:
- Generate - create content with default prompt. Click the label icon if you want AI to consider the current category description. This is especially helpful if you're using supplier descriptions and want a more appealing variant while preserving important details.
![]()
- Refine - improve the grammar, syntax, and wording of your existing content.
- Generate descriptions with custom prompt - use this option to provide your specific instructions to ChatGPT for content generation - either add your own prompt manually or select custom prompt template from the dropdown.
Note
When using a custom prompt, make sure to use the all.product.data variable. You can find and copy it by going to Prompts > Add new prompt in the app’s admin panel.
Blog posts generation
To generate blog content, first create a post in BigCommerce Admin, then use ChatGPT AI Content Master to generate content for it.
1. In BigCommerce Admin, go to Storefront > Blog and click the ‘+’ icon.
2️. Enter the Title, Author, Tags, and Thumbnail (if needed).
3. Save the post as a draft or Publish it.
Note
If you choose to save the post as a draft, you'll need to return to BigCommerce Admin (Storefront > Blog > Draft column) after generating content in ChatGPT AI Content Master to publish it on your website.
Next, open ChatGPT AI Content Master and go to Blog Posts. Select your blog article to generate content.

In the right column, you can add additional information and adjust content generation settings for the blog post.
In the left column, click Generate or Generate with custom prompt to create blog content and an SEO description. After generation, you can regenerate or edit the content directly in the app.
To improve your existing blog content, click Refine action button.
Once you're happy with the content, click Publish.
Note
Here’s how credit usage is calculated for generation:
1 post generation = 3 credits
1 SEO description = 1 credit
1 refine = 6 credits
Custom prompt templates
Custom prompts are your personalized instructions for ChatGPT, helping you generate content tailored to your business needs. You can use them to create content of any type, e.g. promotional product descriptions, SEO-optimized blog posts, and more.
To apply a custom prompt, click Generate with custom prompt on the desired item.
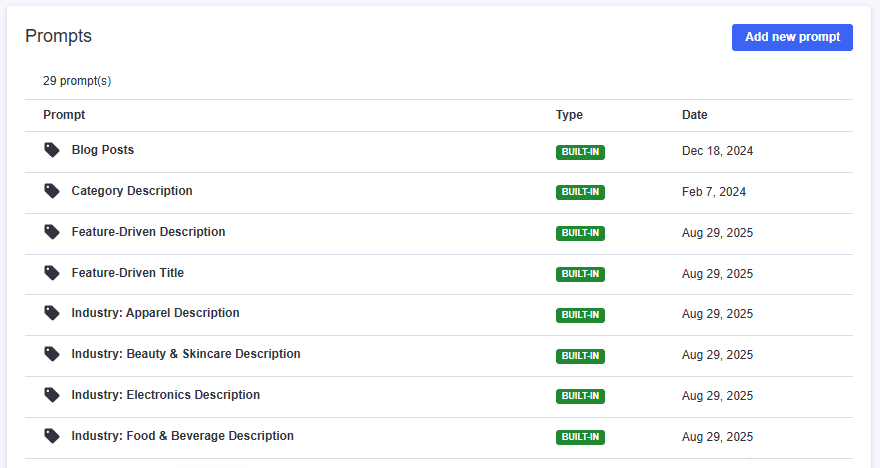
You can also save prompts as templates or explore built-in templates on the Prompts page. Templates help speed up content creation.
To create a new template, click Add new prompt and fill in the required details.
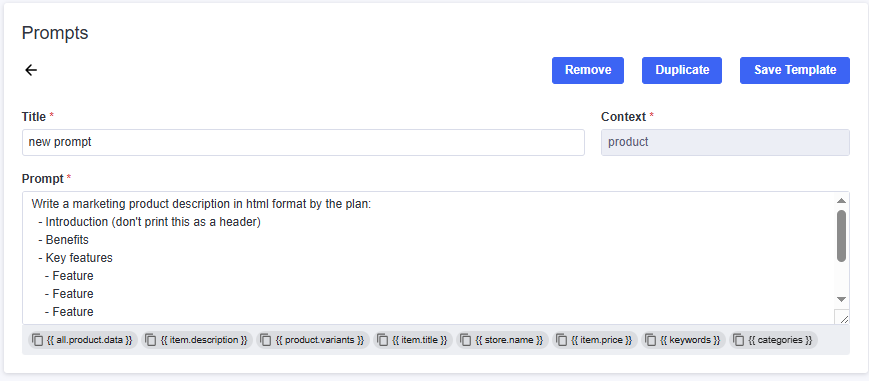
Be sure to include any of these variables in your prompt, the system automatically pulls the corresponding, most up-to-date data from your store to automatically insert into your generated content.
Available variables:
- all.product.data – full product data set
- item.title – product title
- item.description – product description (if available)
- item.price – product price
- product.variants – product variants (if available)
- store.name – your store name (from Settings)
- keywords – keywords assigned to the product or post
- categories – categories assigned to the product or post
Note: The variables are used only during the content generation process. Once the content is created and published, it is static. Any subsequent changes to the data in your store (e.g., a price change for item.price) will not automatically update the already published content. You would need to regenerate the content to reflect new data.
If you're looking for ideas for custom prompts, check out our blog post.
To apply template to content generation, simply click ‘Generate with custom prompt’ and choose appropriate template from the Prompt Template dropdown.
History
Open History page to view the content generation history. The history displays the latest 200 generations, starting from the most recent. This enables tracking content changes and allows you to analyze the effectiveness of different content and revert to using the product descriptions and SEO data that have demonstrated the highest success rates.
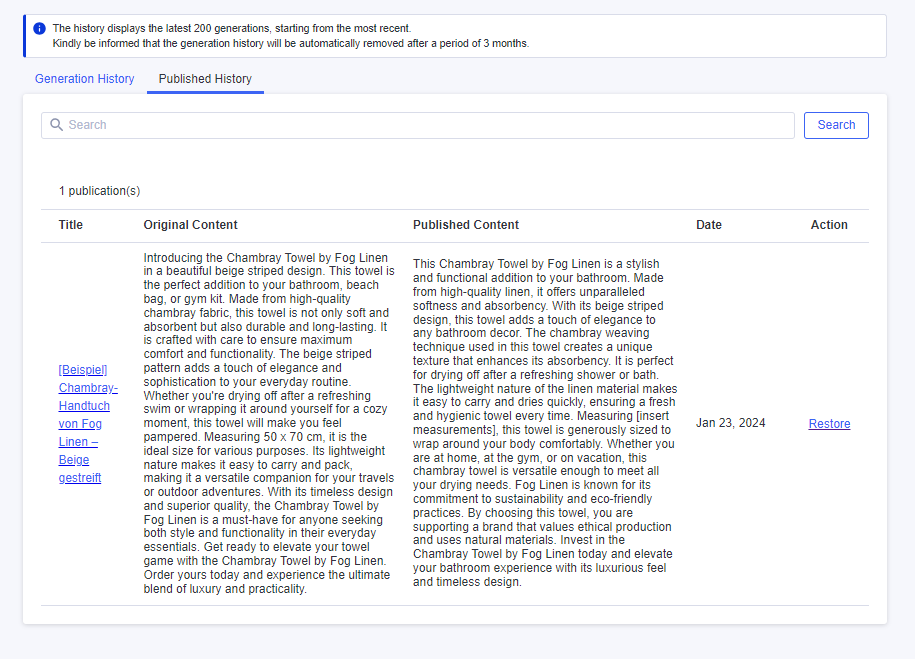
Use the search window to quickly find the needed content in history.
To restore a previous version, go to the Published History tab and click Restore.
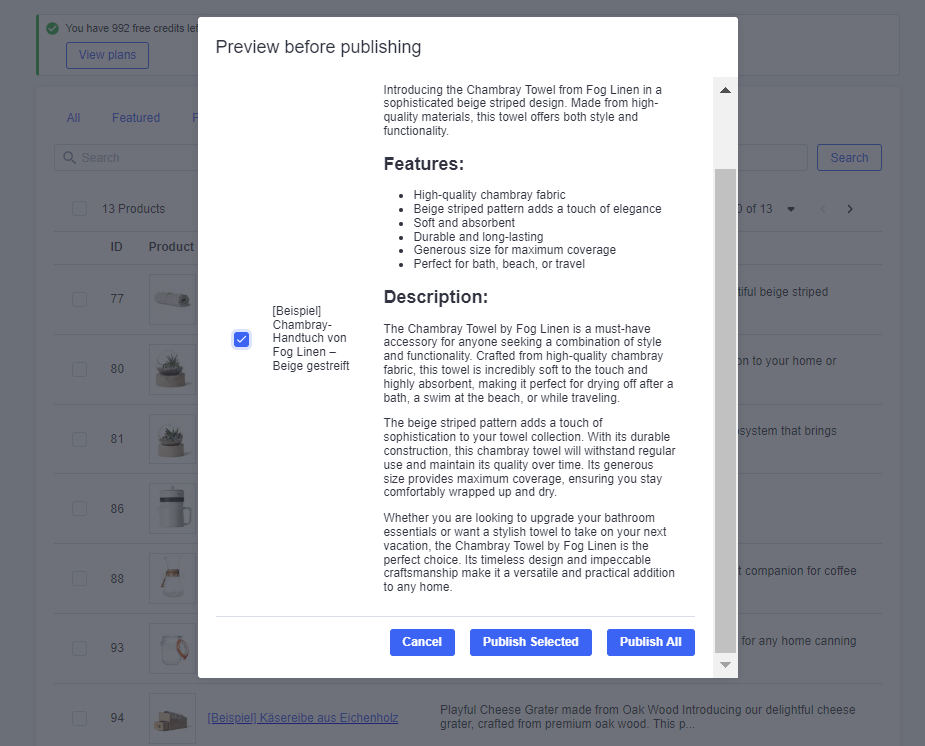
Note
You can preview any content using the 'Preview before publishing' option in general Settings. When set to 'Yes,' during mass content generation, you can select what to publish directly from the preview window.
Buy extra credits for content generation
If you need more credits to generate content beyond your current plan, you can easily purchase extra ones in the app.
Go to the Menu, open the Pricing page, and scroll to the One-Time Payment section. Click Buy to add more credits.

Note: 1 credit = 1 description generation