Table of contents
- Home page and Navigation
- Settings
- Products
Generate product descriptions and metadata.
- Generate Product Content in Bulk
- Generate Product Content Individually
Generate product descriptions or product metadata for multiple products at once.
Generate descriptions or metadata for products individually.
- Categories
- Blog Posts and Thumbnails
- Custom Prompt Templates
- Create New Custom Prompt Template
- Which Prompts to Choose and When
- How to use custom prompts or custom prompt template
- History
- Pricing
- FAQ
General information about the app.
Recommended before content generation.
Generate category descriptions - individually only.
Generate blog posts and images for them - individually only.
Save your prompts in templates and access default ones - for more precise content.
Save your prompts in templates and access default ones - for more precise content.
Explore how to choose custom prompt template.
Learn how to use custom prompt templates.
Check content generation history and restore previous version.
Learn how pricing is built and how to buy extra credits.
When you open ChatGPT AI Content Master, you'll land to the Home page. Here, you'll find details about your subscription plan, a quick setup guide, the change log, and a support form.
To navigate through the app, simply use the Navigation dropdown at the top center or the Wix Navigation menu - under the app’s name.
Note
We recommend you using Navigation dropdown for faster page loading.

Settings
Before you start generating content, we recommend customizing the app to fit your preferences on the Settings page.
Note
These settings are used to generate both individual and bulk content. If needed, you can adjust them for specific products or categories by opening the item and modifying the settings in the right section.
1. Access the Settings Page
Click Settings in the navigation menu or click the Settings icon in the top left corner of the app.
2. Configure the following fields:
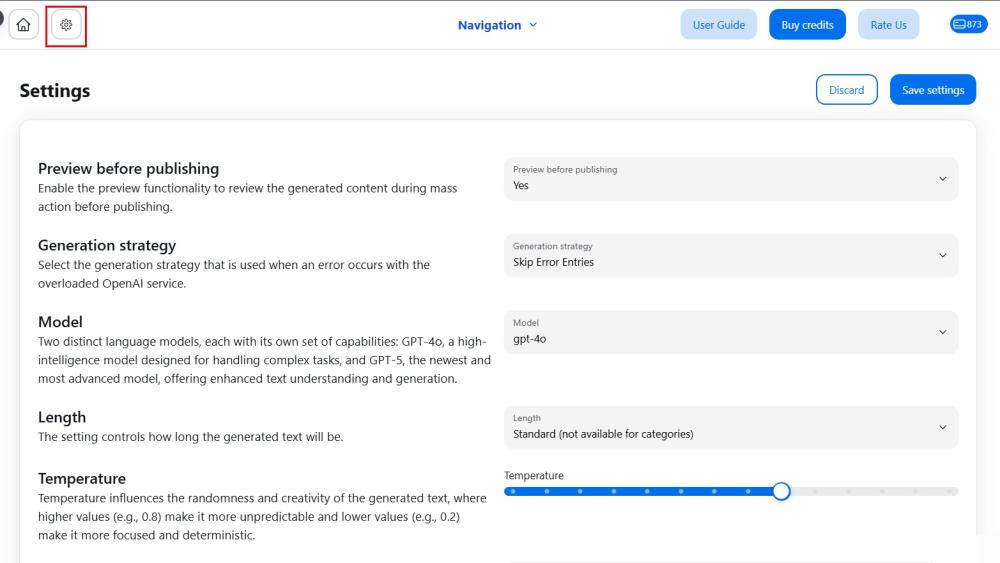
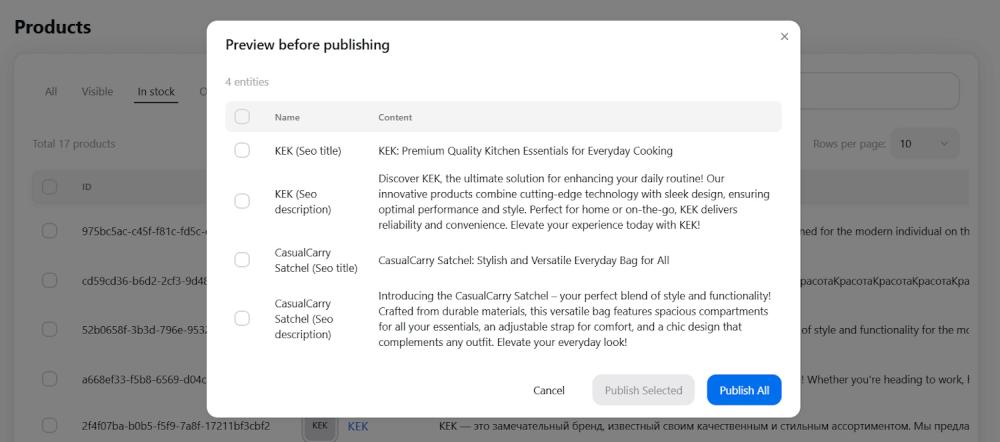
Preview before publishing - enable the preview functionality to review the generated content during mass action before publishing.
Generation strategy - select the generation strategy that is used when an error occurs with the overloaded OpenAI service.
Model - select ChatGPT language model that best suits your specific requirements:
- ChatGPT-4o is an advanced and highly intelligent multimodal model for complex tasks.
- ChatGPT-5 (available on paid plans only) is a newer model from OpenAI, offering a significant leap in intelligence over previous versions, with state-of-the-art performance across writing, math, health, and more.
Length - choose the size of the generated text: short, standard, long.
Temperature - specify the level of randomness and creativity in the generated text. Setting a higher temperature, such as 0.8 or 1.0, makes the output more random and creative. Setting a lower temperature, such as 0.2 or 0.5, makes the output more focused and deterministic.
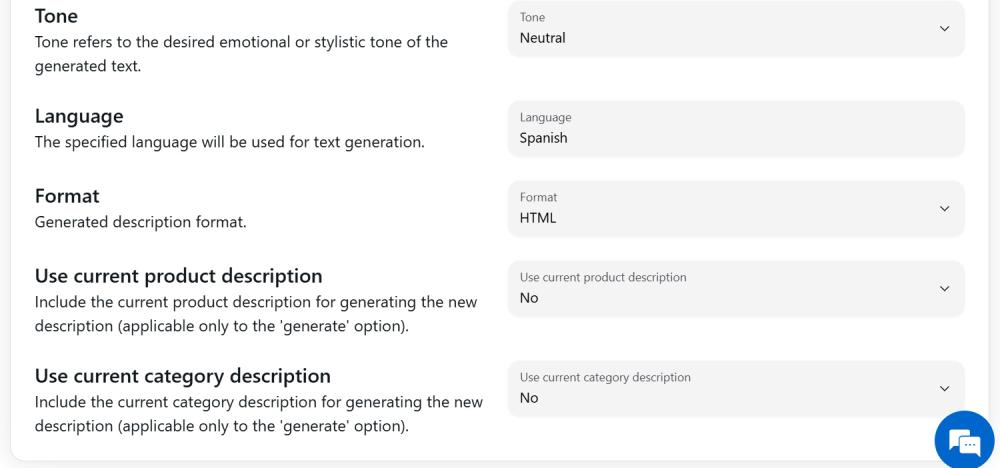
Tone - specify style or tone of the generated text. This feature assists in shaping the AI's response to match a specific writing style or emotional tone.
Language - specify the language used for text generation.
Format - this parameter allows you to select the desired format for the generated content.
- By selecting the "HTML" option, the content generator will create text that adheres to the HTML markup language. This enables the creation of structured content, including headings, paragraphs, lists, links, images, and other web page elements.
- By selecting the "Plain text" option, the content generator will produce unformatted text without any styling or markup. This simple text format does not include styles, fonts, or external elements.
Use current product description – Set to "Yes" if you want to include the current product description when generating a new one.
Note: This option only applies to the 'Generate' action.
Use current category description – Set to "Yes" if you want to include the current category description when generating a new one.
Note: This option only applies to the 'Generate' action.
3. Save Settings.
After saving your preferences, you can go to the Products, Categories, or Blogs page to begin generating content.
Note
The app uses credits for content generation: 1 credit = 1 description or SEO item. For bulk SEO generation, 2 credits are needed for each SEO item (1 for the SEO title and 1 for the SEO description).
Products Content Generation
Generate Product Content in Bulk
Save time and generate content for multiple products at once.
1. Navigate to the Products page
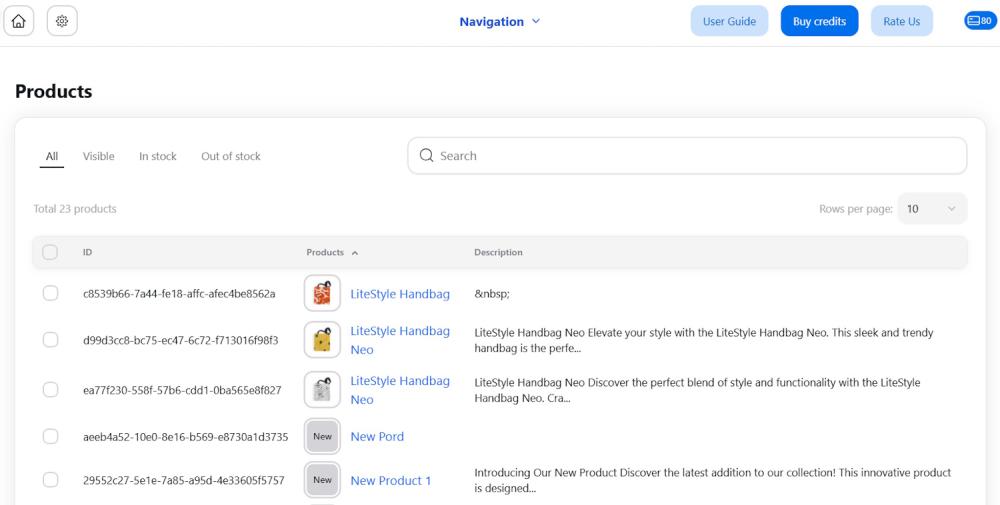
Open Products page, where you’ll find the product grid.
2. Select Products
Select the products for which you want to generate content. Use a search function to quickly find specific products.
3. Choose Action
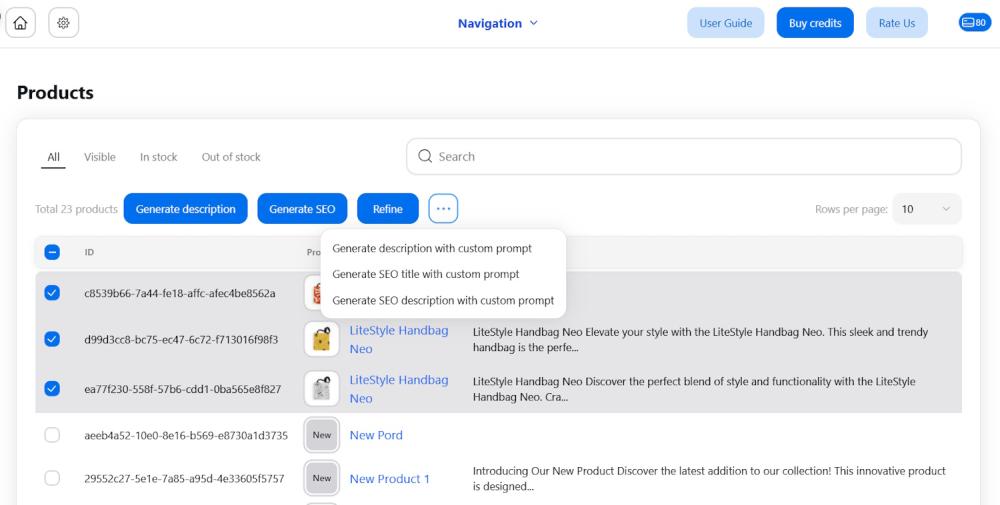
Click the desired action:
- Generate Description - create descriptions for selected products.
- Generate SEO - produce meta titles and descriptions for selected products (available from Basic plan).
- Refine - improve the grammar, syntax, and wording of your existing product descriptions.
- … > Generate descriptions with custom prompt - use this option to provide your specific instructions to ChatGPT for product description generation - either add your own prompt manually or select custom prompt template from the dropdown.
- … > Generate SEO title with custom prompt - use this option to provide your specific instructions to ChatGPT for SEO title generation - either add your own prompt manually or select custom prompt template from the dropdown.
- … > Generate SEO descriptions with custom prompt - use this option to provide your specific instructions to ChatGPT for SEO description generation - either add your own prompt manually or select custom prompt template from the dropdown.
When using a custom prompt, make sure to use the all.product.data variable. Learn more.
Note
Here’s how credit usage is calculated for generation:
1 product description = 1 credit
1 SEO = 2 credits (1 for SEO title and 1 for SEO description)
1 refine = 2 credits
4. Wait for the Process to Complete
If needed, you can stop the generation at any time.
5. Preview and Publish
If preview before publishing is enabled, review the content and make any necessary edits. Once you’re satisfied, click Publish to apply the content to your products.
Generate Product Content Individually
For a more customized generation experience, create content for products individually.
1. Navigate to the Products Page.
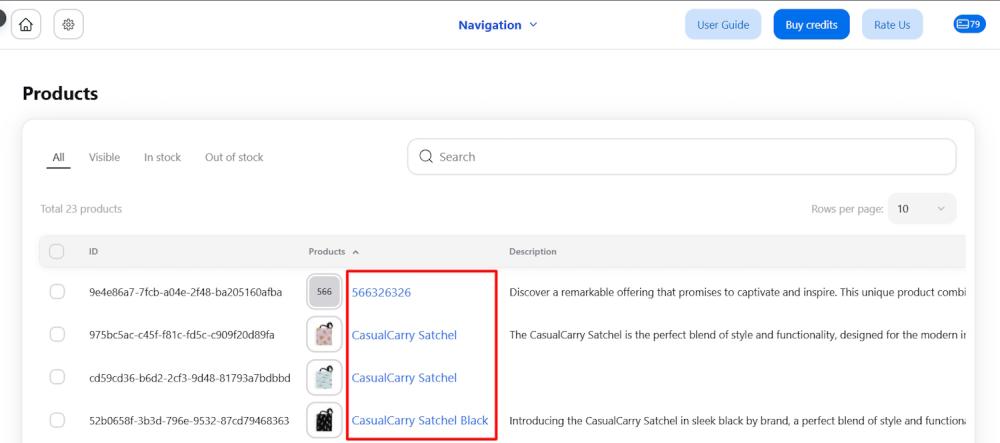
Using navigation menu, open Products page, select and open the product by clicking its link in Products column.
2. Understand the Product Page Layout
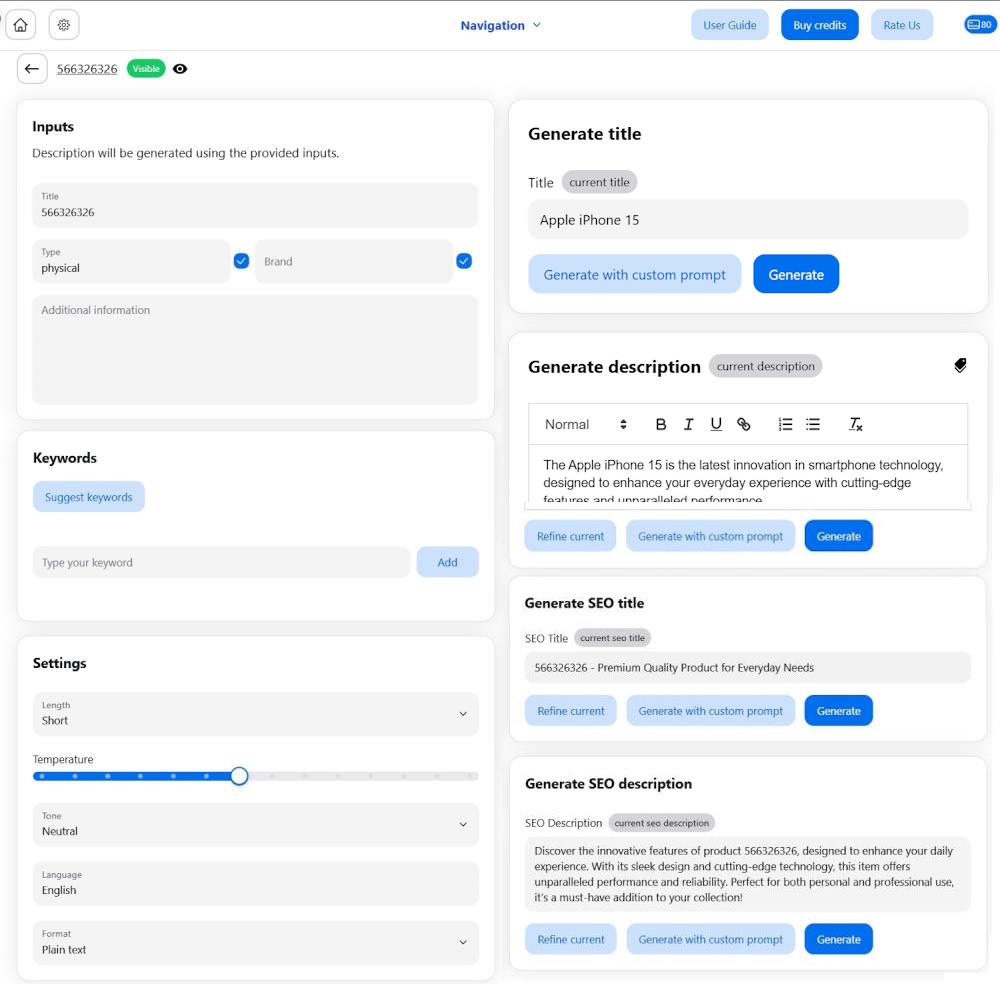
The product page is divided into two sections:
- Left Section: Input and settings
- Right Section: Content generation options
3. Adjust Product Details for AI (Optional)
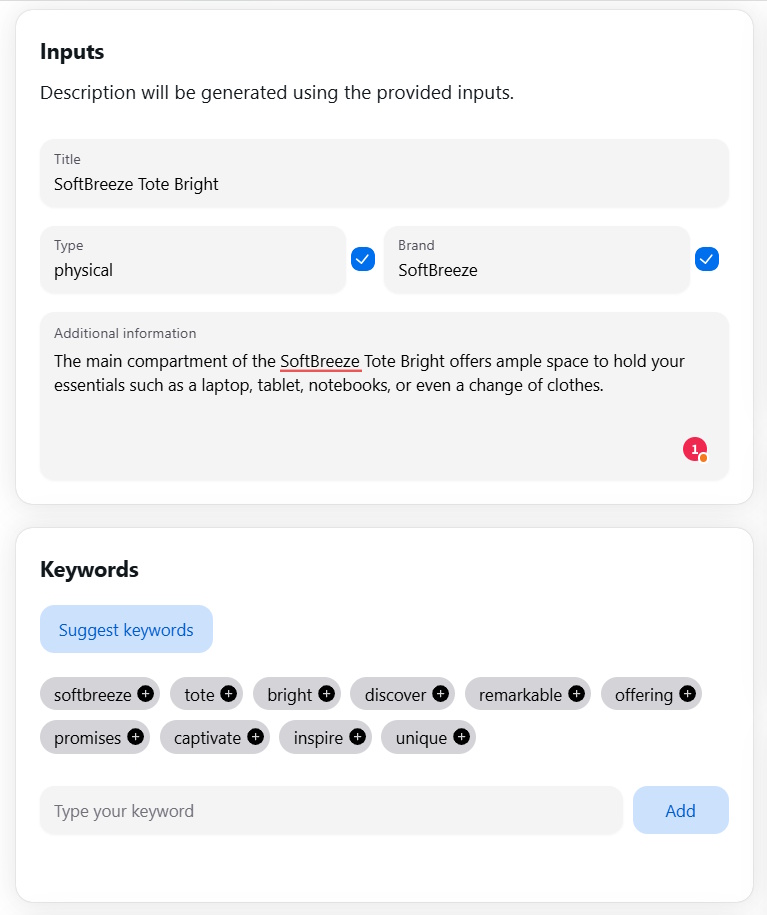
In the left section, you can add or adjust product details that the AI will use to generate the description:
- Product title
- Type
- Brand
- Additional information - add details to include in the generated content and keywords to enhance your SEO.
- Keywords - click Suggest keywords to let the AI suggest relevant keywords for your product, or add your own.
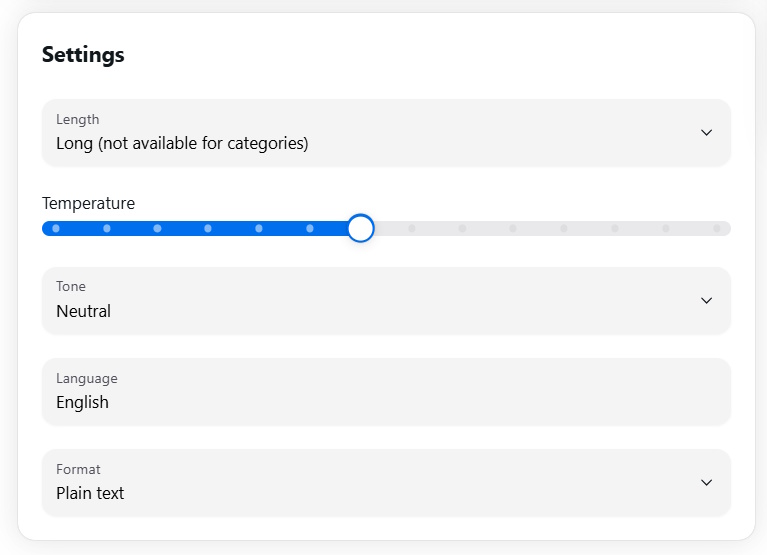
Below, configure the Settings for this individual product. These will override the general settings.
4. Override General Configuration with Individual Settings (Optional)
The settings from your general configuration are duplicated in this section. However, any settings you configure within the product will override the general ones, allowing for more personalized adjustments if needed.
5. Generate or Refine Content
Generate product descriptions, SEO titles, and SEO descriptions by clicking the desired action:
- Generate - create content with default prompt. Click the label icon if you want AI to consider the current product description. This is especially helpful if you're using supplier descriptions and want a more appealing variant while preserving important details.
- Refine - improve the grammar, syntax, and wording of your existing content.
- Generate descriptions with custom prompt - use this option to provide your specific instructions to ChatGPT for content generation - either add your own prompt manually or select custom prompt template from the dropdown.
Note
When using a custom prompt, make sure to use the all.product.data variable. You can find and copy it by going to Prompts > Add new prompt in the app’s admin panel. This step ensures that ChatGPT accesses information about your product from your product settings. Learn more.
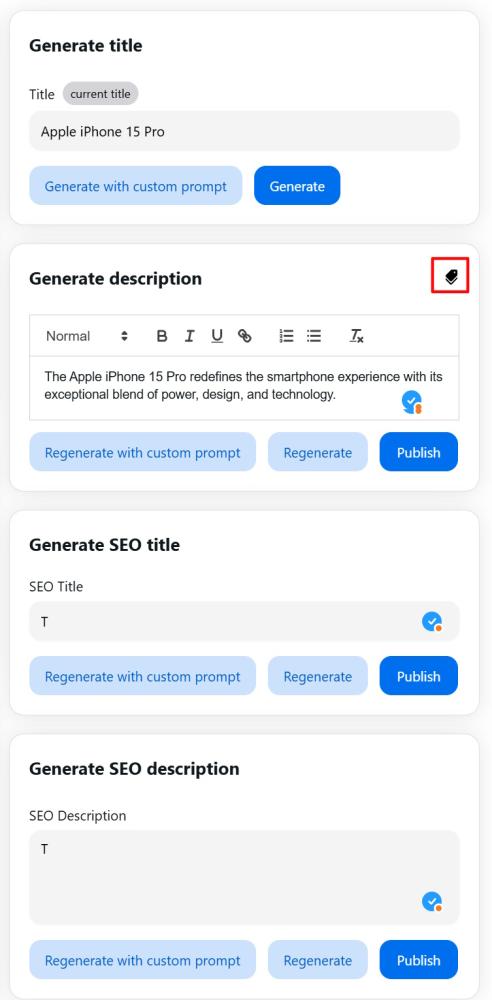
6. Edit and Publish
Once content is generated, you can regenerate or edit it using the advanced HTML editor. Don’t forget to Publish the content after making adjustments.
Categories Content Generation
Generating content for categories works the same way as generating content for individual products. Here’s how you can do it:
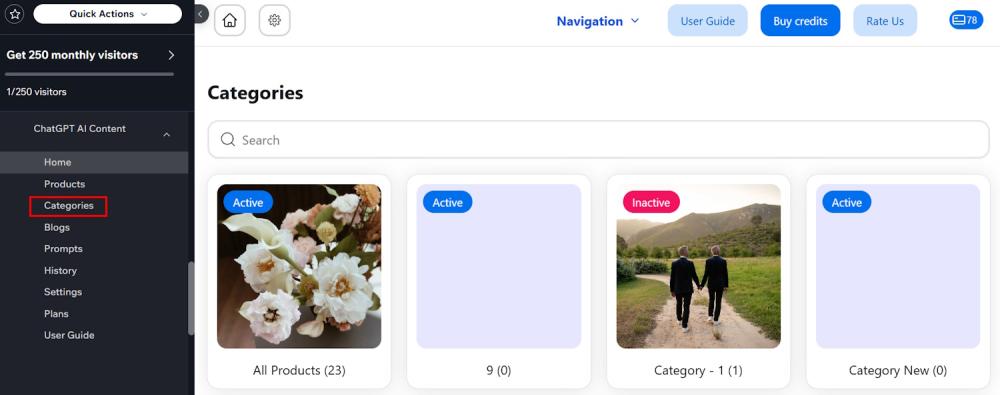
1. Go to Categories Page
Navigate to the Categories page in the app. Select and open a category from the list.
2. Adjust Category Details for AI (Optional)
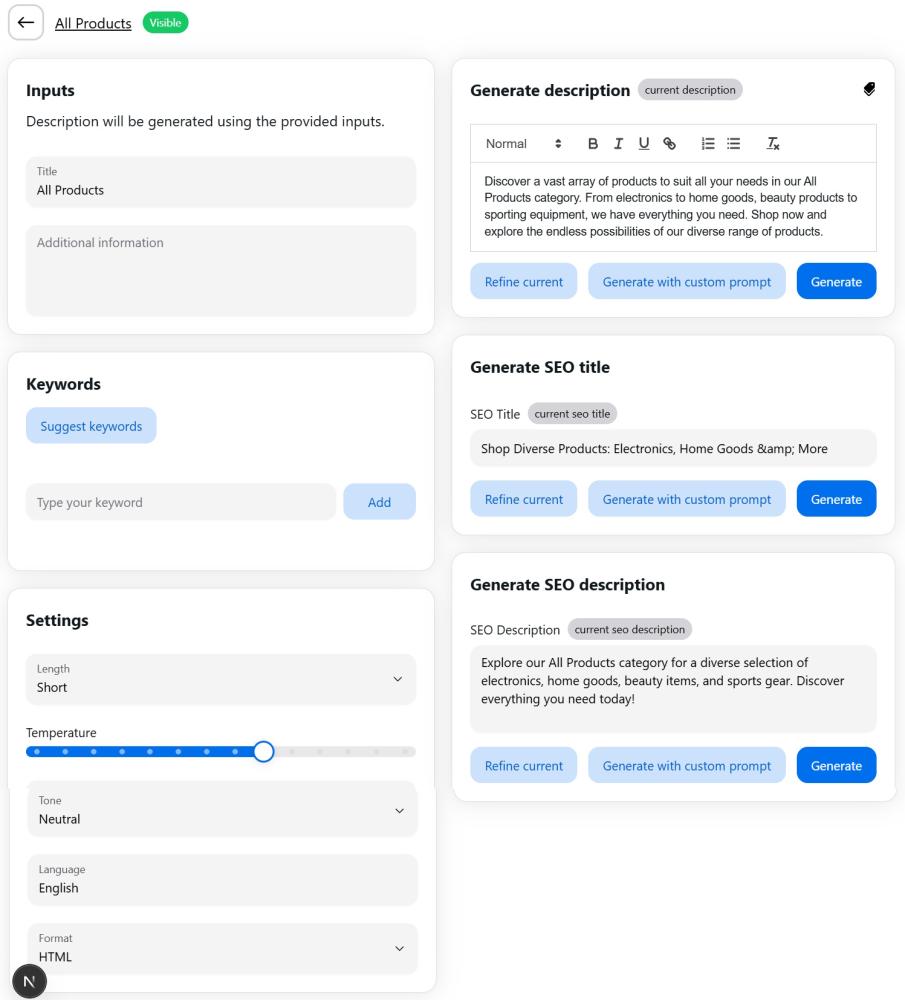
In the left section, you can add or adjust the category name. The AI will use this information to generate the description. You can also add additional information and keywords to enhance SEO. Click Suggest keywords to let the AI suggest relevant keywords for your category.
Below, adjust the settings for this individual category. These will override general settings.
3. Generate or Refine Content
In the right section, generate description, SEO title and SEO description by clicking the desired action:
- Generate - create content with default prompt. Click the label icon if you want AI to consider the current category description.
- Refine - improve the grammar, syntax, and wording of your existing content.
- Generate descriptions with custom prompt - use this option to provide your specific instructions to ChatGPT for content generation. In the dialog window, enter custom instructions or select an in-built prompt template from the dropdown.
Note
When using a custom prompt, make sure to use the all.product.data variable. You can find and copy it by going to Prompts > Add new prompt in the app’s admin panel. This step ensures that ChatGPT accesses information about your product from your product settings.
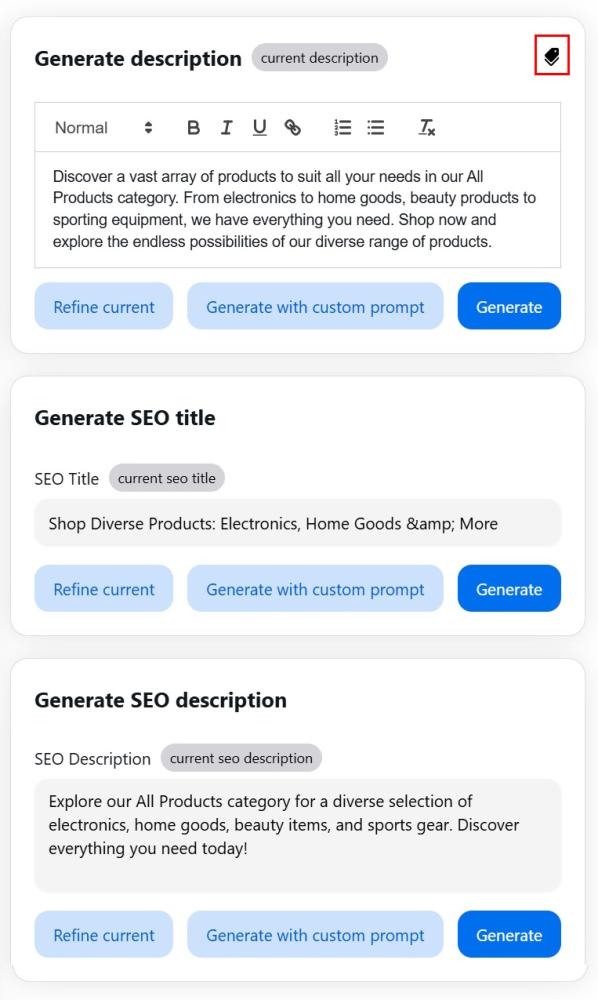
5. Edit and Publish
After generating the content, you can regenerate or edit it using the advanced HTML editor. Make sure to Publish the content after making any adjustments.
Blog Posts and Thumbnails Generation
Note: please be aware that you can generate blog posts only if you have the Wix Blog app installed on your Wix Store.
1. From apps admin, go to the Blogs page and select a blog category.
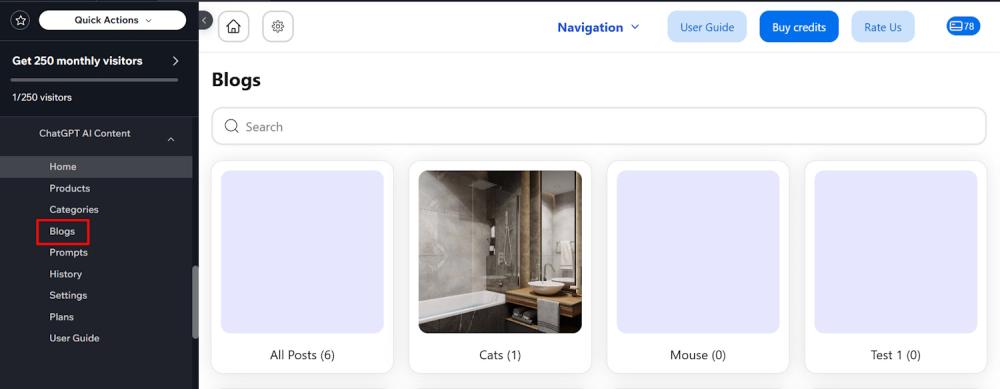
Note
If no categories are available:
Navigate to Blog > Categories in the Wix admin panel. Click the Create Category button at the top right. Name the category and fill in the necessary fields. Save changes, then return to ChatGPT AI Content Master. Read more in Wix guides.
2. Click the Create post button.
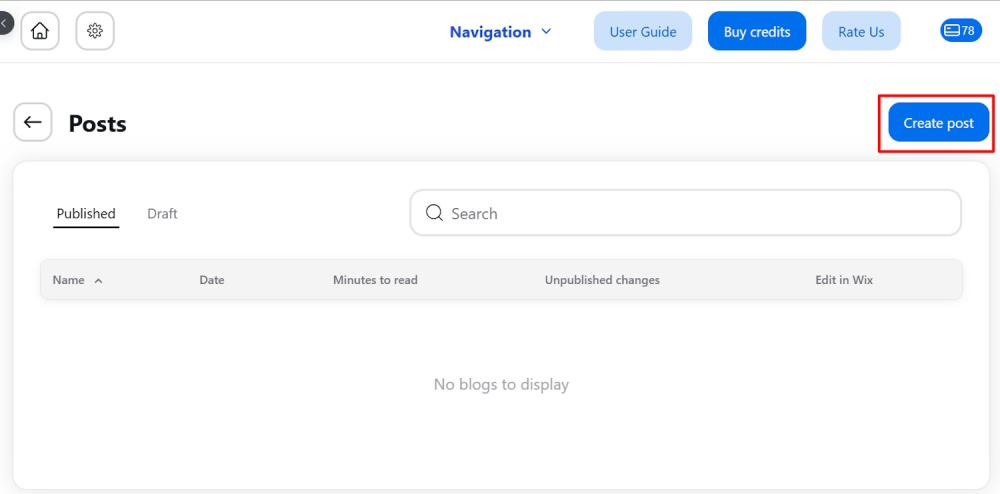
3. In the left section, add the Title of your blog post and optional Additional information.
4. Specify the settings for the selected post.
5. In the left section, click Generate to create content, or Generate with custom prompt for specific instructions. You can also Refine current content if you already have one.
Note: The blog posts content generation feature is available for Essential and Advanced plans only. 1 post generation = 3 credits; 1 refine = 6 credits.

6. Once your post is generated, you can Edit or Regenerate it until you're satisfied with the result.
7. When ready, click Create. You'll be redirected to the Posts grid.
8. Go to the Draft tab and open your blog post.

9. Scroll to the Generate image section and click Generate.
If you're not satisfied with the result, click Generate again or Cancel.
Note: 1 image generation = 20 credits.
10. When the image is ready, click Publish.
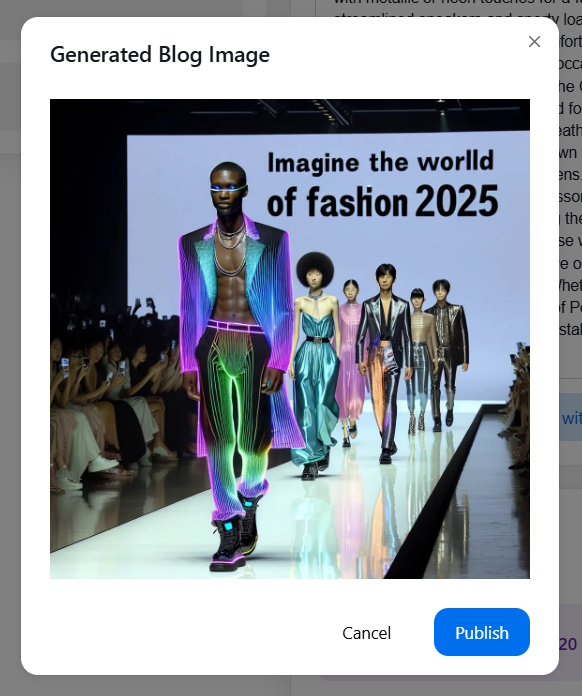
Note:
All images, even canceled ones, are stored in the 'amasty' folder in the default Wix Blog section. To find them, go to Wix Blog > Post and choose any existing post or create a new one. Then, navigate to the ‘Post settings’ section and click on the ‘Featured image’ field to add an image. You'll be directed to the ‘Choose images’ board where you can find the 'amasty' folder containing all the images you've created.
Custom Prompt Templates
Create New Custom Prompt Template
Custom prompt templates allow you to generate content tailored to your business needs faster.
1. Open the Prompts page.
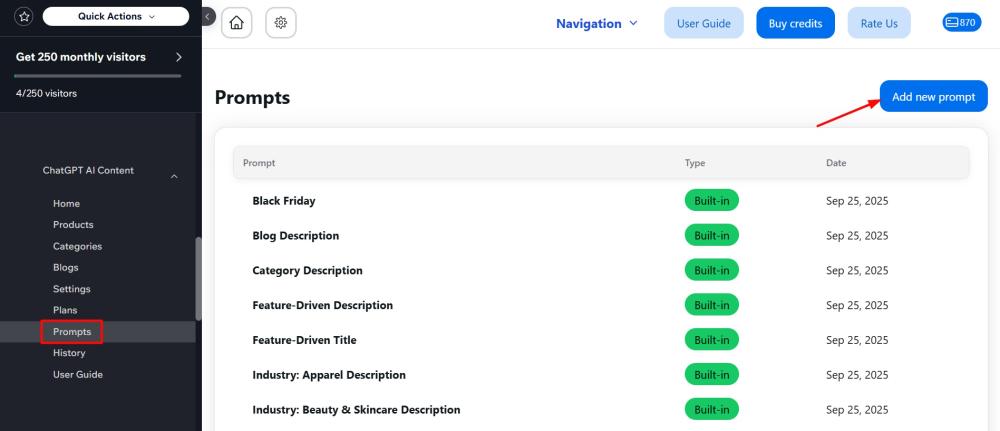
2. Click the Add new prompt button.
3. Enter all the required information for your prompt. You can specify the text structure, the type of content you want, key information to include, and any other details you want the AI to consider.
4. Use the all.product.data variable — it pulls information about your product directly from your product settings.
You can also use additional variables to make your prompt more specific (not all of these variables are available on all instances):
- item.description – includes context from your current product description (first 400 characters).
- product.variants – adds information about product variants.
- item.title – provides the product title for the AI to incorporate.
- store.name – includes your store’s name in the prompt.
- item.price – adds the product’s price to the context.
- keywords – helps AI generate and use relevant, popular keywords.
- collections – adds information about the collection the product belongs to.
Need ideas for custom prompts? Check out our blog post for inspiration!
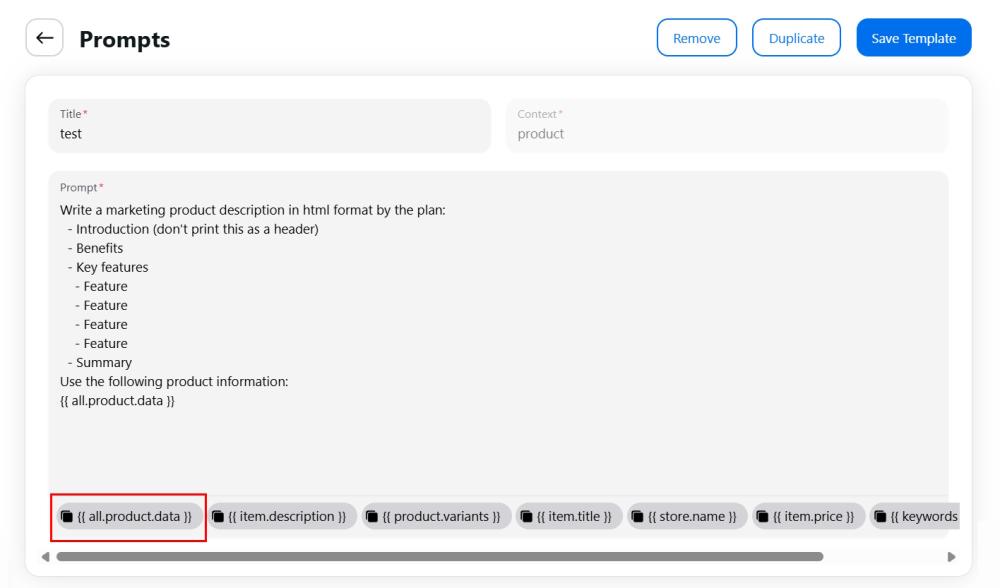
5. After completing your prompt, click Save template.
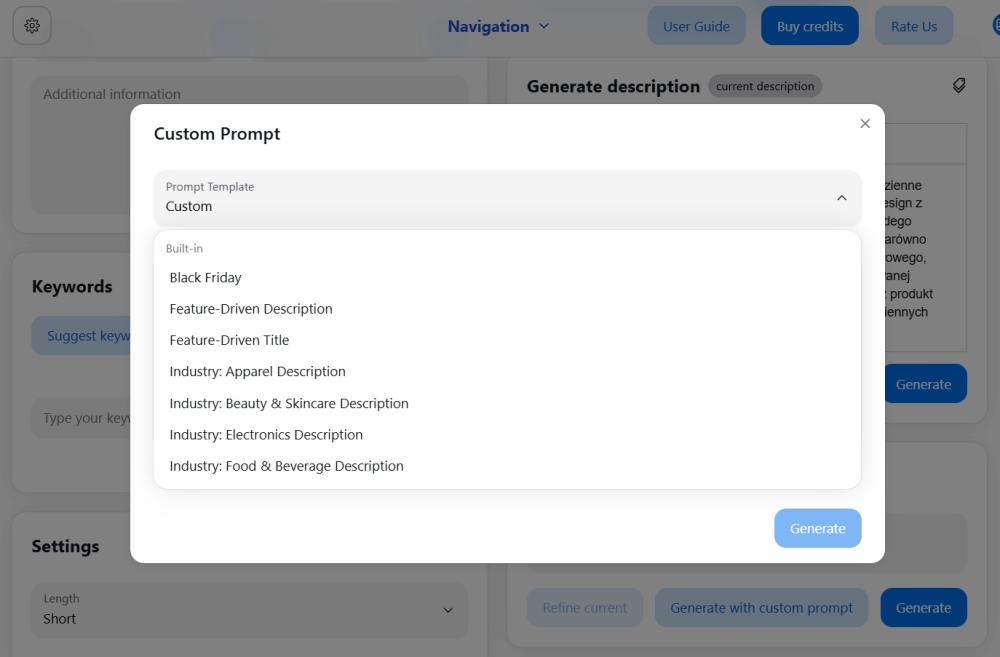
6. To apply template to content generation, click Generate with custom prompt and select your template from the dropdown menu.
Note
Built-in prompt templates are not editable. Please use the Duplicate function to create a new template and make the necessary changes.
Which Prompts to Choose and When
Depending on your goals, you can use the built-in templates or create custom ones. For example, you might want an SEO-friendly product description, a version tailored to a specific audience, or a description that combines both. Choose or customize prompts based on what fits your needs best.
How to use custom prompts or custom prompt template
1. Go to Products (or any other resource you want to generate content for).
2. Select the item you want to work with.
3. Click Generate with Custom Prompt.
A popup window will appear. You can either:
- Type your custom prompt directly, or
- Click the dropdown under Prompt Template to choose one of built-in or saved custom prompt templates.

4. Once ready, click the Generate button to create the content.
History
The History page allows you to view the timeline of all your generated content and restore previous versions.
1. Open the History page.
2. Search and Sort History.
The search function is based on the generated content, not the specific object it was generated for. The history is divided into generation history and publication history, making it easy to track and manage your content.
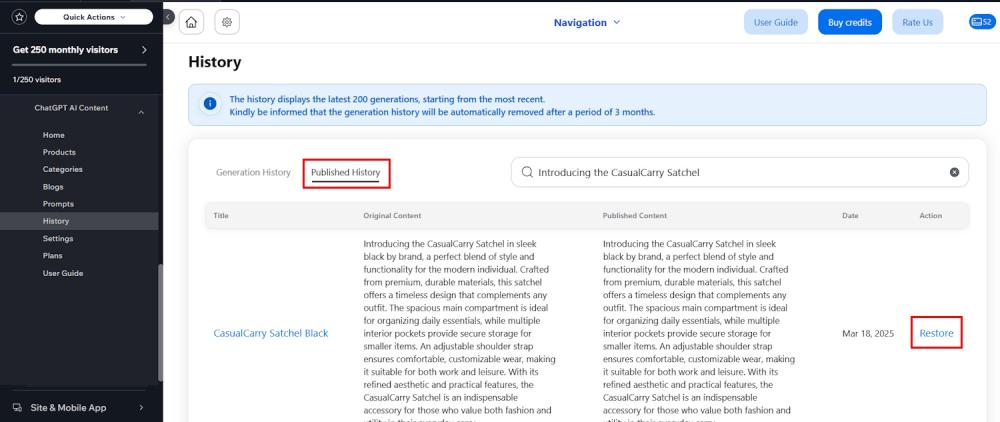
3. Open Published History tab.
Click the Restore option to recover previous versions of any content if needed.
Note
You can preview any content using the 'Preview before publishing' option in General Settings. When set to 'Yes,' during mass content generation, you can select what to publish directly from the preview window.
Pricing Plans
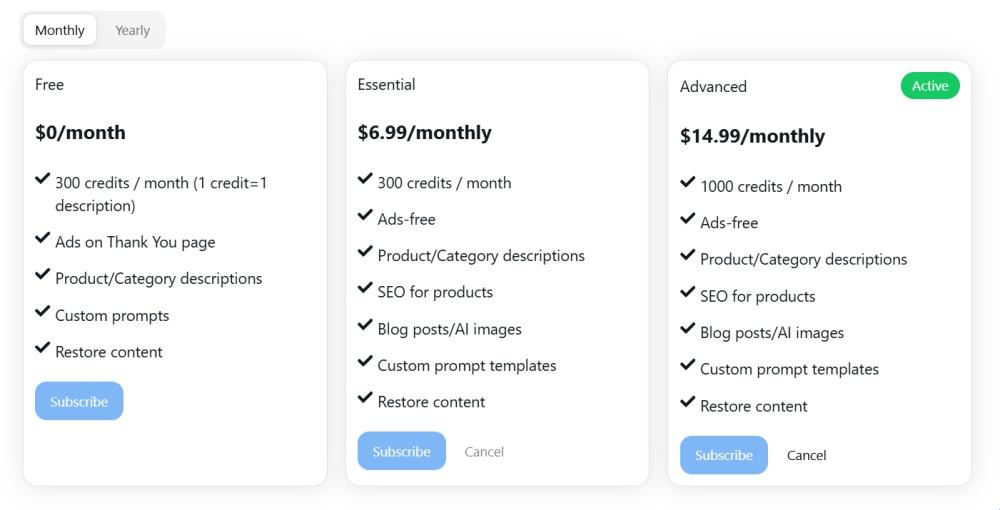
You have the option to select either a monthly or annual subscription, tailored to your preferences. Opting for the yearly subscription rewards you with a 20% discount.
The app uses credit system for content generation. Here’s how credit usage is calculated for generation:
1 product description = 1 credit
1 SEO = 2 credits (1 for SEO title and 1 for SEO description)
1 refine = 2 credits
1 blog post = 3 credits
1 blog post refine = 6 credits
1 image = 20 credits
If you need more credits to create content beyond your current plan, just top up extra ones in the app. On the Pricing page, click Buy button in the One time payment section.
Note
Top up is available for paid plans only.
