Table of contents
- Home page
A quick overview of home page. - Settings
Set up the app to manage your media uploads and optimization preferences.- Media upload settings
Specify settings and name image and video files according to your settings before media upload. - Image optimization settings
Specify your settings for compression, file format conversion, resize type, or enable automatic compression to optimize images daily based on your preferences.
- Media upload settings
- Upload Media
Upload images and videos in bulk and assign them to your products.- Select assignment method
Select how you want to assign media: automatically or manually. - Select files
Upload images and videos from your computer, Google Drive, Dropbox, or via CSV. - Start uploading
Upload your media and cancel upload anytime. - Automatic assignment
Assign media to products automatically and finish uploading. - Manual assignment
Assign media to products manually and finish uploading.
- Select assignment method
- Product Variants
Specifics on uploading media for product variants. - Optimization
Optimize images: compress, resize, crop and convert to PNG, WebP.- Sync your images
Sync your images with the app - a required step. - Preview changes
Preview how images will look after optimization. - Optimize images
Run optimization for your images. - Check Results
Check which images were optimized, compare the original and compressed sizes, and view the total percentage of weight saved.
- Sync your images
- History
Find the details about all your uploads and optimizations.- Revert changes
Remove previously uploaded media from your products. - Restore optimized images
Restore optimized images to their original version.
- Revert changes
- FAQ
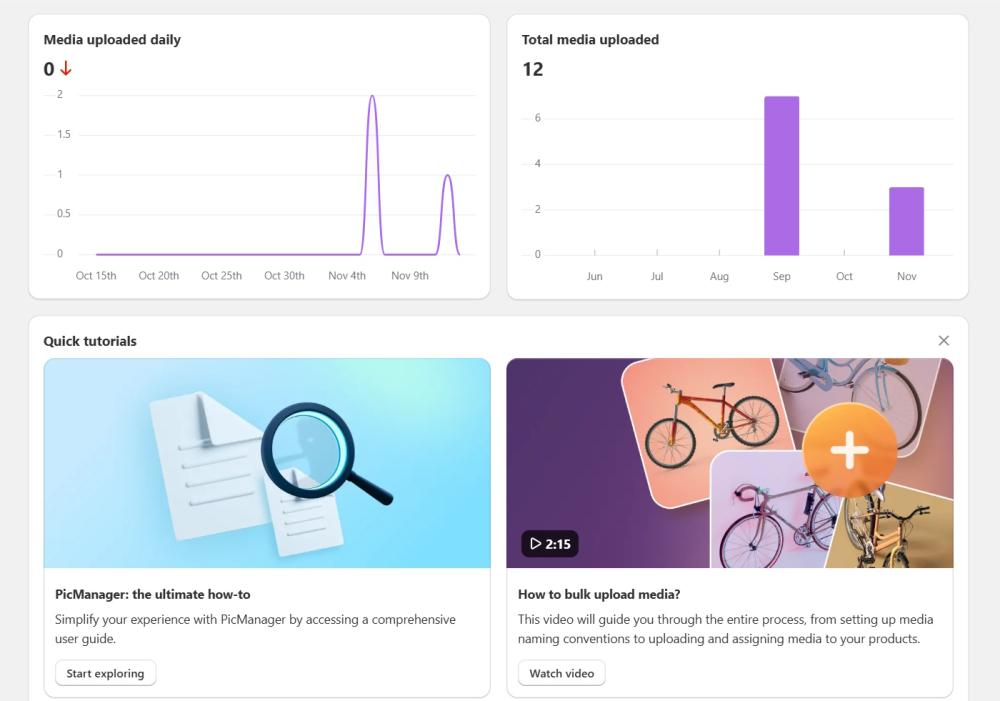
After installing, you'll land on the Home page, where you can go through onboarding, watch a quick video guide, check your media upload stats, and view the Change Log. If our app missing a specific feature, or you need assistance, please contact us at help-center@amasty.com or via the Get Support page.
Before uploading, we suggest going to the Settings page to customize your preferences for media matching, order, and alt tags.
Settings
The Settings page is organized into two tabs: Media Upload and Image Optimization.
Media Upload Settings
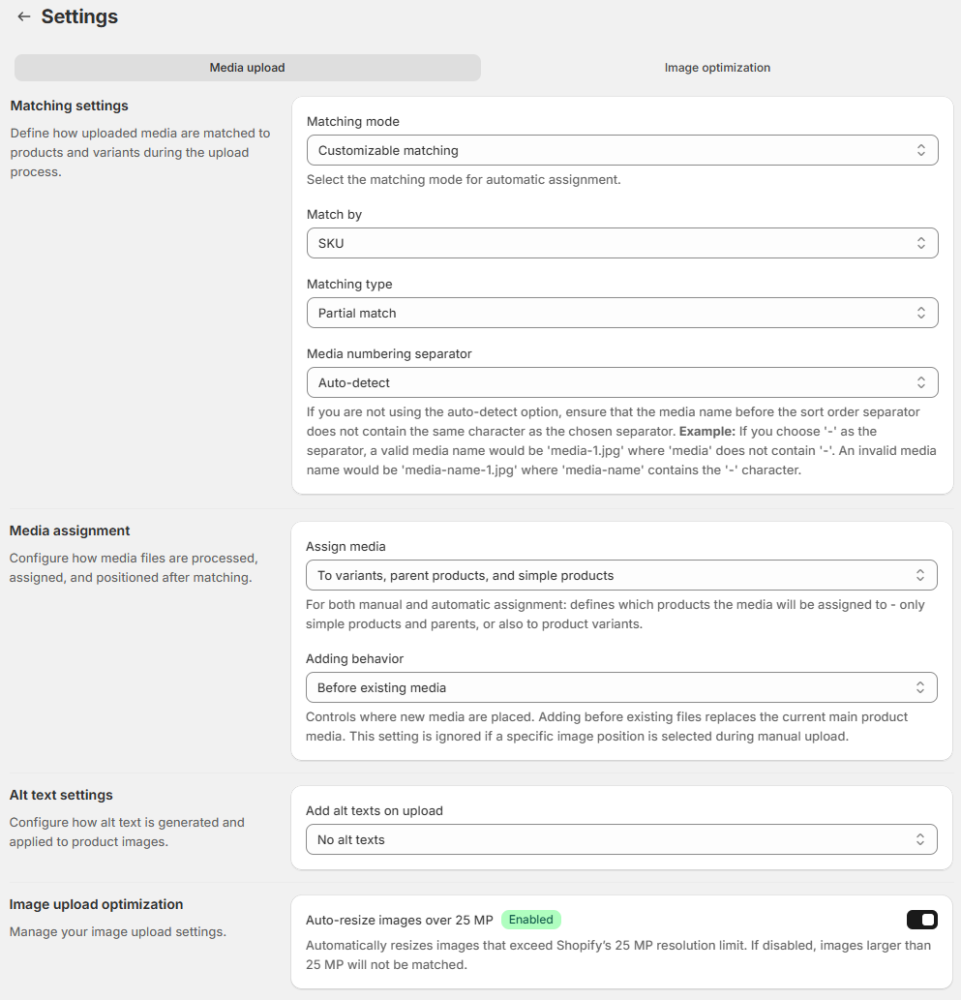
Specify the following Media upload settings:
Matching settings
1. Select Matching Mode
- AI Matching (available on the Standard plan only) - AI automatically analyzes your product details, media names, and metadata to assign images to the right products.
Use Similarity threshold to control how strict the matching is - a higher threshold means AI will only link media that are a very close match. Lower threshold may result in more matches.
Note: AI matching works only for image upload, it doesn’t match videos.
When AI Matching is selected as the Matching Mode, you can control which product information is used to match media to products.
Use the Match by setting to select one or more of the following fields:
- Title
- Variant title
- Collection
- Tags
- Description
By default, all fields are selected to provide the most comprehensive matching results.

- Customizable Matching - Manually define how media are matched to products. Choose the matching criteria (e.g., SKU, title), type, and set a separator if needed.
2. Configure Match by settings (when ‘Customizable Matching’ option is chosen) to assign media to products based on their names:
- SKU - name your image or video files with the product SKU. PicManager will assign media to products whose SKU matches the file name.
- Title - name your media files with the product title. PicManager will match files to products with the same title.
- Barcode - the file name must exactly match the product barcode, or the barcode can be part of the file name. This option is useful when product images are named using barcode values provided by suppliers, warehouses, or inventory systems.
- URL handle - the file name must exactly match the product URL handle, or the URL handle can be part of the file name. This option is especially useful when media files are named using Shopify product handles or when importing assets from external systems that use product URLs as identifiers.
3. Select Matching Type:
- Full Match - the image name must exactly match the product information. Full Match is case-sensitive.
- Partial Match - the app will match images to products based on a portion of the image name. If part of the image name matches a product’s SKU (or title), the image will be assigned to that product and any of its variations.
For example, if you have an image named "Toy50.jpg," it will be assigned to products with SKUs like "Toy50," "Toy501," or "Toy502."
Note: For a successful match using the partial match type, the image name only needs to include part of the product's SKU. There's no need to modify the product SKU to match with images.
4. Choose Media numbering separator to set the order of your media:
- Auto-detect – The system automatically identifies the numbering separator in your media filenames (such as a hash #, dash -, or underscore _) to order your images correctly. One detected separator will be applied to all media for a single product.
- Hash (#) – Enable this option and add a number after the # to define the media order. Example: sample-product.png, sample-product#2.png, sample-product#3.png
- Dash (-) – Enable this option and add a number after the - to define the media order. Example: sample-product.png, sample-product-2.png, sample-product-3.png
- Underscore (_) – Enable this option and add a number after the _ to define the media order. Example: sample-product.png, sample-product_2.png, sample-product_3.png
Note: avoid using a separator symbol in the SKU itself.
Media assignment
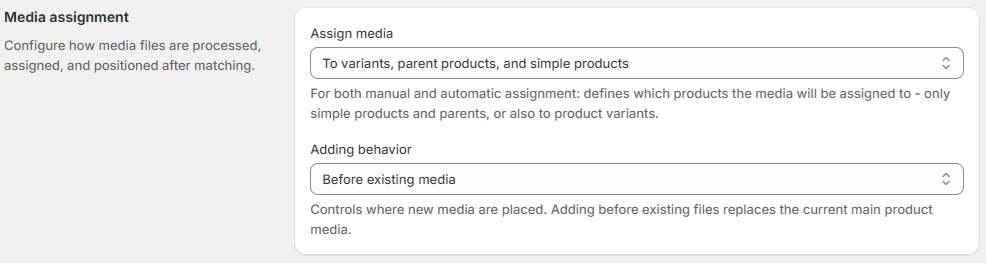
5. In the Assign Media field, select which products your media will be linked to - either simple products and parent products, or also product variants. This applies to both manual and automatic assignment:
- To parent and simple products - assign media only to the parent product or simple product.
- To variants, parent products, and simple products - this option allows you to assign images to product variants as well.
Note: According to Shopify requirements, it’s not allowed to upload videos to product variants, they will be assigned to parent products only.
Note: The application automatically prevents duplicate images by default. If an image matches multiple variants or products, a single file is uploaded to Shopify and linked to all matching items, keeping your parent product galleries clean and organized.
6. Adding behavior - choose where to insert new media relative to your existing media:
- Before existing media
Note: Adding before existing files replaces the current main product media.
- After existing media
Alt text settings
7. Add alt texts on upload - activate the automatic addition of alt tags for uploaded images. This can be useful for SEO purposes, and you have the option to:
- Disable alt tags addition.
- Use the product title as a base for the alt tag addition.
- Use the variant title as a base for the alt tag addition.
Manage your image upload settings
8. Auto-resize images over 25 MP - switch the toggle On to automatically resize images that exceed Shopify’s resolution limit. Off - images larger than 25 MP will be skipped and not matched.
9. Click the Save button to apply your settings. Then, go to Image optimization tab.
Image Optimization Settings
Open the Image optimization tab to configure how your images are optimized.
Note
Image optimization is available on paid plans only.
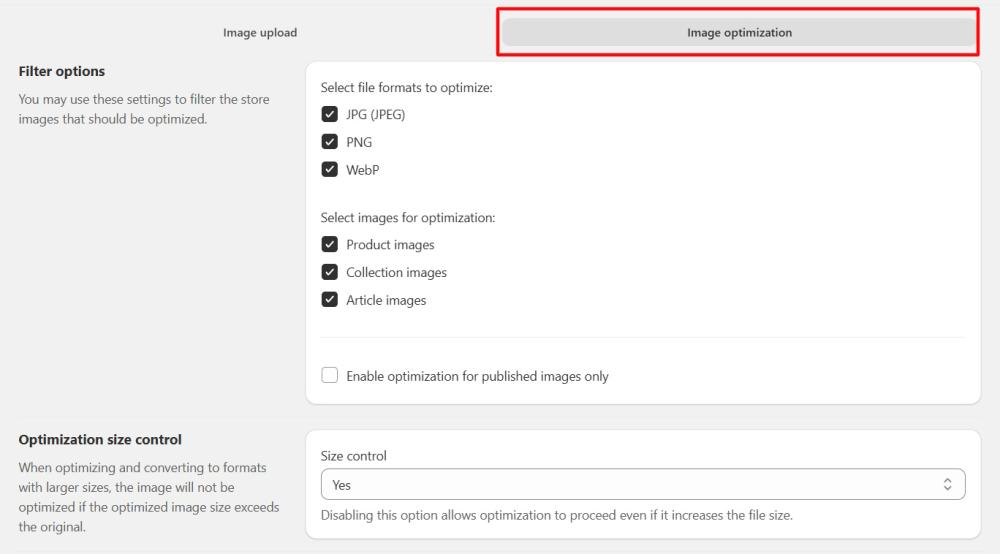
Filter Options
Control which images the app will optimize:
- Select file formats to optimize - choose the image formats (JPG, PNG, WebP) that should be processed.
- Select images for optimization - decide whether to optimize Product images, Collection images, and/or Article images.
- Enable optimization for published images only - optimizes only images of published products.
Optimization size control
Size control - if enabled, images will only be optimized if the file size gets smaller. If the optimized file ends up larger, it won’t be changed. Disable this option to allow optimization, even if it increases the file size.
Note
The file size may increase if you compress an image and then recompress it with a lower compression ratio (e.g. if you compress an image with lossy compression and then recompress it using normal compression). In this case, the recompressed image can actually become larger than the original.
Image Adjustment
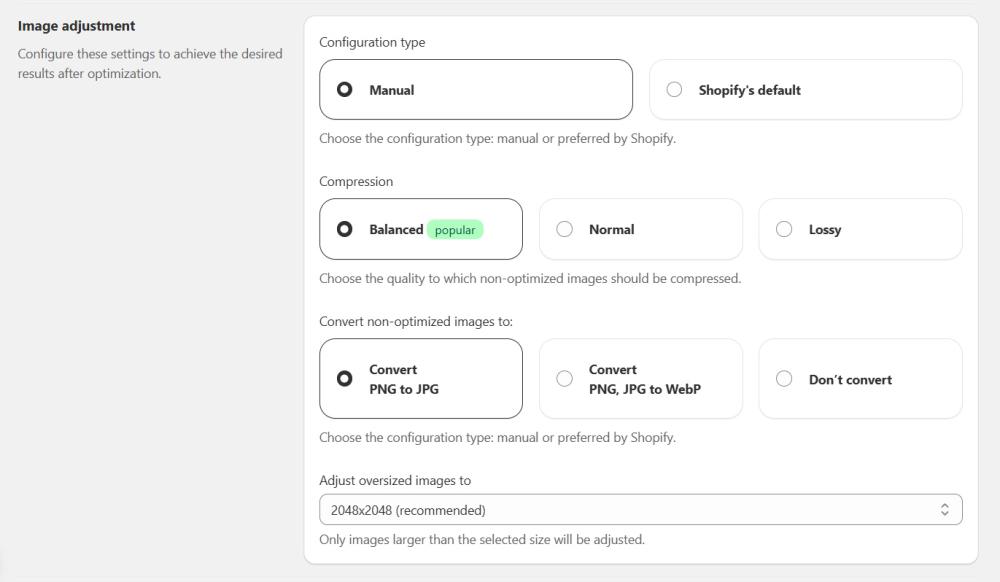
Customize how your images are processed:
- Configuration type - select Manual to control compression, conversion and resize options. With Shopify's default type, only Shopify's preferred compression, conversion and resize resolution are available.
- Compression - select the level of compression for non-optimized images:
- Balanced compression - good quality with moderate image weight reduction. Reduces image quality by up to 20%, not noticeable to the eye.
- Normal compression - fine quality with a good image weight reduction. Reduces image quality by up to 30%.
- Lossy compression - satisfactory quality with significant image weight reduction. Reduces image quality by up to 40%.
- Convert non-optimized images to - choose whether to convert images to more optimized formats:
- Convert PNG to JPG - JPG is a lighter format that preserves size and colors. Recommended for product images.
- Convert PNG, JPG to WebP - WebP is the lightest format, often used by websites. Recommended for collection and blog images.
- Don’t convert - select this option to keep the original image format.
- Adjust oversized images to - set the maximum resolution. Only images larger than this will be resized to fit within the limit.
Note
The aspect ratio of the image is preserved. For example, if you specify 2048x2048 and your image is 4096x2048, it will be resized to 2048x1024 to fit within the limits.
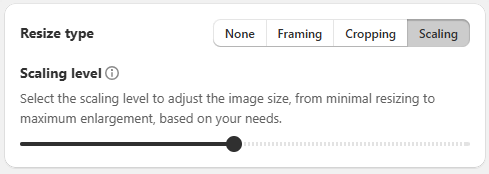
Image resize

Resize images using one of these three main resizing methods: Framing, Cropping, and Scaling.
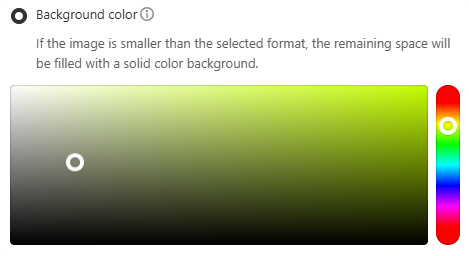
1. Framing - choose the desired aspect ratio for your image: Square (1:1), Landscape (4:3) or Portrait (3:4) or define precise, custom dimensions for your product images (Custom). The aspect ratio changing can result in blank areas (borders) if the original image doesn't perfectly fit the new ratio. The app provides options to fill these areas with a solid color or an AI-generated background.

Then use one of the following background treatment options:
- Background Color - select a solid color to fill the blank areas. Use the color picker to choose your preferred color.
How it works: https://dev-sf-image-optimizer.app.amasty.com/assets/framing-bg-BHNEHaVl.mp4
- AI-generated Fill - the AI will generate a seamless background that complements the image and fills the empty space.
How it works: https://dev-sf-image-optimizer.app.amasty.com/assets/ai-fill-C7KcTKj-.mp4
2. Cropping - it helps you focus on the most important part of your image. We offer both manual (Fixed Crop) and AI-powered (Smart Crop) options. Choose the desired aspect ratio for your image: Square (1:1), Landscape (4:3) or Portrait (3:4) or define precise, custom dimensions for your product images (Custom).
And use one of the following cropping methods:
- Fixed Crop - this is a manual cropping mode. You define how the image should be cropped by selecting the area you want to keep. You can choose the alignment point for your crop (Centre, Top, Right, Left, Bottom).
How it works: https://dev-sf-image-optimizer.app.amasty.com/assets/fixed-crop-DhdR2qdk.mp4 - Smart Crop - this automatic mode uses AI to analyze the image and identify the most important content (e.g., the product). It then crops the image to keep this content in focus.
How it works: https://dev-sf-image-optimizer.app.amasty.com/assets/smart-crop-D-FoARxC.mp4
3. Scaling - adjust images from minimal resizing to maximum enlargement as needed, choosing the scaling level.
4. The “Remove background” option allows you to automatically remove or replace the background of product images.
It works independently and is fully compatible with all Resize types: Framing, Cropping, and Scaling.
Available Options:
- None - (default) Images are processed as usual, without background changes.
- Remove background - The image background will be removed.
For PNG and WebP images - the background becomes transparent.
For other image formats - the background is automatically replaced with white.
Note: Transparency is applied only to formats that support it. - Color replace - The image background will be replaced with a selected color.

When the color replace option is selected, a color picker setting appears. Choose the color that will replace the image background.
Auto Compress
Optimize images automatically - turn on this option to automatically optimize new images daily using your settings. Can be toggled on or off anytime.

Adjust Alt Text During Optimization - Enable the toggle to automatically generate alt texts during image optimization.

After enabling the setting, you can configure templates for:
- Products
- Collections
- Blog posts
You can build alt texts using available variables and custom text.
Product Variables:
- Product title
- Product collections
- Image name
- Shop name
- Variant title
Collection Variables:
- Collection title
- Shop name
Blog Post Variables:
- Blog title
- Shop name
How Templates Work: You can mix dynamic variables with your own custom text. The system automatically formats your template elements by separating them with hyphens (e.g., Product title - Custom Text - Shop name).
Note: If you share a single image asset across multiple products, the system will generate the alt text using the details of the first product assigned to that image.
Update Only Empty Alt Texts - this option is enabled by default.
- Enabled - alt texts are added only to images that currently do not have alt texts.
- Disabled - existing alt texts are replaced with new values generated from the configured templates.
The settings for your file Uploader and the Optimizer operate independently. If you have alt texts enabled on upload, they will apply the moment a file enters the system.
- If you want the Optimizer to override those initial upload tags with your new advanced templates, ensure Update only empty alt texts is unchecked.
- If you want to keep the uploaded tags and only optimize images that missed out, keep it checked.
After optimization, the details page displays:
- New alt text - the updated alt text applied during optimization.
- Original alt text - the previous value before optimization. If no alt text existed, a dash (-) is displayed.
Click the Save button to apply your settings. Then, go to Upload images page.
Upload Media
After setting your preferences, go to the Upload Media page to start uploading your images and videos.
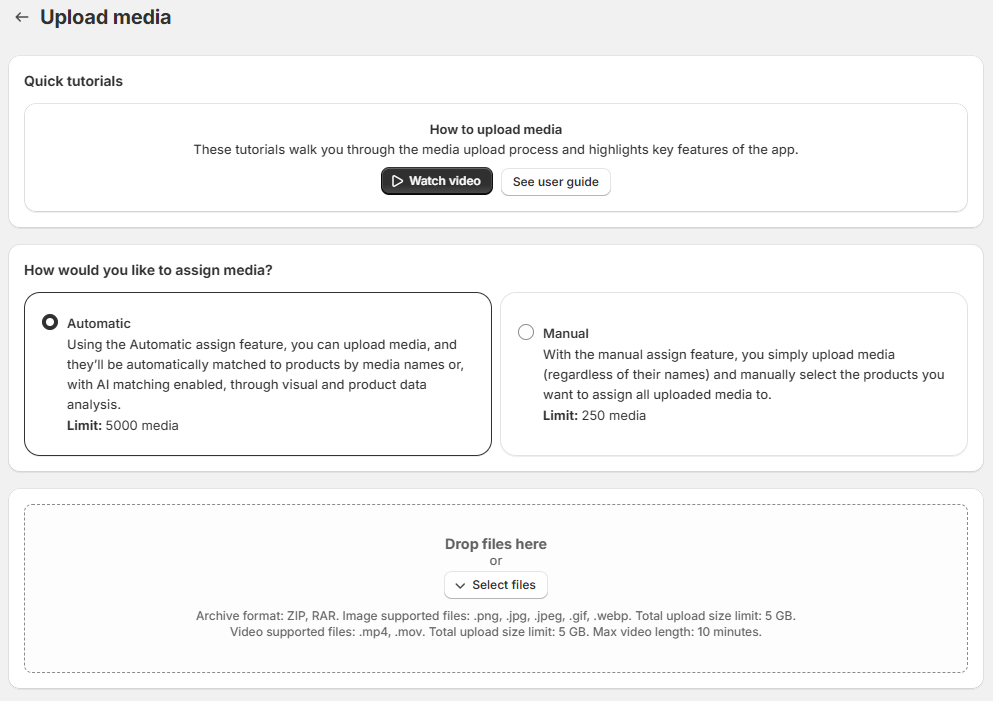
Select assignment method
Decide whether to manually or automatically assign images to products:
- Manual assign: Manually assign uploaded images and videos to products. This is a preferred method if you’re planning to add the same image/video to multiple products, regardless of file name.
- Automatic assign: Automatically assigns media to products based on the matching criteria set on the Settings page.
Select Files
To upload files, simply drag and drop your images, or click the Select Files button to choose them from your computer, CSV file, Google Drive, Dropbox or Upload from Shopify files.

Upload from Shopify files
Select Upload from Shopify files. A Shopify media popup opens.
Browse or search files by name using the search bar. Choose one or multiple items and confirm.
After selection, files appear in your list the same way as when uploading from your computer.
Note:
- Uploading from Shopify Files is only available on the Standard plan.
- Assignment doesn’t duplicate files. Reuse of the same file depends on your settings (on/off).
- Existing alt text is preserved. Your current alt text settings won’t overwrite it.
- Reverting removes media from the product only. Does not delete files from Shopify or other products.
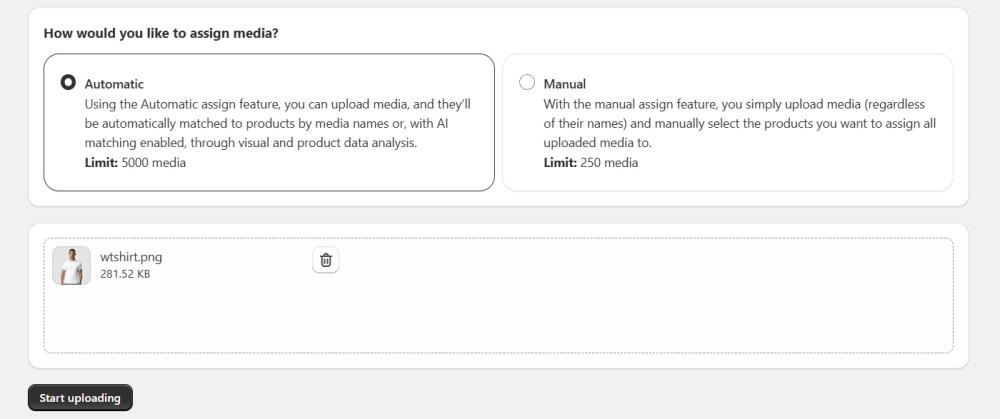
Upload media via your computer
Select files or drag-and-drop them.
You can also upload media in the ZIP or RAR file from your computer. The name of the compressed file or folder doesn't matter; only the image/video names inside are considered.
Note:
We support the following file formats: .png, .jpg, .jpeg, .gif, .webp, .mp4, .mov with a limit of 5000 images per upload. The maximum batch size allowed is 1 GB for Free plan and 5 GB for Standard plan. The maximum video length is 10 minutes. It's recommended to avoid simultaneous downloads as it can affect download speed. Also consider that Shopify limits the number of hosted videos based on your Shopify plan:
- Basic Shopify: 250
- Shopify: 1,000
- Advanced Shopify: 5,000
Upload media via Google Drive
Sign in to your account and grant PicManager access, so the app can view and upload your files. Select files or drag-and-drop them one by one or as a ZIP or RAR file. The name of the compressed file doesn't matter; only the image/video names inside are considered.
Note:
We support the following file formats: .png, .jpg, .jpeg, .gif, .webp, .mp4, .mov with a limit of 5000 images per upload. The maximum batch size allowed is 1 GB for Free plan and 5 GB for Standard plan. The maximum video length is 10 minutes. It's recommended to avoid simultaneous downloads as it can affect download speed. Also consider that Shopify limits the number of hosted videos based on your Shopify plan:
- Basic Shopify: 250
- Shopify: 1,000
- Advanced Shopify: 5,000
Upload media via Dropbox
Sign in to your account and grant PicManager access, so the app can view and upload your files. Select files or drag-and-drop them one by one or as a ZIP or RAR file. The name of the compressed file doesn't matter; only the image/video names inside are considered. Note: Loading files from Dropbox may take some time. Please wait until the process is complete.
Note:
We support the following file formats: .png, .jpg, .jpeg, .gif, .webp, .mp4, .mov with a limit of 5000 images per upload. The maximum batch size allowed is 1 GB for Free plan and 5 GB for Standard plan. The maximum video length is 10 minutes. It's recommended to avoid simultaneous downloads as it can affect download speed. Also consider that Shopify limits the number of hosted videos based on your Shopify plan:
- Basic Shopify: 250
- Shopify: 1,000
- Advanced Shopify: 5,000
Upload images via CSV (not available for AI matching)
When the Upload via CSV option is selected, a pop-up window will appear for file selection. Click Browse and choose your CSV file. After selecting the file, proceed to the matching page as usual.
Your CSV file must follow one of the supported formats: Download Sample CSV 1 or Sample CSV 2
Matching by SKU:
- Specify the SKU of the parent or variant to which the images will be assigned.
- Include the direct image/video URL. (for images hosted externally)
- OR Include the filename of the image already uploaded to Shopify's files section.
Matching by Title:
- Specify the Title of the parent item.
- Include the direct image/video URL. (for images hosted externally)
- OR Include the filename of the image already uploaded to Shopify's files section.
Note:
Optionally, add a column to indicate whether the image should be assigned to the parent variant.
Note:
To assign multiple images, list them separated by commas in a single cell.
If you attempt to upload a CSV file containing only Google Drive or Dropbox links instead of direct media URLs, you will receive an error message on the upload page, guiding you to select the correct "Upload from Google Drive" or "Upload from Dropbox" option.
If your CSV file contains a mix of direct URLs and Google Drive/Dropbox links, the system will process the valid direct URLs. Any Google Drive or Dropbox links included in a standard direct URL upload will be marked as "Invalid" on the matching page and will not be matched or assigned.
Start Uploading
After you've added the necessary files, find and click the Start Uploading button.
You can cancel the media matching process at any time, even while it's in progress. For it, simply click the Cancel button. The media loading and matching process will immediately stop.
Automatic assignment
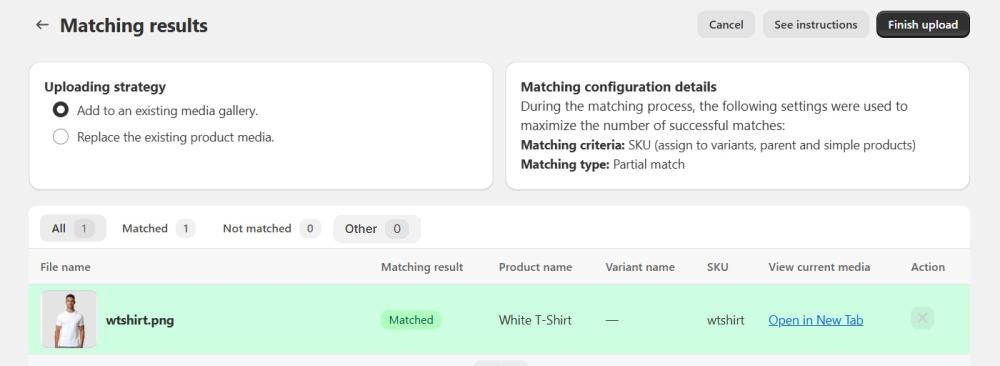
After the upload is complete, if automatic assignment is selected, you'll be taken to a page with a grid displaying the matched products. Review the grid to ensure all media are correctly matched with their respective products:
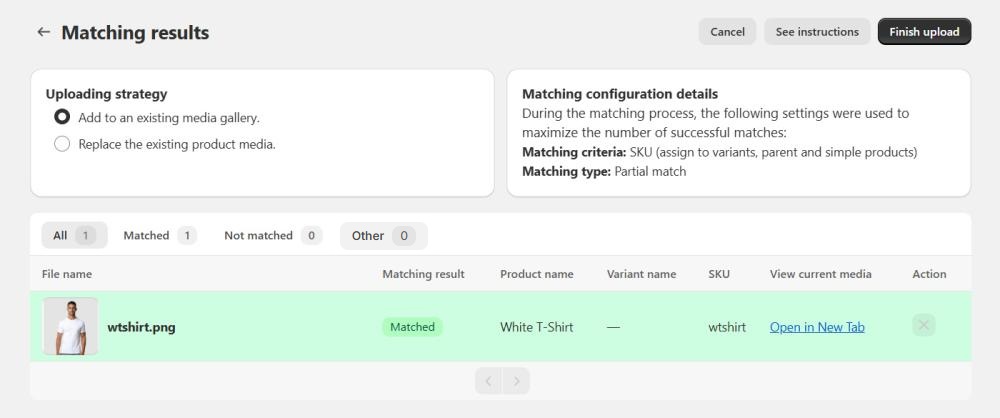
Uploading strategy - decide whether you want to add the new media to the existing ones or replace them.
Note: use the replacement strategy with caution, as it will replace the current product images.
Please note that the original images cannot be restored.
You can remove media from matching by clicking the "X" icon.
An Other tab is available for files that cannot be processed or assigned to products.
Files may appear in this tab if:
- The file type is not supported (Invalid file type status).
- The file URL is invalid.
- Another issue prevents the file from being processed.
Files in the Other tab are excluded from matching and upload processing and cannot be assigned manually.
Note: To upload these files, correct the issue (for example, use a supported file format or a valid URL) and start a new upload.
Click Finish Upload.
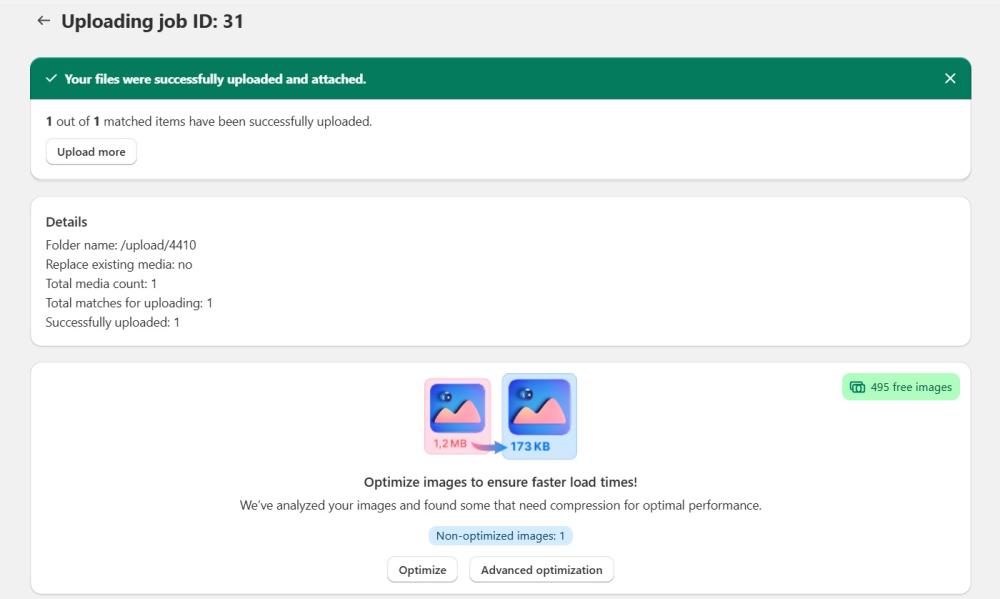
If the upload is successful, you’ll see a confirmation message with the upload details.
Any newly uploaded images that may require optimization — due to large file size, aspect ratio, or format — will be detected. These factors can slow down page loading or affect image appearance.
To optimize your newly-uploaded images, choose one of the options:
- Optimize – instantly process all non-optimized images using your current optimization settings.
- Advanced optimization – customize settings for this optimization session. Specify your preferences in two steps, then click Optimize.
Note: Optimization may require syncing your images first. This step allows the app to analyze them.
Note: Image optimization is available on paid plans only.
Resolving partial auto-assignment
If some of your images cannot be automatically assigned with products during the initial upload, you can review and assign them manually before finalizing the upload process.
Click Manual Assign on the Matching Results page to open the manual assignment page. Here, all unmatched images are displayed and can be assigned to products manually.
Available assignment options:
- Assign media to selected products only (enabled by default)
- Assign media to all products
After assigning the images, click Continue to return to the Matching Results page.
The updated matches will appear in the Matched category.
Click Finish Upload to upload the media to the assigned products.
Note: If you leave the manual assignment page before saving, the upload process will be interrupted and unsaved changes will be lost.
Manual assignment
If you chose manual assignment, after the upload completed, you’ll be directed to the matching menu.
Note:
Shopify allows to manually upload up to 250 images/videos.
Here You have two options:
- Assign media to all products (except selected) - click Select products to attach the media to all/multiple products, excluding the chosen ones if needed.

- Assign media to selected products only - click Select products to attach the uploaded media to selected products or variants only.

Image position - When manually assigning media to products, you can control where uploaded images appear in the product gallery using the Image position field.
- Leave the field empty to use the default behavior defined by the Adding behavior setting.
- Enter a number to place uploaded images at a specific position in the product gallery.
Note: Position 0 uses the default Adding behavior setting.
Click Continue.
At this point, you’ll be taken to a Matching Results report with a grid showing matched products.
Uploading strategy - decide whether you want to add the new images/videos to the existing ones or replace them.
An Other tab is available for files that cannot be processed or assigned to products.
Files may appear in this tab if:
- The file type is not supported (Invalid file type status).
- The file URL is invalid.
- Another issue prevents the file from being processed.
Files in the Other tab are excluded from matching and upload processing and cannot be assigned manually.
Note: To upload these files, correct the issue (for example, use a supported file format or a valid URL) and start a new upload.
Click Finish Upload.
If the upload is successful, you’ll see a confirmation message with the upload details.
Any newly uploaded images that may require optimization — due to large file size, aspect ratio, or format — will be detected. These factors can slow down page loading or affect image appearance.
To optimize your newly-uploaded images, choose one of the options:
- Optimize – instantly process all non-optimized images using your current optimization settings.
- Advanced optimization – customize settings for this optimization session. Specify your preferences in two steps, then click Optimize.
Note: Optimization may require syncing your images first. This step allows the app to analyze them.
Note: Image optimization is available on paid plans only.
Product Variants
Each product variant can only have one image assigned to it. Additional images will be saved under the parent product. Note: Videos can’t be uploaded to product variants.
Add to an existing image gallery - If the product variant didn't have any images previously, one image will be added to it, and any additional images will be linked to the main product. If there was already an image, all files will be linked to the main product at once.
Replace image - only one image can be linked to each variant. If you replace an image for a variant, it will simply remove the previously uploaded one.
Optimization
You can optimize your images to correct large file sizes, aspect ratios, or formats that can slow down page loading or affect image appearance.
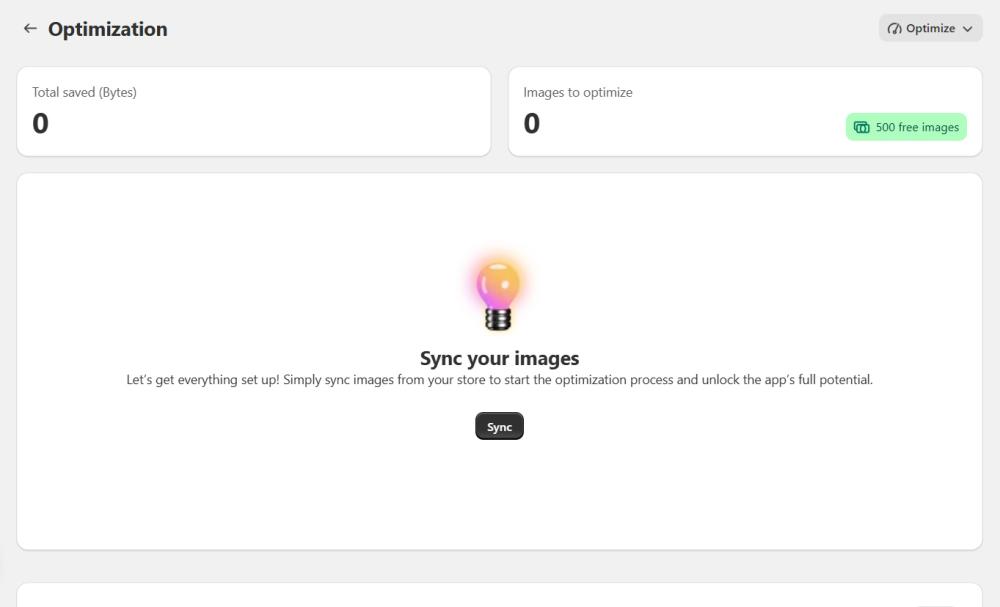
Sync your images
Before optimizing, Sync your images - this is a required step. Wait until the sync process is complete. Once synced, your images will appear in the grid.
Note
- Product and collection images will automatically sync after the first sync, no need for further syncing when new ones are added.
- New blog images require manual syncing. Click the Sync blog post images button before optimization.
Preview Images
See the results of optimization before or after you apply it:
1. Find an image with the "Not optimized" status.
2. Click the Eye icon next to the image status:
- Not optimized status: preview of how the image will look after optimization.
- Optimized status: view the final version of the processed image.

Optimize Images
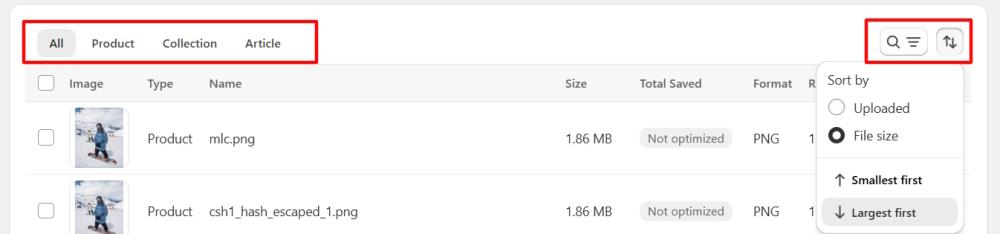
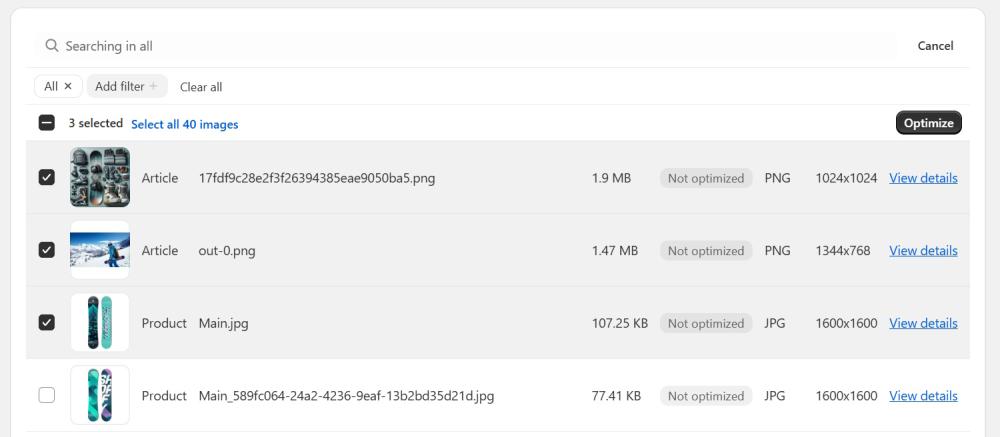
1.Select the images you wish to process. You can easily find them by:
- Filtering: use the tabs to browse by Product, Collection, or Article.
- Searching: use the search bar to find specific images.
- Sorting: organize your list by Upload Time (Newest/Oldest) or File Size (Largest/Smallest).
2. Click Optimize or choose Optimize > All images or Not optimized images.
Note: Optimization will follow the settings you configured on the Settings page, or change them in the Adjust settings for optimization section.
3. Optimization runs in the background. Click "Notify me when finished" to receive an email once the process is complete. Notifications are sent to your store’s default email address (check in Shopify Settings).

In the meanwhile, feel free to leave the Shopify admin and return later.
Note
The app performs one task at a time. Please wait for the current process to finish before starting new image optimization.
Check Results
After optimization, you’ll be redirected to a page showing Optimization job details and an Images preview grid.
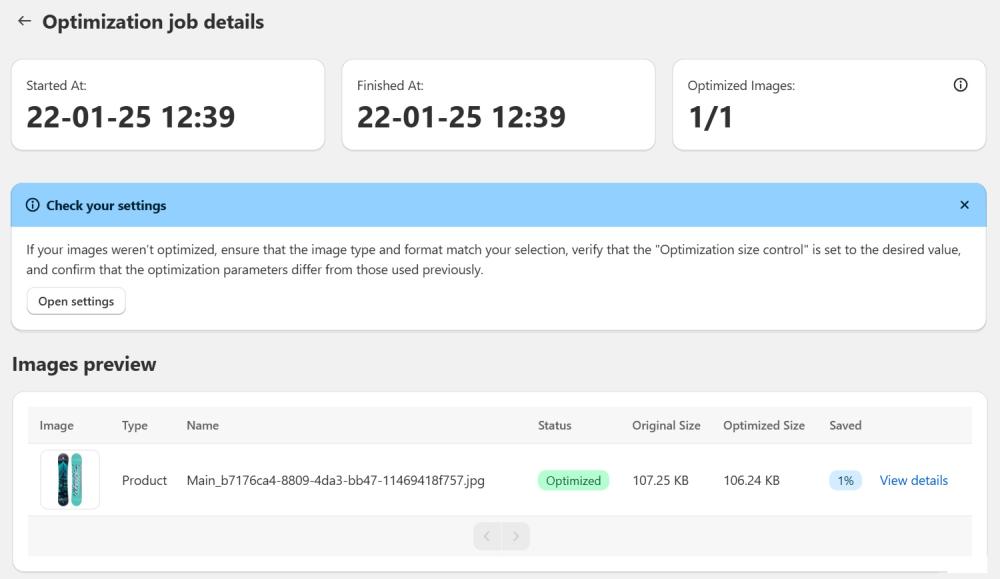
Under the Optimization job details section, you'll find the start and finish times, and the number of images selected and successfully optimized.
In the Images preview grid, you can see which images were optimized, compare the original and compressed sizes, and view the total percentage of weight saved.
Click View details link for more information on each image's optimization:

Note
If an image's size or parameters remain unchanged after optimization, it means the image already meets your set criteria and doesn’t require further optimization.
At the top of the Optimization page, the Total Saved (MB) section shows the total space saved through compression.
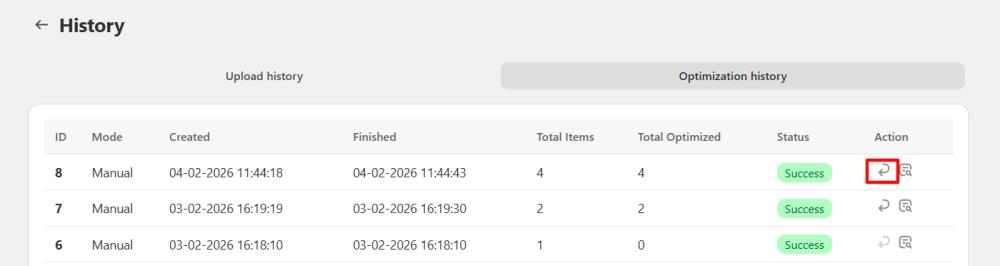
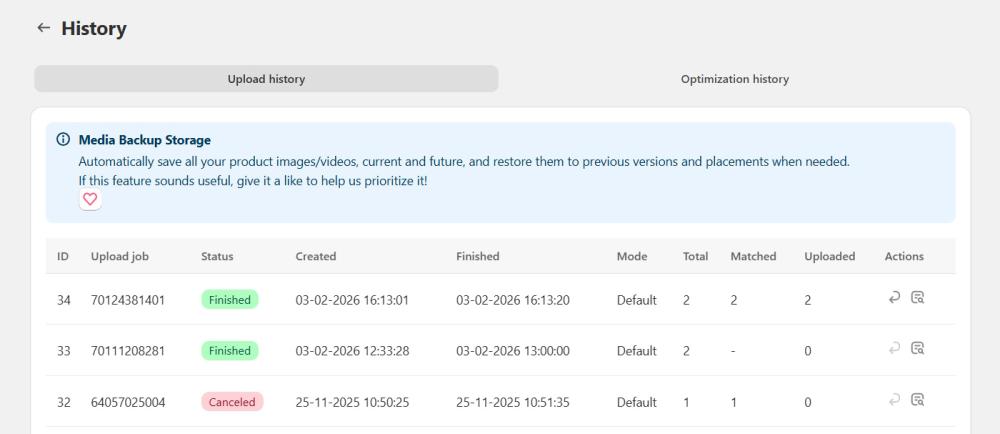
History
The History page provides detailed information about all your uploads and optimizations. The page is divided into 2 tabs: Upload history and Optimization history. You can track the status, dates of uploads/optimizations, and details of each task.
Revert changes (for media upload)
You can undo an image or video upload by reverting a specific job:
1. Navigate to the History page.
2. Locate the job you wish to revert.
3. Click the "Revert" icon associated with that job.
4. Confirm the action.
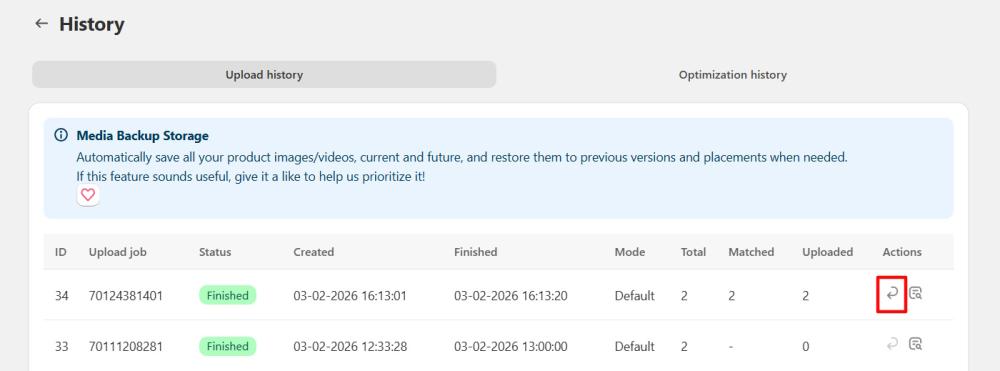
After clicking "Revert," the images uploaded within that specific job will be deleted, and the links between those images and your products will be removed.
Note: The backup period available for reverting depends on your subscription plan. Please check our Pricing page for details.
Restore optimized images
You can revert images to their original state individually or as an entire batch.
Note: Original images are only available during your plan's backup period. Once expired, images can no longer be restored.
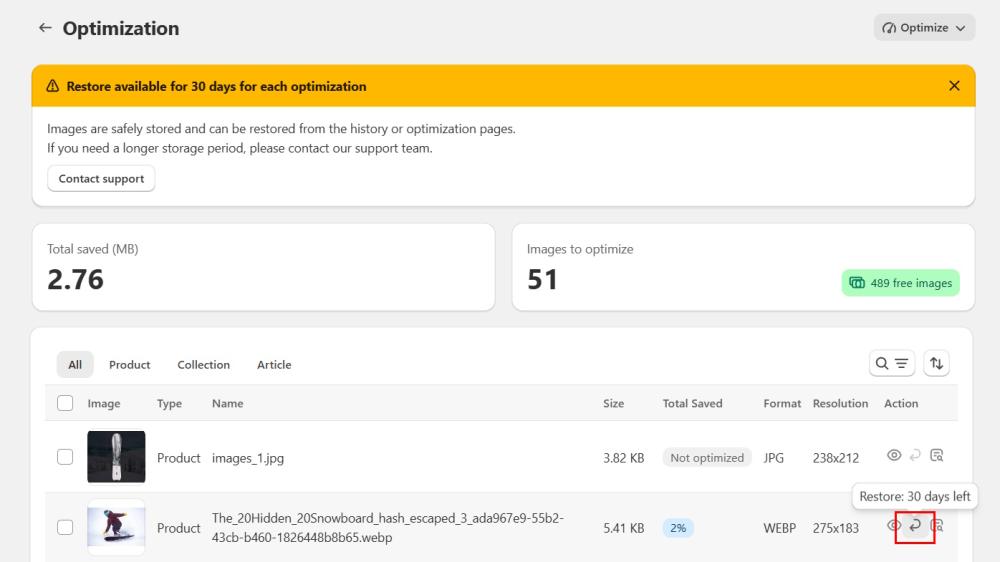
Restore individual images
If you are satisfied with most of your results but want to restore specific images, follow these steps:
- Go to the Optimization page.
- Locate the images you wish to revert.
- Click the Restore icon next to the image.
Restore a batch of images
To restore an entire group of images processed during the same optimization, follow these steps:
- Go to History page.
- Open the Optimization history tab.
- Find the specific optimization log for the images you want to revert.
- Click the Restore icon for that log.