Table of contents
- Enable the app - a required step
Enable the app in App Embeds to ensure it works well with your theme. - Activate checkout messages - recommended
Add a success messages block to the checkout page to display special offers customers have unlocked. - Create a new promotion campaign
Set up a promotion campaign and define its conditions. - Countdown timer
Create urgency-driven promotions. - Settings - email alerts
Decide whether to receive alerts when the promotion campaigns are deactivated.
SaleBoost is a Shopify app that lets you create promotional offers, such as free gifts, Buy X Get Y, and free shipping, with no limit on the number of active campaigns.
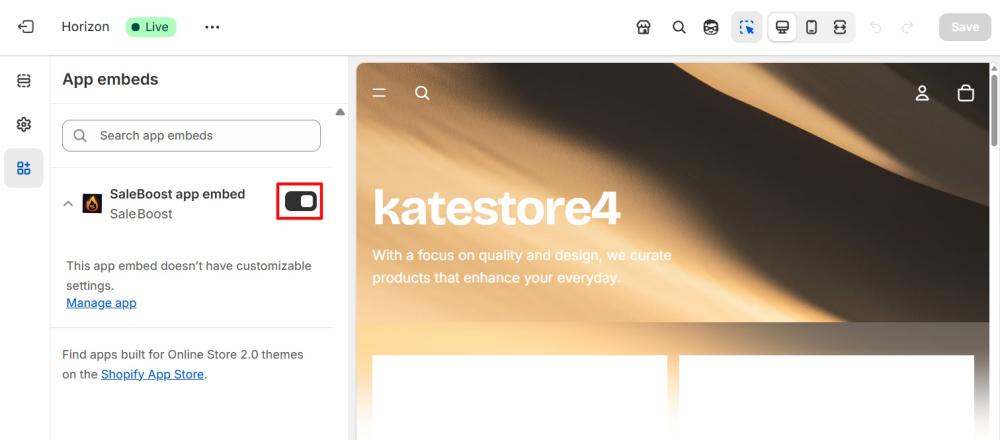
Enable the app
When you first open the app, enable it in the App embeds to make it work with your theme. For it, simply click the Activate button in the notice “SaleBoost is inactive”. You’ll be redirected to your theme settings. There, enable the toggle next to SaleBoost: Free Shipping, Gift and Save changes. Afterward, return to the app.

Note
You can also access App Embeds by going to Online Store > Themes, clicking Customize next to your current theme, then opening the App Embeds tab in the top left corner. Enable the app there and click Save changes.
Activate checkout messages
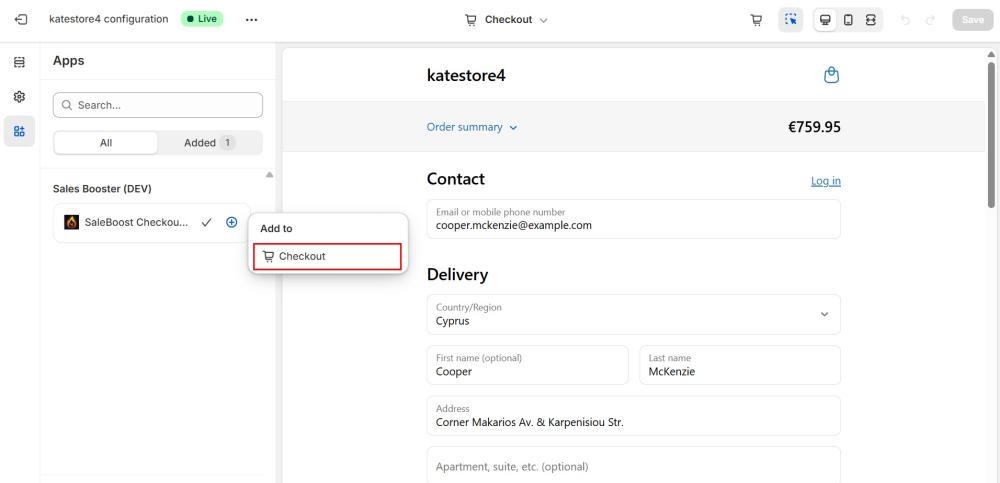
Return to the app and complete the second step in the onboarding to enable messages for customers when a free gift or free shipping is added at checkout.
Click the Activate button in the second step. You’ll be redirected to the Checkout Settings. In the Apps tab, find the SaleBoost Checkout Messages field, click the + (plus icon), and then click Checkout. Finally, click Save Changes.
Note
You can also access Checkout Settings by going to Settings > Checkout, clicking Customize in Configurations section, then opening the Apps tab in the top left corner. Click + (Plus) > Checkout and Save changes.
Create a new promotion campaign
Go to the Campaigns page. From here, you can filter existing campaigns and edit, duplicate, or delete them individually or in bulk.
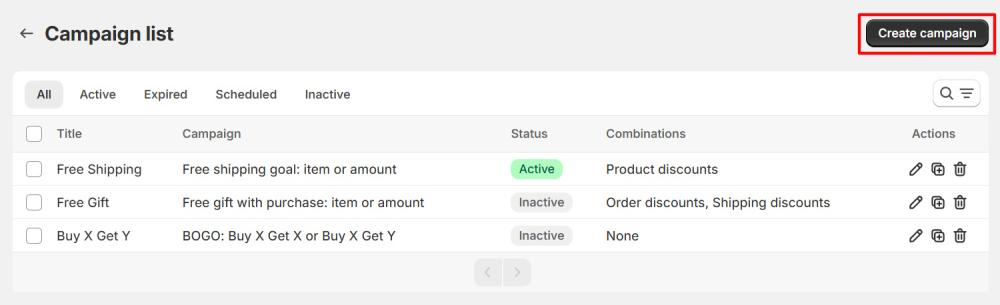
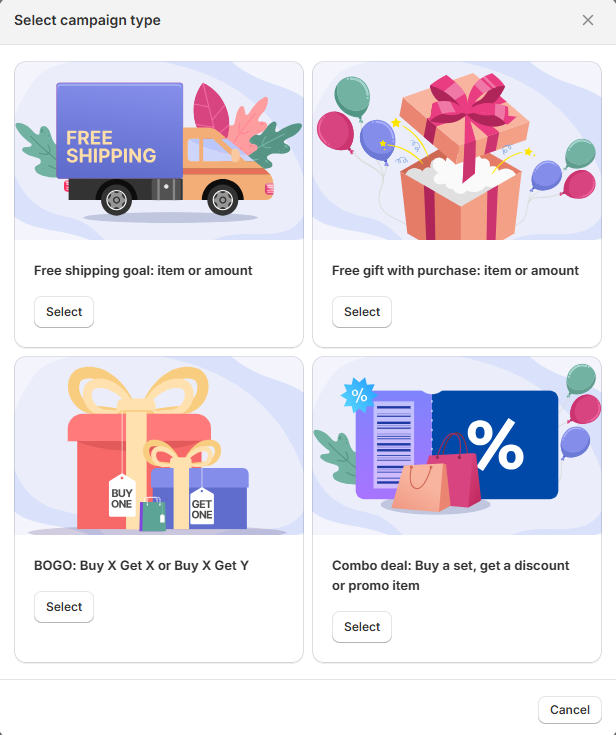
Click Create campaign and choose the campaign type for your promotion:
- Free Shipping Goal: item or amount
- Free Gift Goal: item or amount
- BOGO: Buy X Get X or Buy X Get Y
- Combo deal: Buy a set, get a discount or promo item
Free Shipping Goal: item or amount
To create a free shipping campaign, select this option.
Note
Free shipping is applied to the entire order once the shipping goal is reached. A success message will appear at checkout to highlight that free shipping is applied.
Configuration tab
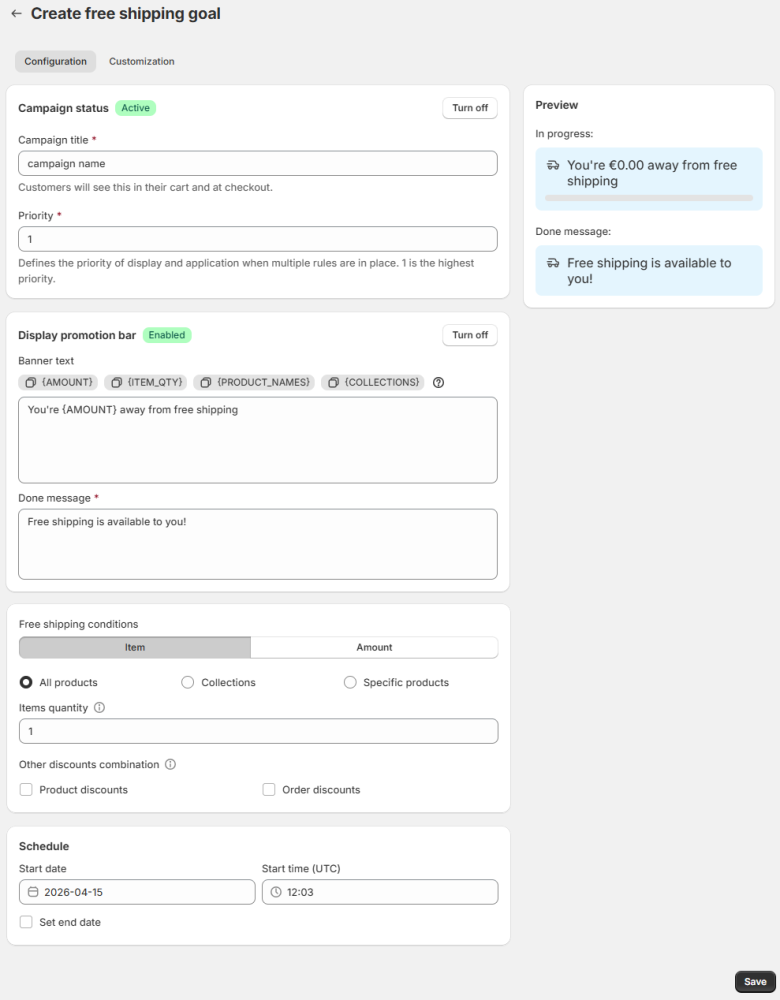
Campaign status - by default, the campaign status is turned on. You can turn it off from this setting.
Name your campaign.
The Priority field determines the order in which rules are displayed and applied when multiple rules are applicable. The rule with the highest priority (lowest number, e.g., 1 is higher than 2) is applied. On the front end, applicable bars are displayed from top to bottom according to their priority, with the highest priority rule's bar appearing first.
If two or more applicable rules have the same Priority value, the rule that was created first (the one with the lowest Rule ID) is given priority.
If the Priority field is cleared or reset by an administrator and no new value is set, the rule is automatically treated as having the lowest possible priority.
Note: Once a rule has been applied and a bar displayed, changing the order of products afterwards does not cause the system to re-evaluate all rules.
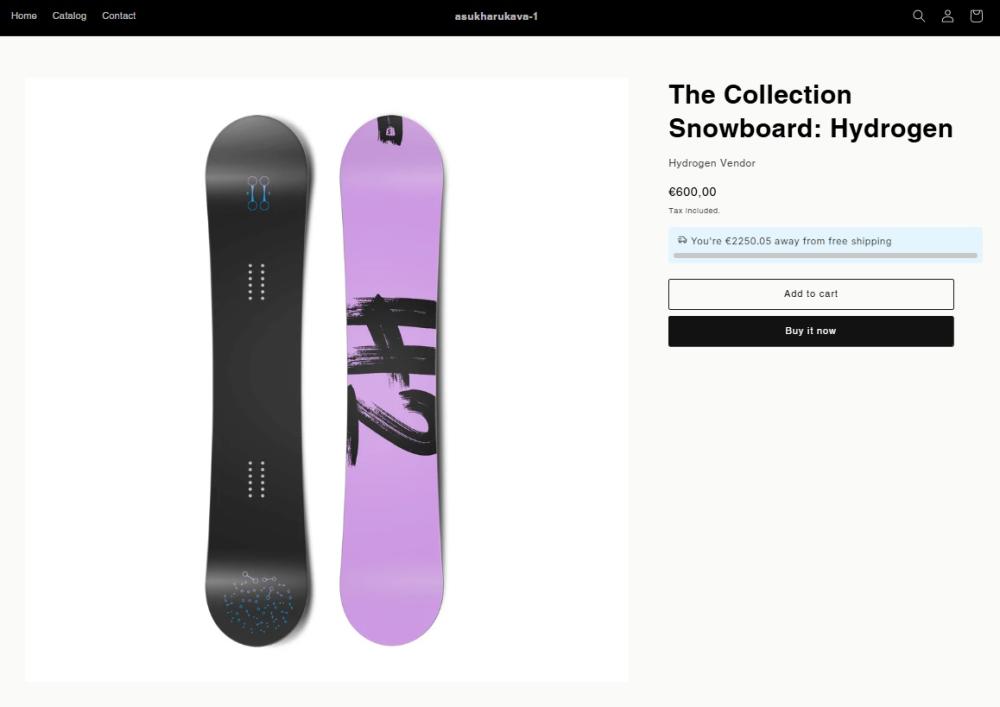
Display Promotion Bar - by default, the promotion bar is turned on. You can turn it off, and its status will change accordingly. The bar shows users how much more they need to spend to qualify for free shipping, and displays a done message once the goal is reached. Promotion bars are displayed for all products, regardless of whether the customer is viewing promotional items.
Note
Promotion banners appear one after another, so having too many active banners can take up a lot of space on your pages. To keep things clean, we recommend showing banners for different campaigns on different pages (e.g., free shipping on the cart page, free gift on product pages) or turning off banners for some campaigns.
Customize the text for both the "Banner" text and "Done" messages.
Banner text - adjust the text of your bar. Use the following variables in your messages to help customers understand what’s needed to reach the goal:
- AMOUNT: Indicates how much more needs to be spent to unlock free shipping.
- ITEM_QTY: Shows how many more items need to be added to qualify for free shipping.
- PRODUCT_NAMES: Inserts product names from rule conditions (up to 5). Works with rules based on Specific products or All products.
- COLLECTIONS: Inserts collection names from rule conditions (up to 5). Works only with Collections conditions.
To the right, you’ll see the bar preview, which updates instantly to show all your changes.
You can customize the banner’s design in the Customization tab.
Here’s an example of how the promotion bar looks on the storefront:
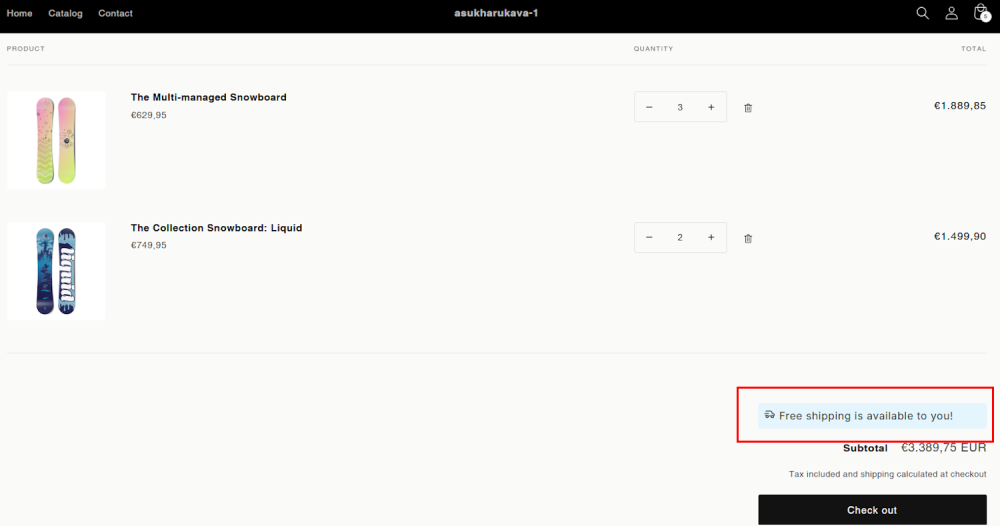
Done message - customize the text that appears on the bar when the goal is achieved.
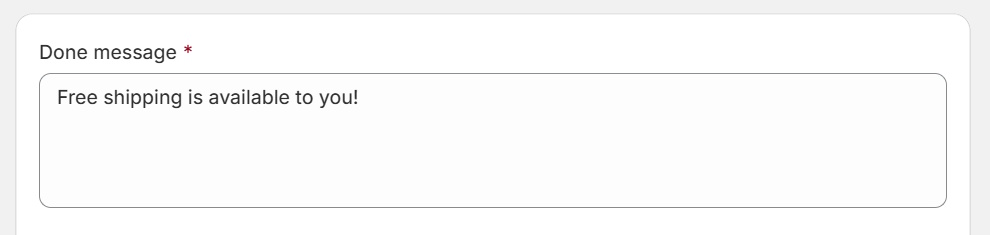
Here’s an example of how the bar looks when the goal is achieved:
Free shipping conditions - specify the criteria for qualifying for free shipping:
- Item - select items that qualify for free shipping. It can be All products, specific collections or specific products or product variants.
- Amount - specify the purchase amount required to qualify for free shipping.
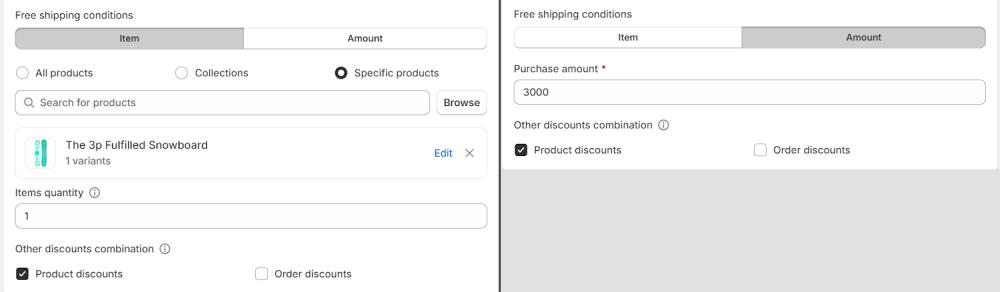
Items quantity (available for Item option) - define the quantity of each individual item that needs to be added to the order to qualify for free shipping.
Note
The promotion will apply only if the required quantity of the same product is added to the cart. For example, if Product A and Product B are selected with a quantity of 2, the rule will apply if either Product A or Product B is in the cart with a quantity of 2. Combinations of different products do not count.
Other discounts combinations - choose whether this promotion can be combined with other types of discounts, such as product discounts (applied first to individual items) or order discounts (applied to revised subtotal), when applicable.
Note
SaleBoost promotions can only be combined with other SaleBoost promotions.
To ensure predictable and reliable promotion logic, we recommend using only SaleBoost rules. Combining them with Shopify rules may lead to conflicts or duplicate behavior.
Schedule - set the start date and time for the promotion, and optionally specify an end date and time.
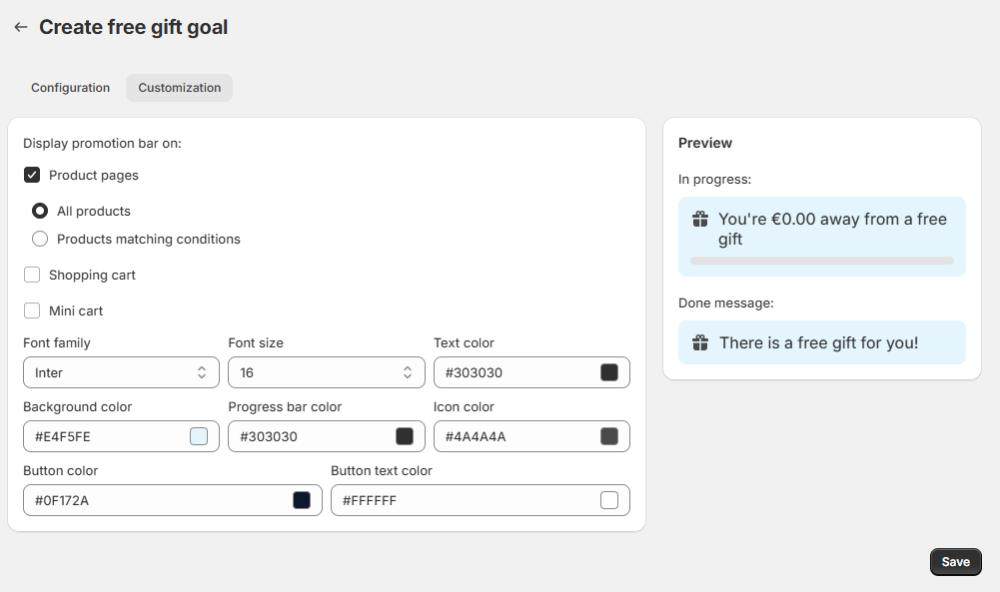
Customization tab
Here, you can customize the promotion bar:
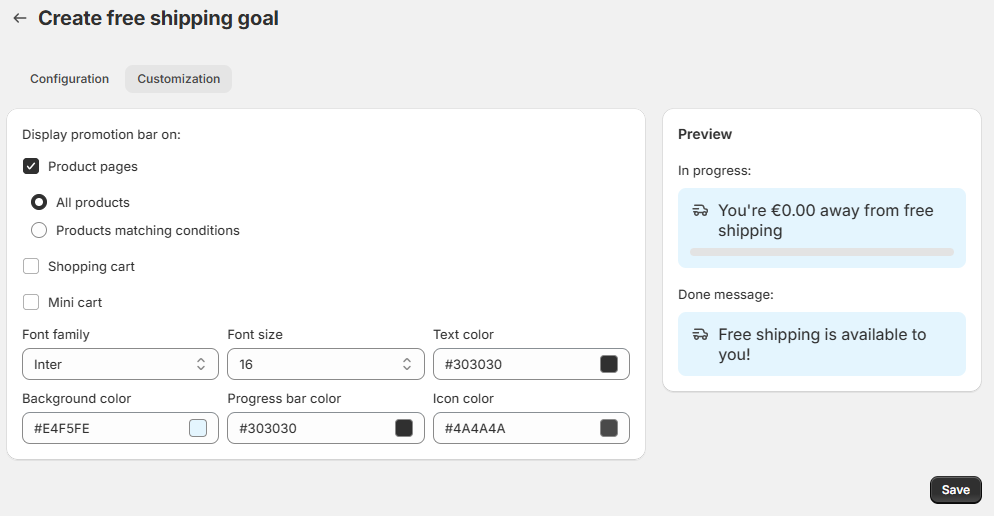
Display promotion bar on - choose where the promotion bar appears across your store:
- All product pages - show the bar on every product page
- Products matching conditions - show the bar only on product pages that contribute to the free shipping condition.
- Shopping cart - show the bar in the cart
- Mini cart - show the bar in the mini cart
Customize bar’s colors and font.
Save changes once campaign is set.
Free Gift Goal: item or amount
To create a Free gift to purchase campaign, select this option.
Configuration tab

Campaign status - by default, the campaign status is turned on. You can turn it off from this setting.
Name your campaign.
The Priority field determines the order in which rules are displayed and applied when multiple rules are applicable. The rule with the highest priority (lowest number, e.g., 1 is higher than 2) is applied. On the front end, applicable bars are displayed from top to bottom according to their priority, with the highest priority rule's bar appearing first.
If two or more applicable rules have the same Priority value, the rule that was created first (the one with the lowest Rule ID) is given priority.
If the Priority field is cleared or reset by an administrator and no new value is set, the rule is automatically treated as having the lowest possible priority.
Note: Once a rule has been applied and a bar displayed, changing the order of products afterwards does not cause the system to re-evaluate all rules.
Max Uses Per Order - This setting limits how often a customer can benefit from the same rule in the same order, regardless of other discounts or combinations present. If you set the Max uses per order to N, the rule can be triggered and applied at most N times within a single order.
Example: If the rule is “Buy 2 items from Category A, get 1 free gift,” and Max Uses Per Order = 3: A customer buying 4 items from Category A will receive 2 gifts.
A customer buying 6 items will receive 3 gifts (the maximum for this rule).
Even if they buy more items, the limit of 3 gifts applies.
Note: This setting only applies to the specific rule and its usage count. It is not the same as “Item Quantity” — it controls the number of times a rule can be used per order, not how many items trigger it.
Display Promotion Bar - by default, the promotion bar is turned on. You can turn it off, and its status will change accordingly. The bar shows users how much more they need to spend to qualify for a free gift, and displays a message once the goal is reached. Promotion bars are displayed for all products, regardless of whether the customer is viewing promotional items.
Note
Promotion banners appear one after another, so having too many active banners can take up a lot of space on your pages. To keep things clean, we recommend showing banners for different campaigns on different pages (e.g., free shipping on the cart page, free gift on product pages) or turning off banners for some campaigns.
Customize the text for both the "Banner" text and "Done" messages.
Banner text - adjust the text of your bar. Use the following variables in your messages to help customers understand what’s needed to reach the goal:
- AMOUNT: Indicates how much more needs to be spent to get a free gift.
- ITEM: Shows how many more items need to be added to get a gift.
- PRODUCT_NAMES: Inserts product names from rule conditions (up to 5). Works with rules based on Specific products or All products.
- COLLECTIONS: Inserts collection names from rule conditions (up to 5). Works only with Collections conditions.
- GIFTS: Inserts names of selected gifts (up to 5).
To the right, you’ll see the bar preview, which updates instantly to show all your changes.
You can customize the banner’s design in the Customization tab.
Here’s an example of how the promotion bar looks on the frontend:

Done message - customize the text that appears on the bar when the goal is achieved.

Here’s an example of how the bar looks when the goal is achieved:
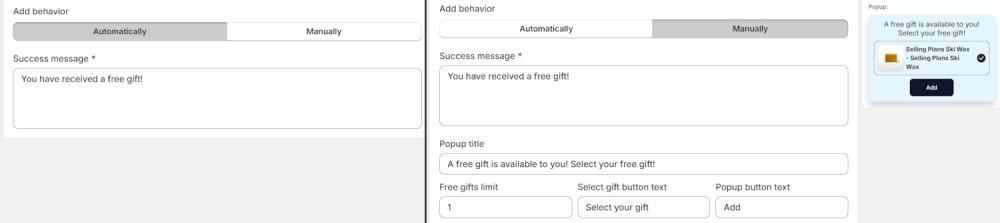
Add behavior - choose how the free gift will be added to the order:
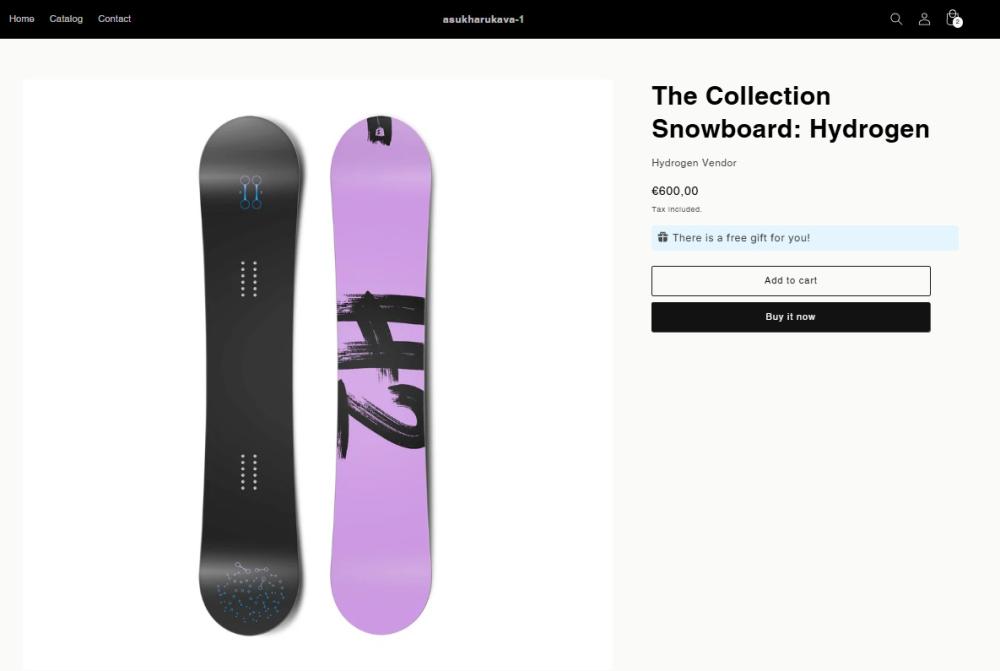
- Automatically - select this option to automatically add one of the specified products to the cart as a gift. You can customize the success message that appears at checkout once the gift is added to the order. Here’s an example of how the success message will appear on the frontend:

- Manually - with this option, customers can choose their gift(s) from the products you've specified via a popup. You can customize the text in the popup and set a limit on how many free gifts each customer can receive. To the right, you can preview the popup.
Free gift conditions - specify the criteria for qualifying for getting a gift with a purchase:
- Item - select the items that qualify for a free gift. You can choose all products, specific collections, or specific products/variants.
- Amount - set the purchase amount required to qualify for a free gift.
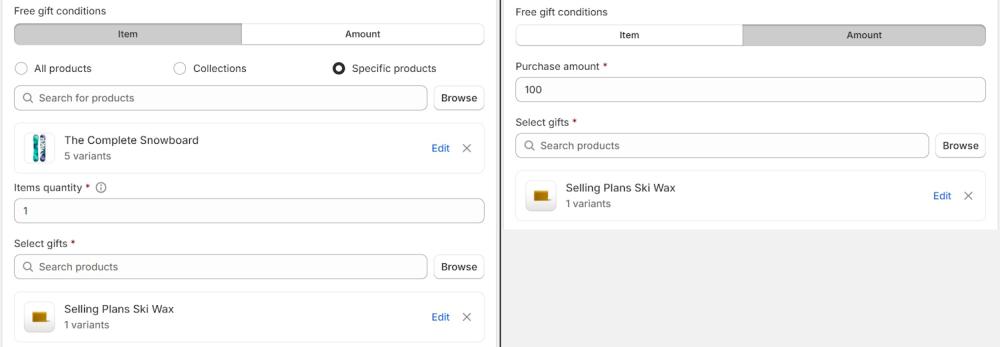
Items quantity (available for Item option) - define the quantity of each individual item that needs to be added to the order to qualify for a free gift.
Note
The promotion will apply only if the required quantity of the same product is added to the cart. For example, if Product A and Product B are selected with a quantity of 2, the rule will apply if either Product A or Product B is in the cart with a quantity of 2. Combinations of different products do not count.
Select gifts - choose at least one product or variant to be given as a free gift with a purchase.
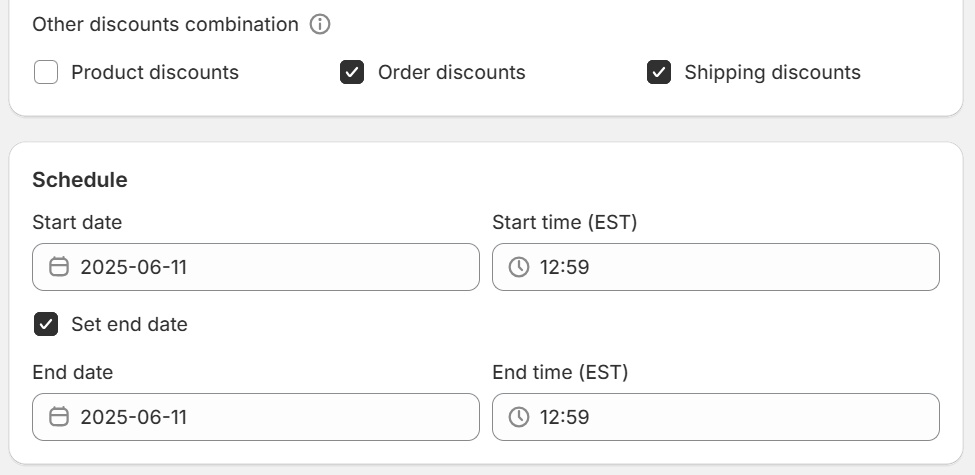
Other discounts combinations - choose whether this promotion can be combined with other types of discounts, such as product discounts (applied first to individual items), order discounts (applied to revised subtotal), or shipping discounts (applied last), when applicable.
Note
- SaleBoost promotions can only be combined with other SaleBoost promotions.
- To ensure predictable and reliable promotion logic, we recommend using only SaleBoost rules. Combining them with Shopify rules may lead to conflicts or duplicate behavior.
- If product and order discounts can combine, multiple discounts may apply to the same item.
Schedule - set the start date and time for the promotion, and optionally specify an end date and time.
Customization tab
Here, you can customize the promotion bar:
Display promotion bar on - choose where the promotion bar appears across your store:
- All product pages - show the bar on every product page
- Products matching conditions - show the bar only product pages that match the deal conditions.
- Shopping cart - show the bar in the cart
- Mini cart - show the bar in the mini cart
Customize the bar’s colors and font.
Save changes once the campaign is set.
BOGO: Buy X Get X or Buy X Get Y
To create a Buy X Get X(Y) campaign, select this option.
Note
The Buy X Get X (Y) campaign automatically adds the discounted product to the cart when the X product is added. A success message will appear at checkout to highlight the discount. Customers can remove the discounted item from the cart if they choose not to purchase it.
Configuration tab
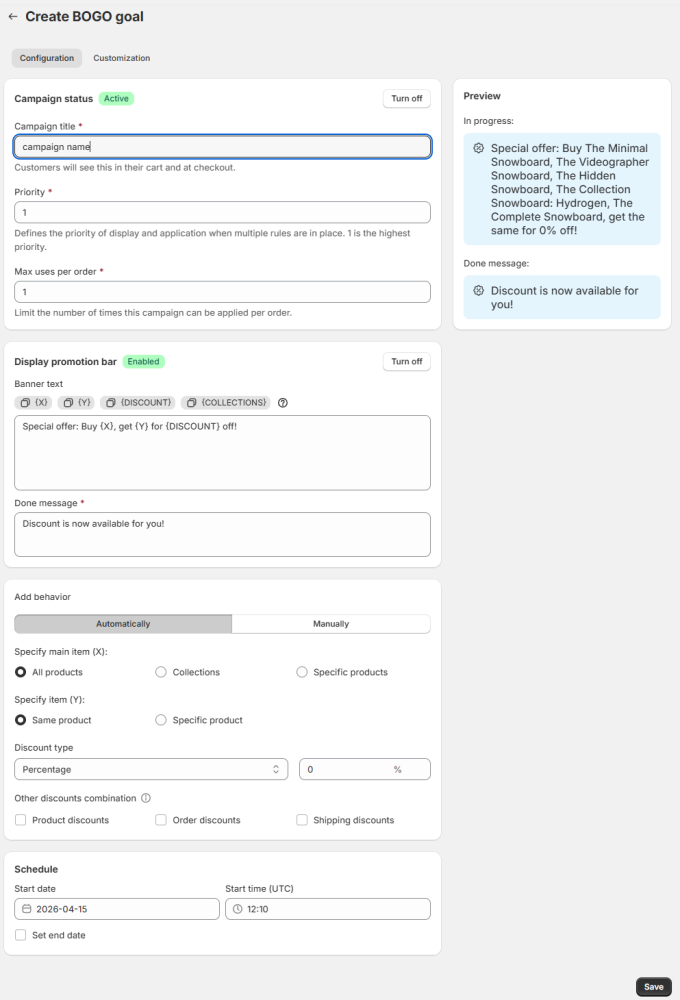
Campaign status - by default, the campaign status is turned on. You can turn it off from this setting.
Name your campaign.
The Priority field determines the order in which rules are displayed and applied when multiple rules are applicable. The rule with the highest priority (lowest number, e.g., 1 is higher than 2) is applied. On the front end, applicable bars are displayed from top to bottom according to their priority, with the highest priority rule's bar appearing first.
If two or more applicable rules have the same Priority value, the rule that was created first (the one with the lowest Rule ID) is given priority.
If the Priority field is cleared or reset by an administrator and no new value is set, the rule is automatically treated as having the lowest possible priority.
Note: Once a rule has been applied and a bar displayed, changing the order of products afterwards does not cause the system to re-evaluate all rules.
Max Uses Per Order - This setting limits how often a customer can benefit from the same rule in the same order, regardless of other discounts or combinations present. If you set the Max uses per order to N, the rule can be triggered and applied at most N times within a single order.
Example: If the rule is “Buy 2 items from Category A, get 1 free gift,” and Max Uses Per Order = 3: A customer buying 4 items from Category A will receive 2 gifts.
A customer buying 6 items will receive 3 gifts (the maximum for this rule).
Even if they buy more items, the limit of 3 gifts applies.
Note: This setting only applies to the specific rule and its usage count. It is not the same as “Item Quantity” — it controls the number of times a rule can be used per order, not how many items trigger it.
Display Promotion Bar - by default, the promotion bar is turned on. You can turn it off, and its status will change accordingly. The bar shows users what product they need to buy to qualify for a discount on other product, and displays a message once the goal is reached.
Note
Promotion banners appear one after another, so having too many active banners can take up a lot of space on your pages. To keep things clean, we recommend showing banners for different campaigns on different pages (e.g., free shipping on the cart page, free gift on product pages) or turning off banners for some campaigns.
Customize the text for both the "Banner" text and "Done" messages.
Banner text - adjust the text of your bar. Use the following variables in your messages to help customers understand what’s needed to reach the goal:
- X: The product whose purchase unlocks the discount for product Y.
- Y: The product that will receive a discount when product X is added to the order.
- DISCOUNT: The percentage or fixed amount of discount applied to product Y when product X is added to the cart.
- COLLECTIONS: Inserts collection names from rule conditions (up to 5). Works only with Collections conditions.
To the right, you’ll see the bar preview, which updates instantly to show all your changes.
You can customize the banner’s design in the Customization tab.
Here’s an example of how the promotion bar looks on the frontend:
Note
Promotion bars appear in the cart and mini cart only if the X product hasn’t been added. Once X is in the cart, the Y product is automatically added, and the "Done" message will show instead of the promotion bar.
Done message - customize the text that appears on the bar when the goal is achieved.
The Add behavior setting for Buy One, Get One (BOGO) rules determines how the discounted item is added to the customer's cart. This allows you to choose between automatic application and requiring the customer to take action.
Here’s an example of how the bar looks when the goal is achieved:
Next, specify the conditions for the rule:
Specify main item (X) - select the items that, when purchased, will unlock the discount for product Y. You can select all products, collections, or specific products.
Specify item (Y) - choose the items that will receive a discount when the main item (X) is purchased. This can be the same product or a specific product.
Discount type - select the type of discount to be applied: percentage or fixed.
Other discounts combinations - choose whether this promotion can be combined with other types of discounts, such as product discounts (applied first to individual items), order discounts (applied to revised subtotal), or shipping discounts (applied last), when applicable.
Note
- SaleBoost promotions can only be combined with other SaleBoost promotions.
- To ensure predictable and reliable promotion logic, we recommend using only SaleBoost rules. Combining them with Shopify rules may lead to conflicts or duplicate behavior.
- If product and order discounts can combine, multiple discounts may apply to the same item.
Schedule - set the start date and time for the promotion, and optionally specify an end date and time.
Customization tab
Here, you can customize the promotion bar:
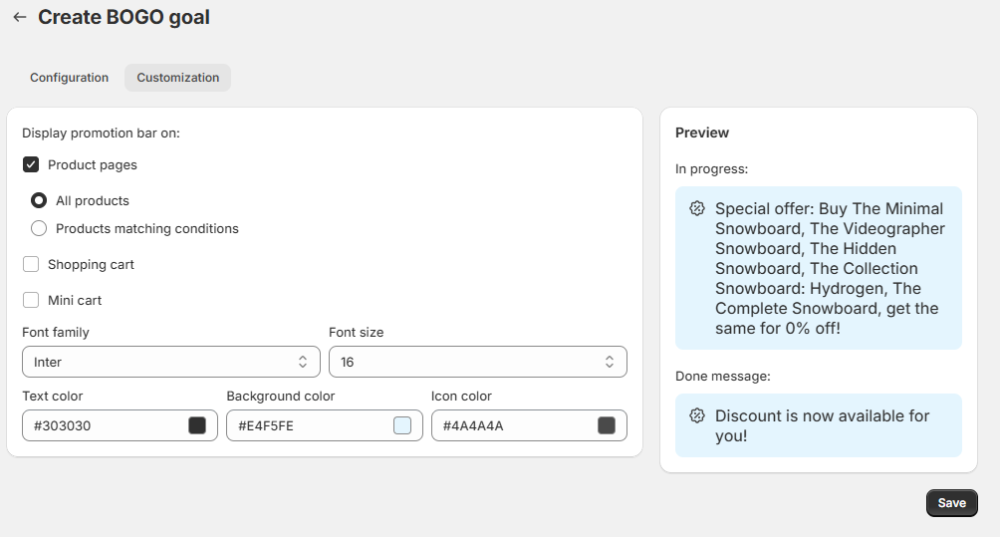
Display promotion bar on - choose where the promotion bar appears across your store:
- All product pages - show the bar on every product page
- Products matching conditions - show the bar only on product pages for items that trigger the BXGY deal.
- Shopping cart - show the bar in the cart
- Mini cart - show the bar in the mini cart
Customize bar’s colors and font.
Save changes once campaign is set.
Combo deal
The Combo Deal allows you to reward customers for purchasing a specific combination of items. Unlike standard "Buy X, Get Y" rules, this allows for complex "sets" - for example, buy a specific shirt and a specific pair of pants to unlock a discount (e.g., buy Product A + Product B → get Product C or a discount).
Configuration tab
Campaign status - by default, the campaign status is turned on. You can turn it off from this setting.
Name your campaign.
The Priority field determines the order in which rules are displayed and applied when multiple rules are applicable. The rule with the highest priority (lowest number, e.g., 1 is higher than 2) is applied. On the front end, applicable bars are displayed from top to bottom according to their priority, with the highest priority rule's bar appearing first.
If two or more applicable rules have the same Priority value, the rule that was created first (the one with the lowest Rule ID) is given priority.
If the Priority field is cleared or reset by an administrator and no new value is set, the rule is automatically treated as having the lowest possible priority.
Note: Once a rule has been applied and a bar displayed, changing the order of products afterwards does not cause the system to re-evaluate all rules. The initially applied rule stays in effect until another rule naturally becomes applicable.
Max Uses Per Order - This setting limits how often a customer can benefit from the same rule in the same order, regardless of other discounts or combinations present. If you set the Max uses per order to N, the rule can be triggered and applied at most N times within a single order.
Example: If the rule is “Buy 2 items from Category A, get 1 free gift,” and Max Uses Per Order = 3: A customer buying 4 items from Category A will receive 2 gifts.
A customer buying 6 items will receive 3 gifts (the maximum for this rule).
Even if they buy more items, the limit of 3 gifts applies.
Note: This setting only applies to the specific rule and its usage count. It is not the same as “Item Quantity” — it controls the number of times a rule can be used per order, not how many items trigger it.
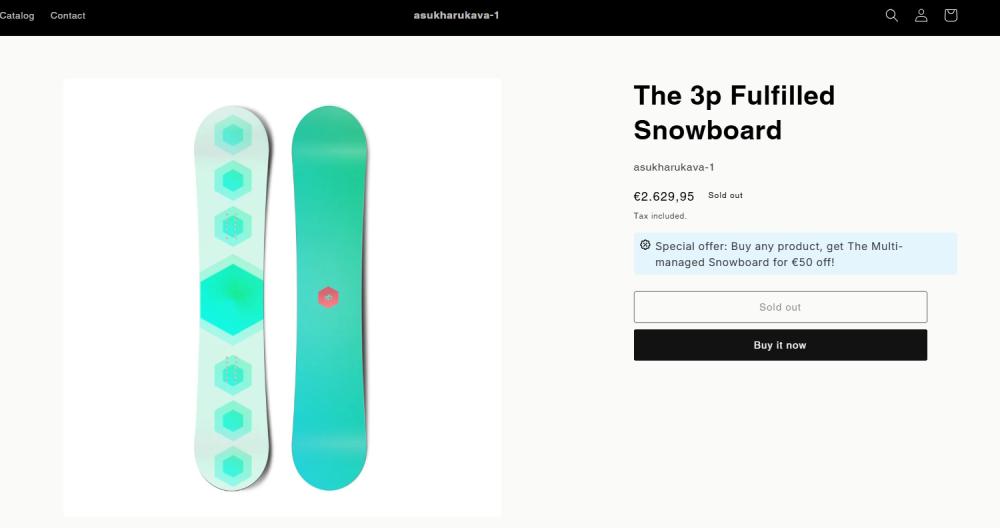
Display Promotion Bar - enabled by default. You can turn it off, and its status will update accordingly. The bar informs customers which combination of products or collections they need to purchase to unlock the offer, and what reward they will receive (discount or promo item). Once all conditions are met, the message automatically updates to confirm that the deal has been unlocked.
Note: Promotion banners appear one after another, so having too many active banners can take up a lot of space on your pages. To keep things clean, we recommend showing banners for different campaigns on different pages (e.g., free shipping on the cart page, free gift on product pages) or turning off banners for some campaigns.
Customize the text for both the "Banner" text and "Done" messages.
Banner text - adjust the text of your bar.
Default Banner text: “Special offer: Buy {PRODUCT_NAMES}, get {DISCOUNT} off! “
Use the following variables in your messages to help customers understand what’s needed to reach the goal:
Available variables:
- {PRODUCT_NAMES} - selected products (up to 5 shown)
- {COLLECTIONS} - selected collections
- {DISCOUNT} - discount value
- {ITEM} -promo item (if configured)
Note: For {PRODUCT_NAMES} and {COLLECTIONS}, a maximum of 5 items will be displayed in the promo bar if multiple selections are made.
To the right, you’ll see the bar preview, which updates instantly to show all your changes.
You can customize the banner’s design in the Customization tab.
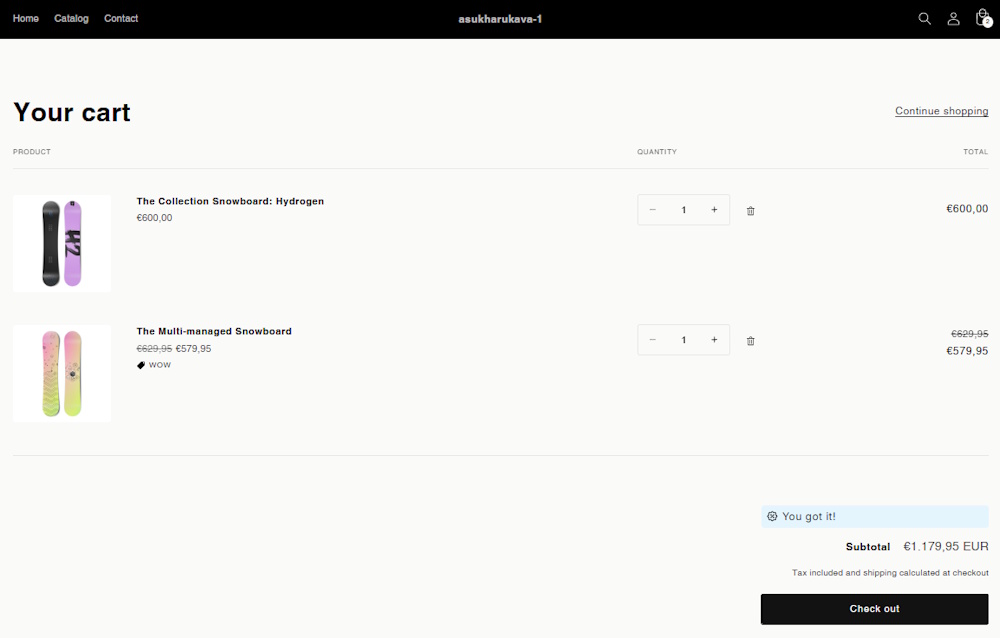
Note: The promotion bar appears in the cart and mini cart only while the required set of items has not yet been fully added. Once all conditions are met, the configured reward (discount or promo item) is applied automatically, and the Done message is shown instead of the promotion bar.
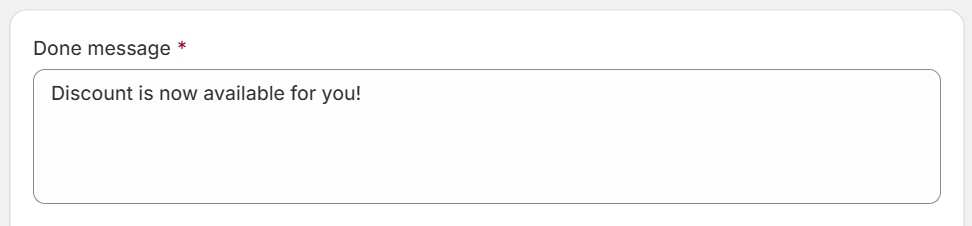
Done message - customize the text that appears on the bar when the goal is achieved
Default done message: “Deal unlocked! Enjoy your savings”
Behavior - If the promotion bar is enabled: Once the required set is completed, the bar text updates automatically, and a confirmation message is displayed in the cart and at checkout (using the Done message text). If the promotion bar is disabled: No bar is shown. Instead, a confirmation message appears in the cart and at checkout when the combo conditions are met (using the Done message text).
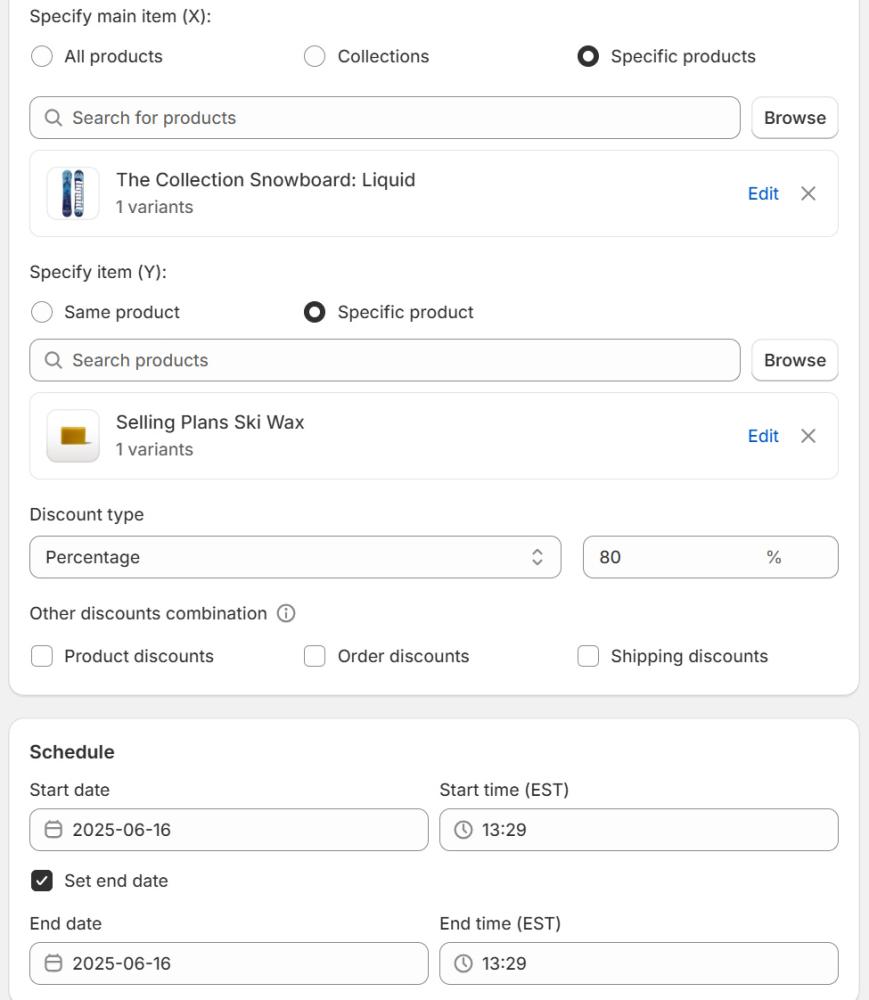
Specify set of items - define what customers must add:
- Select Product or Collection
- Find specific Product (requires a specific item to be added.) or Collection (any item(s) from a specific collection)
- Quantity - set the number of items required from that specific selection.
Click “+ Add” to include more conditions (connected with AND). All conditions must be met
You can mix and match different items. You can combine: Multiple products, Multiple collections, Product + collection.
Examples:
- Product A + Product B - triggers deal
- Any item from Collection X + Product A - triggers deal
- 2 items from Collection X - triggers deal
Select promo - choose the reward customers receive once the required set of products or collections is fully added to the cart:
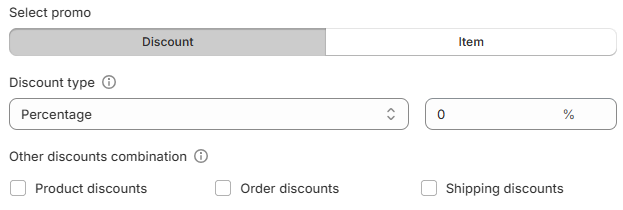
- Discount - Applies only to the items in the combo (not the entire cart)
- Percentage (default)
- Fixed amount (uses store currency)
Note: If the discount exceeds item value, the final price becomes 0.
Example: If the discount is $50 but the set only costs $40, the items become free ($0).
Note: For combos that include multiple items, the discount is applied to the total value, not to each item individually.
For example, if the deal is Buy A + B and get $50 off, the discount is distributed across A and B proportionally (as calculated by the store), rather than subtracting $50 from each item.
- Promo item (gift) - Give away a specific product. You can make this item 100% free (100% discount) or offer it at a partial discount (e.g., "Buy the set, get a Hat for 50% off").
Choose discount type for that item:
- Percentage (e.g., 100% = free)
- Fixed amount
Note: If multiple gift items are added, the discount applies to their total.
Other discounts combinations - choose whether this promotion can be combined with other types of discounts, such as product discounts (applied first to individual items), order discounts (applied to revised subtotal), or shipping discounts (applied last), when applicable.
Note
- SaleBoost promotions can only be combined with other SaleBoost promotions.
- If product and order discounts can combine, multiple discounts may apply to the same item.
Schedule - set the start date and time for the promotion, and optionally specify an end date and time.
Customization tab
Here, you can customize the promotion bar:
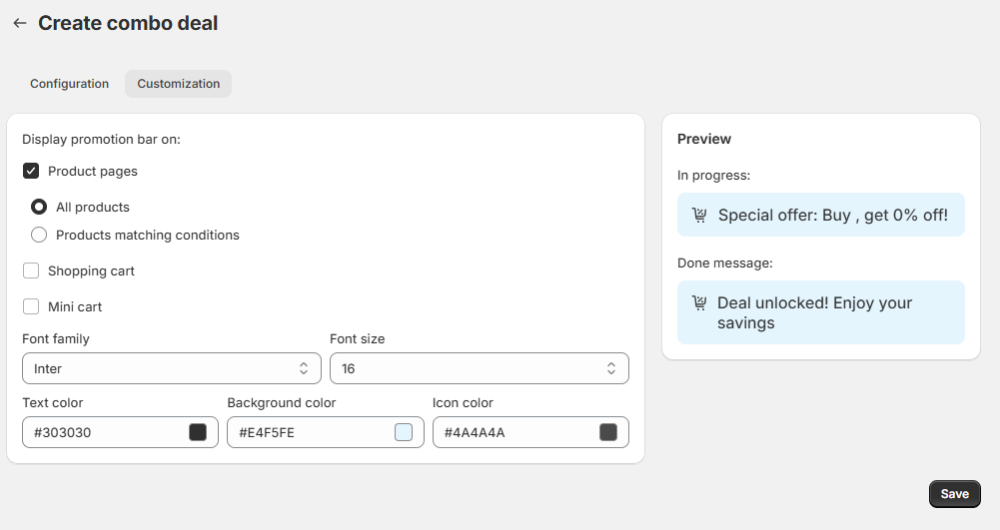
Display promotion bar on - choose where the promotion bar appears across your store:
- All product pages - show the bar on every product page
- Products matching conditions - show the bar only on product pages included in the combo deal (products that help fulfill the set)
- Shopping cart - show the bar in the cart
- Mini cart - show the bar in the mini cart
Customize the bar's colors and font.
Save changes once the campaign is set.
Countdown timer
Create urgency-driven promotions with customizable countdown timers displayed on your storefront. Go to the Countdown timer in the sidebar.
Before you start
To display timers on your store, you need to activate the countdown timer block in your theme. If it’s not activated, you’ll see a warning at the top of the page
Click Activate block to enable it in your theme settings
Once activated, you can manage your timers.
The main grid shows:
- Name - Internal name for the timer (searchable).
- Priority - Determines which timer shows up if multiple are assigned to one page.
- Status - Active and Inactive.
- Action - Edit or manage individual entries.
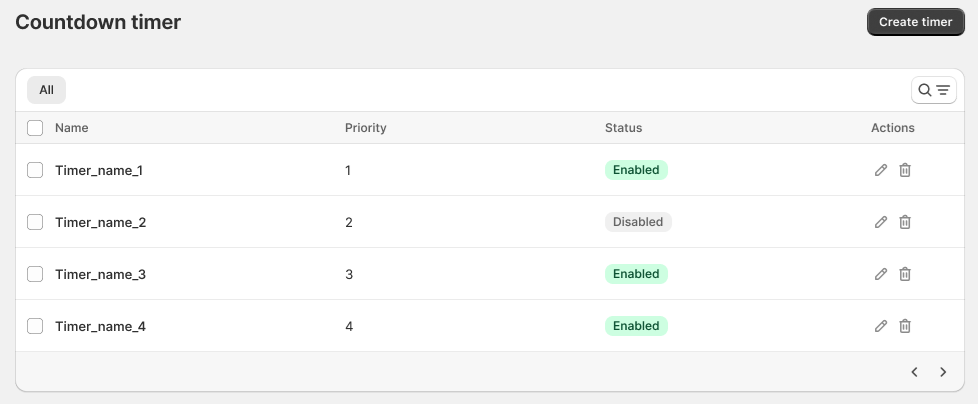
Mass Actions: Select multiple timers via checkboxes to Activate, Deactivate, or Delete them in bulk.
Click Create timer to add a new one.
Creating a timer
Click Create timer to enter the configuration tabs: Settings, Content, Appearance.
You’ll see a Preview at the top that updates in real-time as you tweak settings.
Use the top bar to Save or Discard changes.
Tab 1: Settings - This tab handles where and when your timer appears.
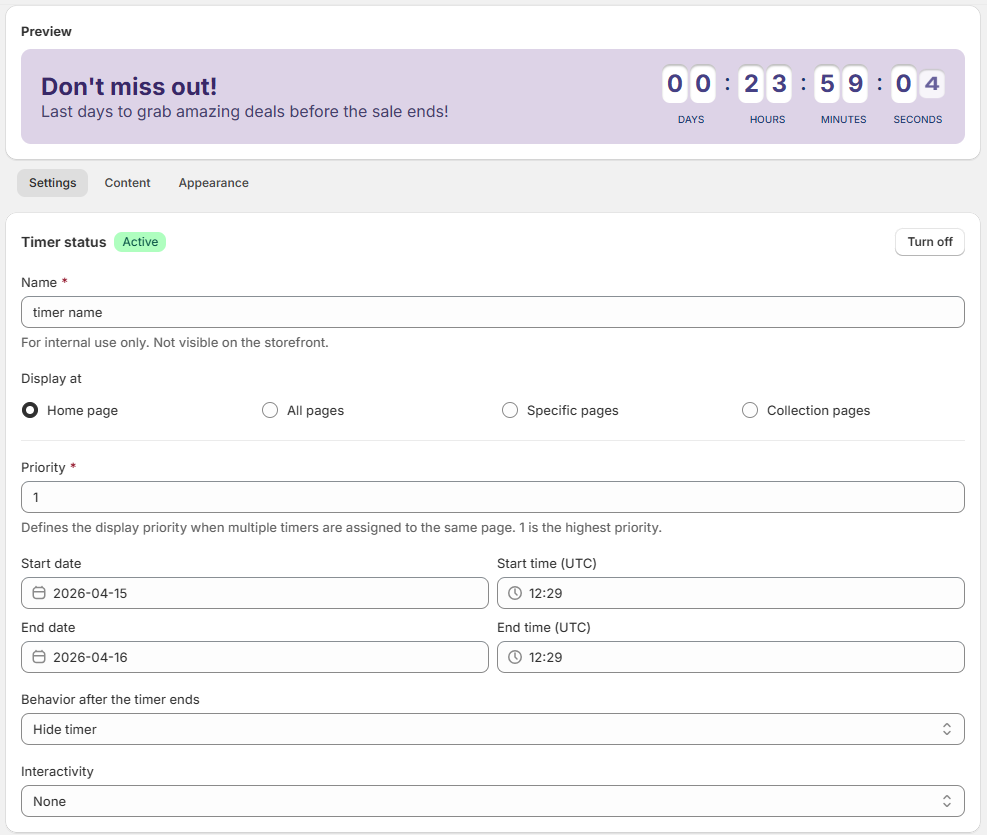
Timer status - Enable or disable (Turn off) the timer
Name - Internal label (not visible to customers)
“Display at” - Choose to show the timer on the Home page, All pages, or target Specific pages (add URLs) and Collections (browse and multi-select specific collections).
Priority - Controls which timer is shown if multiple apply to the same page (1 = highest priority; if equal, the newest timer is shown). If multiple timers match the same page, only one is shown (based on priority)
Schedule - Set start and end dates and times (UTC)
Behavior after the timer ends - choose what happens when the timer finishes: hide it, restart from the beginning, or display a custom message.
Interactivity - Decide if the timer is a static banner, or if the bar is clickable:
- None - No click action
- All timer - make the entire timer clickable and provide a URL for redirection.
- By button - add a button to the timer bar and set a URL for redirection.
After configuring, click the Save button in the Settings tab and move on to the Content tab.
Tab 2: Content - Customize what message your customers see, set the text and time units for your countdown timer:
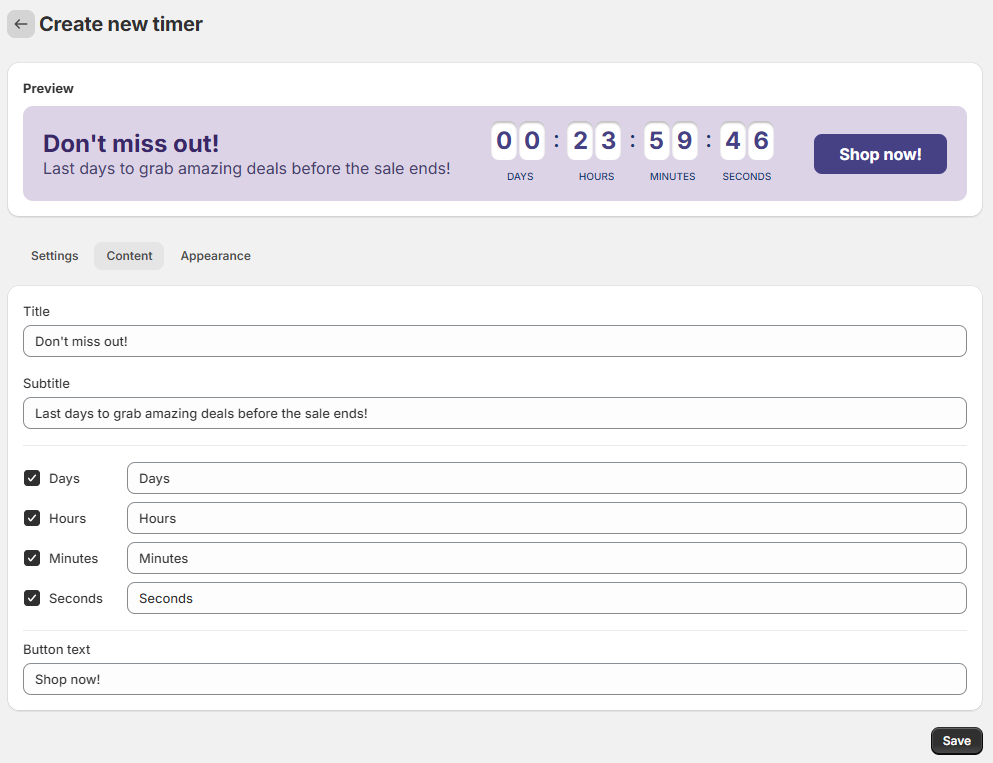
1. Title - enter the main title for the timer. You can add emojis to your text.
2. Subtitle - add a subheading for extra context. You can add emojis to your text.
3. Days, Hours, Minutes, Seconds - choose which time units to display or hide.
4. Button text - customize the text on the button (if enabled).
Once you're done, click the Save button in the Content tab and move on to the Appearance tab.
Tab 3: Appearance - Adjust the visual style. Make it look like it belongs in your store, not like a third-party plug-in.
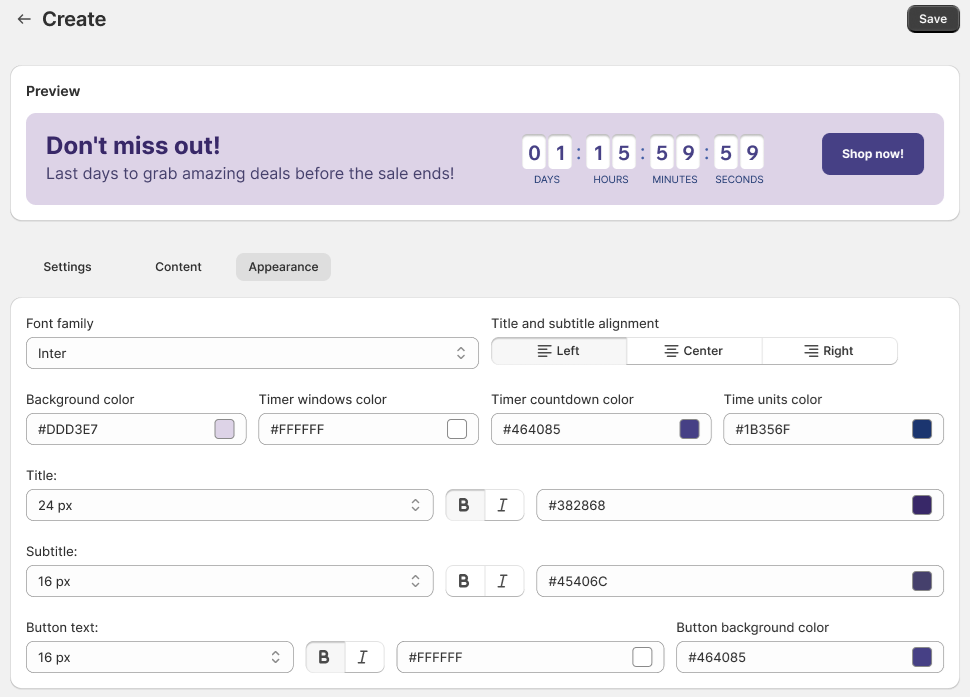
Title and subtitle alignment - Align your text Left, Center, or Right.
Font family - select a font from the dropdown list.
Granular control over fonts, sizes (10px–50px), and colors:
- Background color
- Timer windows color
- Timer countdown color
- Time units color
- Title font size
- Subtitle font size
If you enable a button in the Settings tab, you can style its background and text colors here.
- Button background color
- Button text font size
Click the Save button on the Appearance tab.
Congratulations!
You've successfully configured your first timer. Feel free to experiment with the different settings to create a timer that perfectly suits your needs.
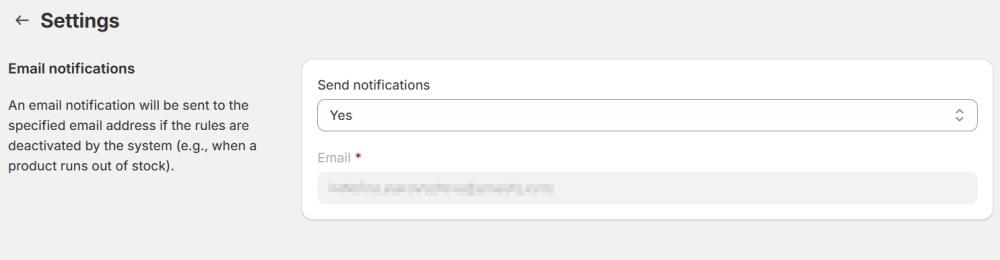
Settings
On the Settings page, you can enable email notifications when promotion campaigns are deactivated (e.g., when a product runs out of stock).
Send notifications - set to "Yes" to receive notifications on your store's email address.
Note:
To change your store's email address, go to Shopify Admin > Settings > General. Click the pencil icon next to your store name, update your email, and save.