Table of contents
- Home page and Dashboards
General information about the app. - Settings
Recommended before content generation. - Products
Generate product descriptions and metadata.- Generate Product Content in Bulk
Generate descriptions or metadata for multiple products at once. - Generate Product Content Individually
Generate descriptions or metadata for products individually.
- Generate Product Content in Bulk
- Collections
Generate collections descriptions and metadata.- Generate Collections Content in Bulk
Generate descriptions or metadata for multiple collections at once. - Generate Collections Content Individually
Generate descriptions or metadata for collections individually.
- Generate Collections Content in Bulk
- Blog Posts and Thumbnails
Generate blog posts and images for them - individually only. - Custom Prompt Templates
Save your prompts in templates and access default ones - for more precise content.- Create New Custom Prompt Template
Learn how to create a new custom prompt template. - Which Prompts to Choose and When
Explore how to choose custom prompt template. - How to use custom prompts or custom prompt template
Learn how to use custom prompt templates.
- Create New Custom Prompt Template
- History
Check content generation history and restore previous version. - Pricing
Learn how pricing is built and how to buy extra credits. - FAQ
When you install WritePilot, you’ll arrive at the app’s Home page. Here, you’ll find a quick onboarding guide, a video tutorial on how to use the app, your subscription details, and the available credits for content generation.

The Home page also features a dashboard with several charts.
Content Audit Dashboard
At the top of the page, you’ll see the Content Audit dashboard, which gives you an overview of your store’s current missing data status.
Located on the left Overall Score is a high-level indicator showing how complete and optimized your product and collection content is.
Audit Details (on the right) organized into two tabs:
- Products
- Collections
Each tab contains tiles highlighting missing or incomplete content, such as:
- Missing description
- Missing SEO title
- Missing SEO description
- Missing keywords (Products only)
- Missing Alt Text
For each tile, you’ll see a Fix button. Clicking it will automatically generate the missing content in bulk for all relevant items.
If no action is required for a specific item, the tile will display the “All set” status, indicating no missing content.
Below the audit section, you can monitor your activity and growth with analytics charts:
- Daily number of generations over the last month
- Total generations over the past 90 days.
Additionally, you’ll see the Changelog and quick-access buttons to rate the app, purchase credits, or view your plan.
Before you start generating content, we recommend specifying Settings for the application to ensure everything is configured correctly.
General Settings
Open Settings page and specify the following:
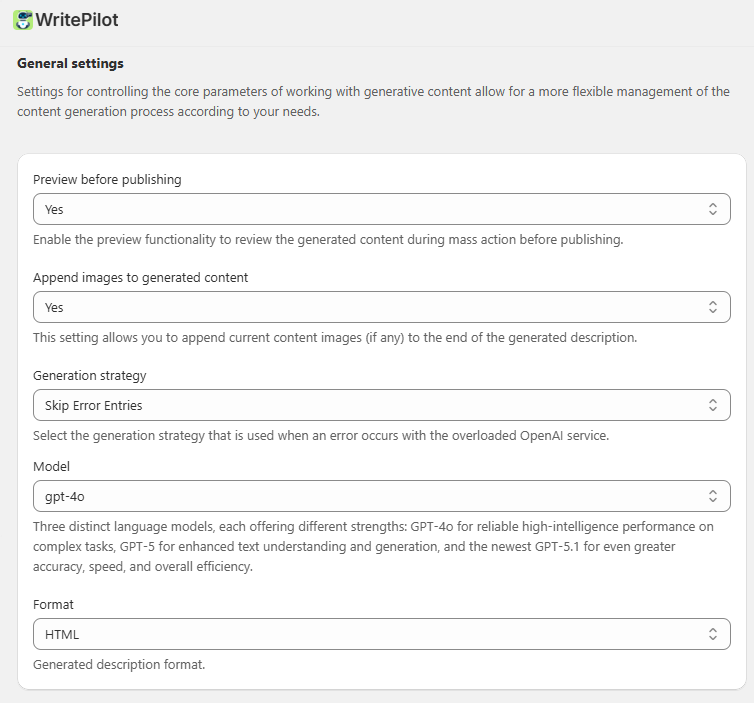
Preview before publishing - enable the preview functionality to review the generated content during mass action before publishing.
Append images to generated content - set Yes to add current content images (if any) to the end of the generated description. The option also works for description refinement - in this case, images remain in their original positions.
Generation strategy - select the generation strategy that is used when an error occurs with the overloaded OpenAI service.
Model - Three distinct language models, each offering different strengths:
- GPT-4o for reliable high-intelligence performance on complex tasks,
- GPT-5 for enhanced text understanding and generation, and the newest
- GPT-5.1 for even greater accuracy, speed, and overall efficiency.
Format - this parameter allows you to select the desired format for the generated content.
- By selecting the "HTML" option, the content generator will create text that adheres to the HTML markup language. This enables the creation of structured content, including headings, paragraphs, lists, links, images, and other web page elements.
- By selecting the "Plain text" option, the content generator will produce unformatted text without any styling or markup. This simple text format does not include styles, fonts, or external elements.
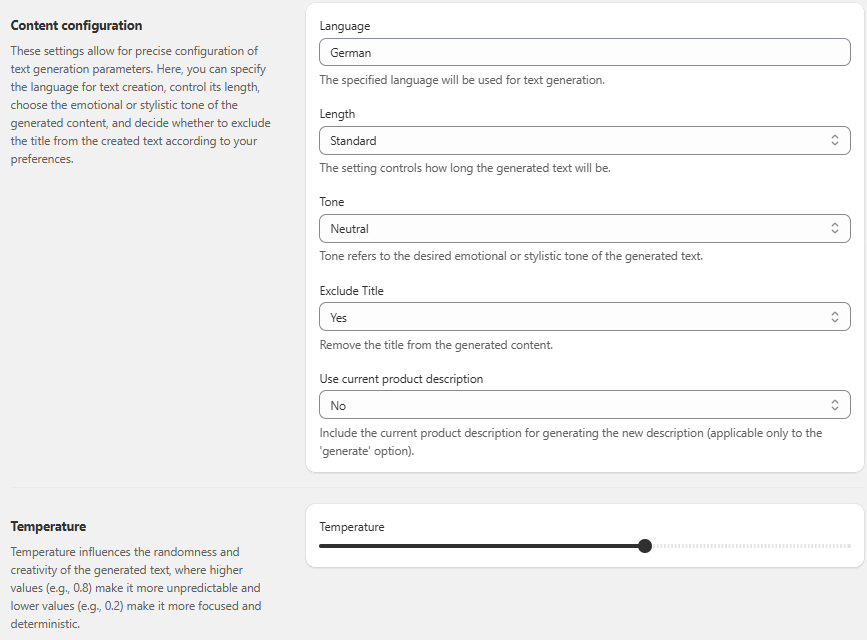
Language - specify the language used for text generation.
Length - choose the size of the generated text. It determines the number of tokens in the output generated by the model:
- Short - choosing the short length option limits the generated text to a maximum of 300 tokens.
- Standard - the standard length option allows the generated text to be up to a maximum of 600 tokens.
- Long - selecting the long length option allows for more extensive and detailed responses, with a maximum of 800 tokens.
Tone - tone refers to the desired emotional or stylistic tone of the generated text.
Exclude Title - remove the title from the generated content. This ensures that the product name doesn't duplicate in both the title and the content.
Use Current Product Description - this setting allows you to include the existing product description when generating a new one using the 'Generate' option. By enabling this feature, the AI will consider the current description as context, potentially leading to more relevant and consistent new descriptions. This is useful when you want to refine or expand upon an existing description rather than starting from scratch.
Temperature - specify the level of randomness and creativity in the generated text.
- Higher Temperature: Setting a higher temperature, such as 0.8 or 1.0, makes the output more random and creative.
- Lower Temperature: Setting a lower temperature, such as 0.2 or 0.5, makes the output more focused and deterministic
Note: For models GPT-5 and GPT-5.1, the temperature value is fixed at 1. These models do not support custom temperature settings. When one of these models is selected, the temperature control disabled.
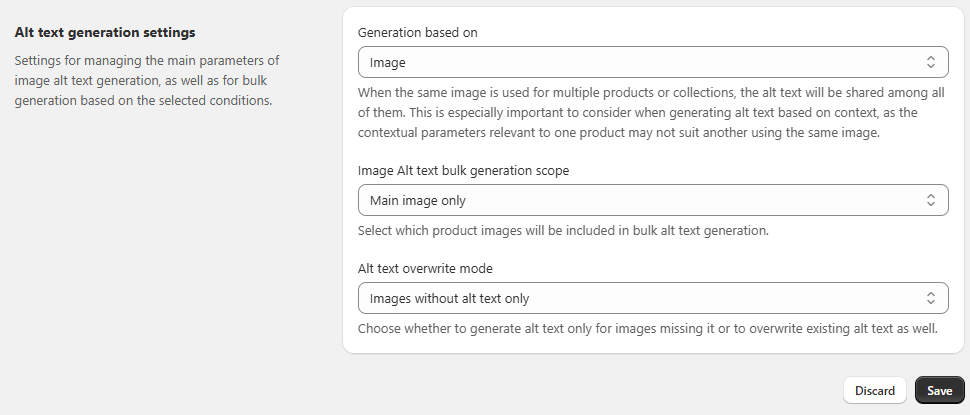
Alt Text Generation Settings - these settings control how image alt texts are created and when they are updated.
- Generation based on - choose what the system should use for generating alt texts:
- Image (default) – Generates based only on the image content.
- Context – Generates using the product or collection title, description, and (if enabled) variants or keywords.
Note: If the same image is used in multiple products or collections, the generated alt text will be shared between them. Keep this in mind when using the Context option, as it may not always fit all cases. - Image Alt text bulk generation scope - Define which images are included when running bulk generation:
- Main image only (default) – Generates alt text only for the main image.
- All images – Generates alt text for all product or collection images attached. - Alt Text Overwrite Mode - Set whether existing alt texts should be replaced during bulk generation:
- Images without alt text only (default) – Generates alt text only where it’s missing.
- All images (overwrite existing) – Replaces any existing alt text with newly generated text.
Note
These settings are the basis for the content generation, both for individual content and multiple content through the 'Generate description'/'Generate SEO' mass action. However, it is important to note that these settings can be individually modified for specific object if custom adjustments are required.
Save changes. After configuring the settings, switch to the necessary object grid, where you can generate content individually or in bulk.
Note
The app uses credits for content generation: 1 credit = 1 description or SEO item. For bulk SEO generation, 2 credits are needed for each SEO item (1 for the SEO title and 1 for the SEO description).
Products content generation
Generate Product Content in Bulk
Open Products page.

The grid provides sorting, searching, and filtering by product name, status or also by Missing AI-Generated Content. This search and filtering option helps you quickly identify products that are missing AI-generated content.
In addition to these controls, the Products page now includes a Content Audit bar at the top of the grid. This bar provides a clear overview of missing product content, including:
- Product descriptions
- SEO titles
- SEO descriptions
- Keywords
- Alt Texts
Each content type is shown as a separate tile.
If content is missing, a Fix button is displayed. Clicking Fix will automatically generate the missing content in bulk for all applicable products.
You can filter by Title, Description, SEO Title, and SEO Description to see products where these fields have not been generated and published by the application. For example, filtering by "Title" will show products with no title or titles that were not created using the AI generation feature.
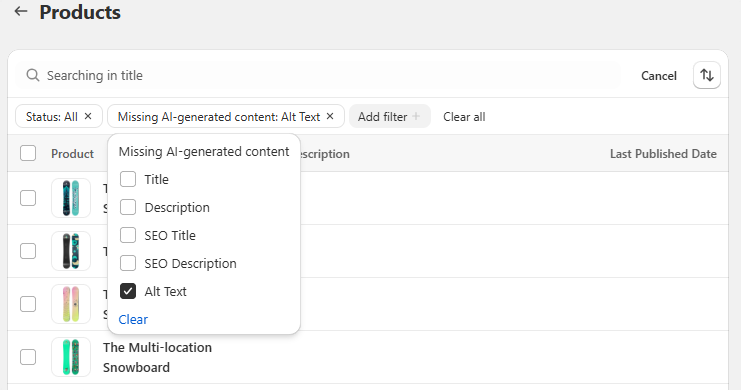
This allows you to easily pinpoint products needing AI content generation.
Note that for users on the free plan (where SEO generation is not available), all products and categories will be displayed as none would have been generated by the application.
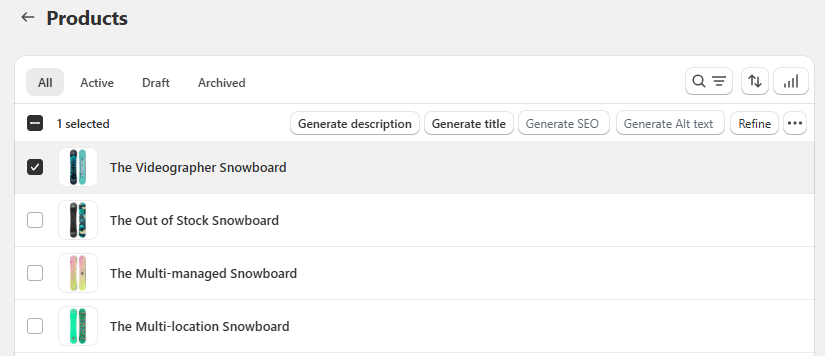
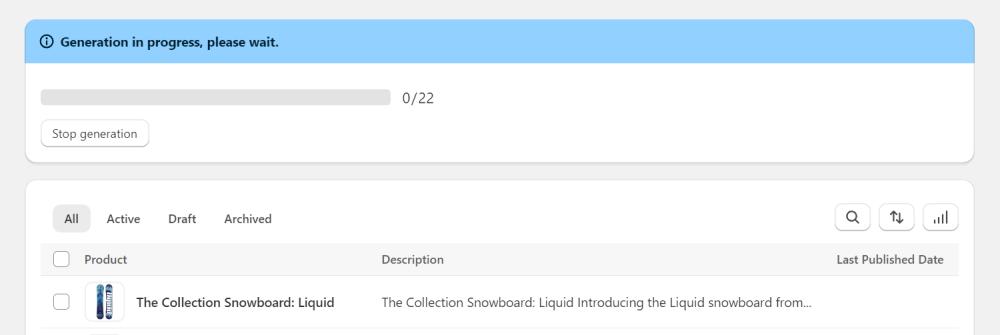
Generate content for products in bulk by selecting items and clicking the desired action:
- Generate Description - create descriptions for selected products;
- Generate Title - create title for selected products;
- Generate SEO - produce meta titles and descriptions (available from Basic plan);
- Generate Alt text - the app generates Alt Text for your product images;
- Refine - improve the grammar, syntax, and wording of your existing product descriptions;
- … > Generate descriptions with custom prompt - use this option to provide your specific instructions to ChatGPT for product description generation - either add your own prompt manually or select custom prompt template from the dropdown.
When using a custom prompt, make sure to use the all.product.data variable. Learn more.
Note
Here’s how credit usage is calculated for generation:
1 product description = 1 credit
1 SEO = 2 credits (1 for SEO title and 1 for SEO description)
1 Image alt text = 1 credit
1 refine = 2 credits
Stop generation - click the button to instantly cease mass generation whenever required.
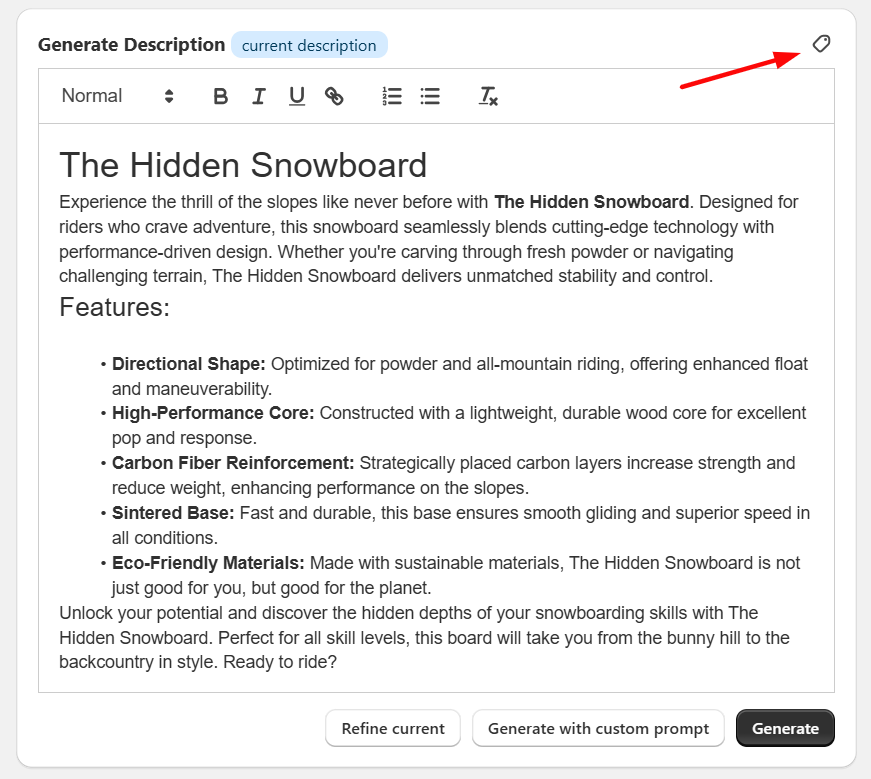
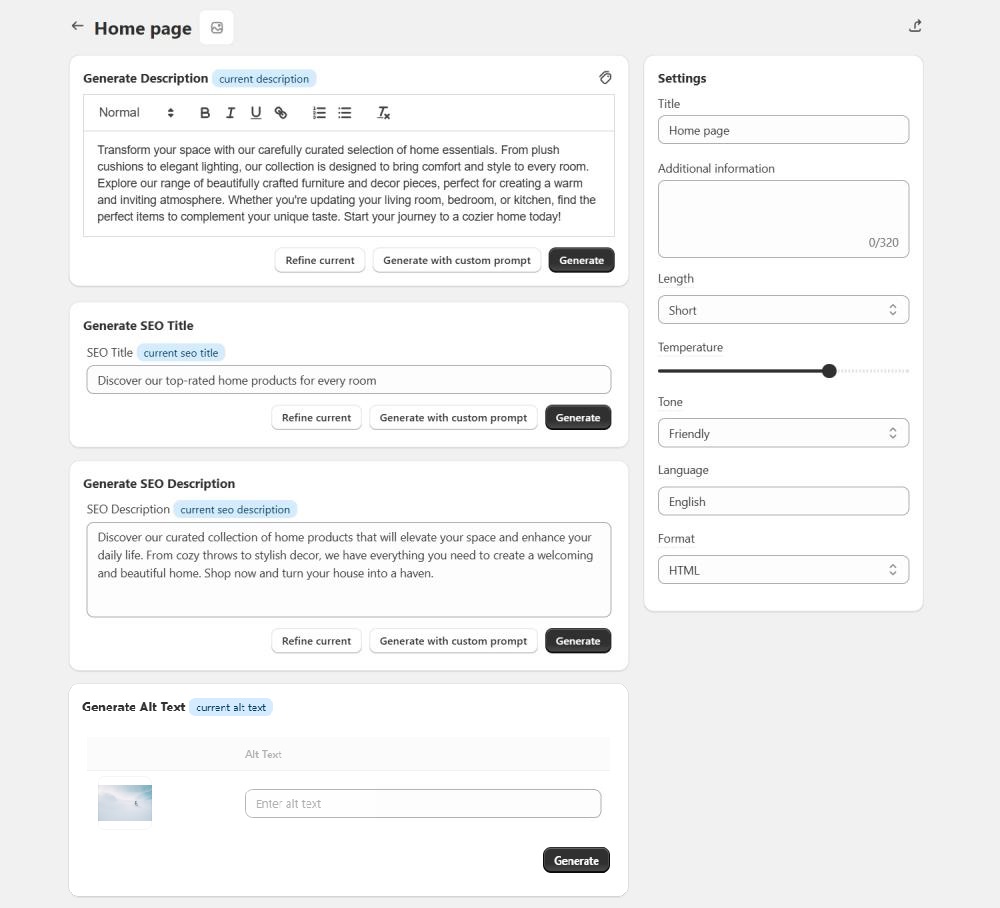
Generate Product Content Individually
You can also generate content for each product individually for a more tailored experience.
For it, open a product you want to generate content for.
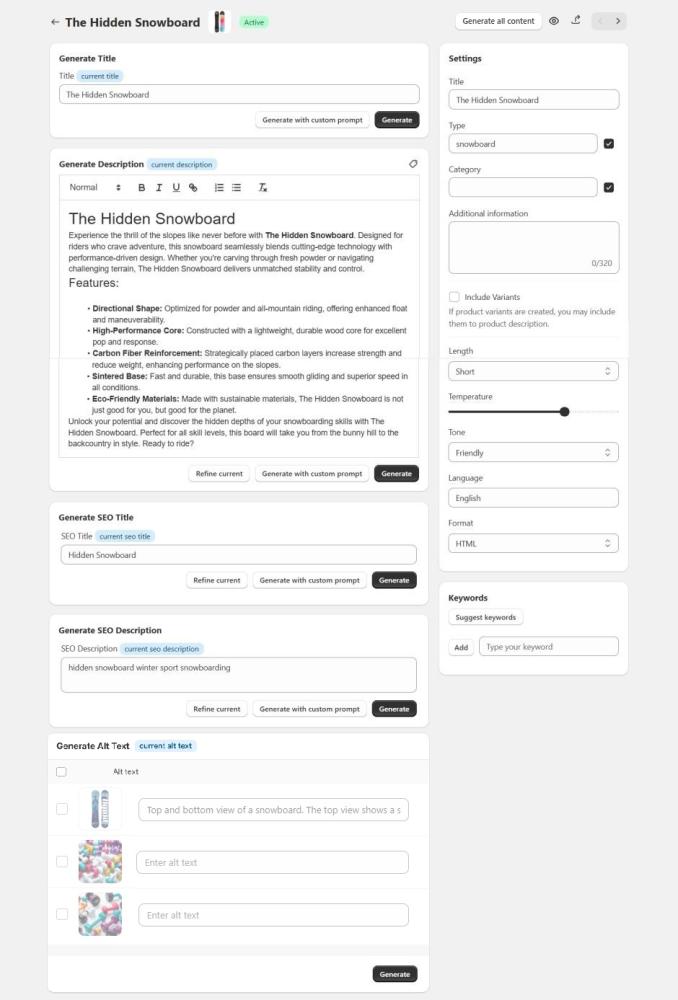
You can generate product titles, descriptions, SEO titles, and SEO descriptions using the Generate or Generate with custom prompt buttons. The latter allows you to create custom descriptions with tailored prompts.
When using a custom prompt, make sure to use the all.product.data variable. Learn more.
Use the Generate All Content button to generate AI content for all four key fields at once: product title, product description, SEO title, and SEO description. Clicking this button will trigger the generation for all these fields.
Note: Using the feature will consume credits based on the total number of content units generated in this single action. This provides a convenient way to quickly populate all essential content fields for a product.
If you already have a description or SEO data, simply use the Refine current button to improve the grammar, syntax, and wording of your existing description, SEO title, and SEO description.
If you want ChatGPT to consider the current product description when generating a new one (applicable only to the ‘Generate’ option in the Generate Description section), enable label. If you prefer ChatGPT to generate it from scratch, leave it disabled.
Note
This feature works differently from the "Refine" option. When generating a description with a label on, ChatGPT uses all the product-specific settings you’ve provided — such as keywords, title, category — and the information from the current description to create a new description. In contrast, the "Refine" option simply improves the grammar, syntax, and wording of your existing description.
Note
Here’s how credit usage is calculated for generation:1 product title = 1 credit
1 product description = 1 credit
1 SEO title = 1 credit
1 SEO description = 1 credit
1 Image alt text = 1 credit
1 refine = 2 credits
Generate Alt Text - create alt texts for your product images.
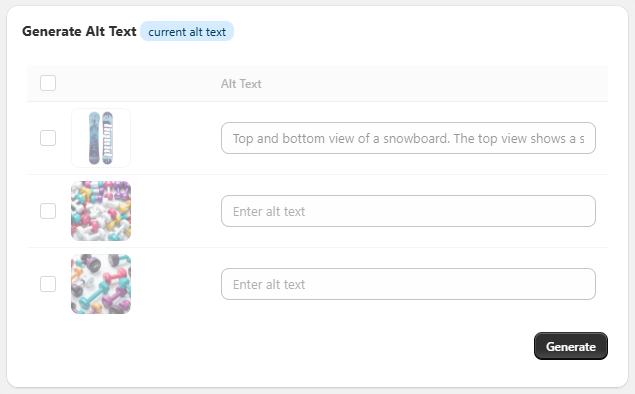
- Use the checkboxes to select specific images or the top checkbox to select all images (across all pages).
- You can edit or manually add alt text directly in the input field next to each image.
Click Generate to create alt texts for the selected images.
Note: After generation, generated alt texts are saved automatically and can be edited anytime. All generations are recorded in History, where you can view or restore previous versions (if available).
In the right column, you can customize specific product details such as Title, Type, and Category. These details help the AI generate accurate descriptions. You can also add Additional information and specify Keywords, either from a suggested list or your own. If available, you can Include product variants. Additionally, you can set the Length, Temperature, Tone, Language, and Format of the generated text.
Note
Product-specific settings (Products page) take priority over general settings (Settings page), allowing you to adjust parameters for each item as needed.
Save changes to publish.
Note
All published content remains saved even after uninstalling the app.
Collections content generation
Generate Collections Content in Bulk
Open the Collections page and use the search bar to find the collection you want to generate content for. Search results are based on matches in the collection’s title and description. Also Missing AI-Generated Content filter allows you to easily find collections that are missing AI-generated content.
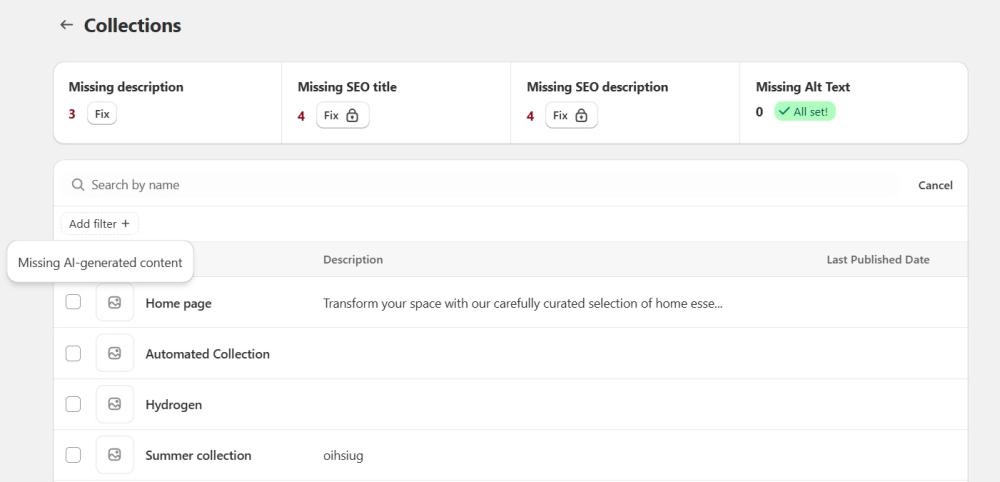
In addition to these controls, the Collections page now includes a Content Audit bar at the top of the grid. This bar provides a clear overview of missing collection content, including:
- Collection description
- SEO title
- SEO descriptions
- Alt Texts
Each content type is shown as a separate tile.
If content is missing, a Fix button is displayed. Clicking Fix will automatically generate the missing content in bulk for all applicable collections.
You can filter by Description, SEO Title, and SEO Description to view collections where these fields have not been generated and published by the application. This helps you quickly identify collections that need AI content generation.
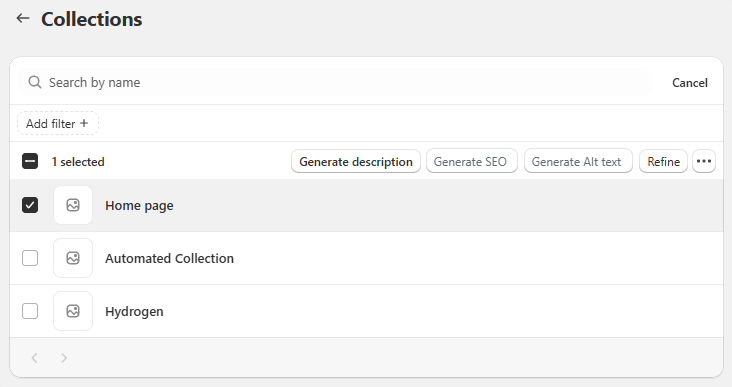
To generate content in bulk, select collections and click the desired action: Generate Description, Generate SEO, Generate Alt text or Refine. To use your custom instructions to ChatGPT, click … > Generate with Custom Prompt and either add your own prompt manually or select custom prompt template from the dropdown.
Generate Collections Content Individually
On the collection customization page, you can enter additional information and customize settings for content generation. If you don't specify these settings, the general settings from the Settings section will be used.
With the application, you can generate and refine the following data for collections:
- Content;
- SEO title;
- SEO description.
Note
Here’s how credit usage is calculated for generation:
1 collection description = 1 credit
1 SEO title = 1 credit
1 SEO description = 1 credit
1 Image alt text = 1 credit
If you want ChatGPT to consider the current collection description when generating a new one, enable the label (applicable only to the ‘Generate’ option in the Generate Content section). If you prefer ChatGPT to generate it from scratch, leave it disabled.
Click Generate with custom prompt to provide specific instructions to ChatGPT for tailored content. In the dialog window, enter custom instructions or select an in-built prompt template from the dropdown.
Generate Alt Text - create alt text for your collection image.
You can edit or manually add alt text directly in the input field next to each image.
Click Generate to create alt texts for the selected images.
Note: After generation, generated alt texts are saved automatically and can be edited anytime. All generations are recorded in History, where you can view or restore previous versions (if available).
Blog Posts and Thumbnails Generation
Go to the Blogs page and select the blog where you’d like to create a post.
Note
A blog page is needed to publish your articles. If you don’t have any Blog pages yet, you can create it by clicking the Create Blog button. You’ll be redirected to Shopify’s Blog settings, where you can add the blog title, SEO details, manage comments, and select a theme template. Save your changes, then return to the app.
When the blog page is selected, click Create Post. This will redirect you to Shopify’s Blog settings, where you can add the post title, an excerpt (post summary), SEO details, visibility settings, a featured image, and other options. Save changes.
Return to the app to complete your post setup (Blogs > open blog page > open newly created blog post).
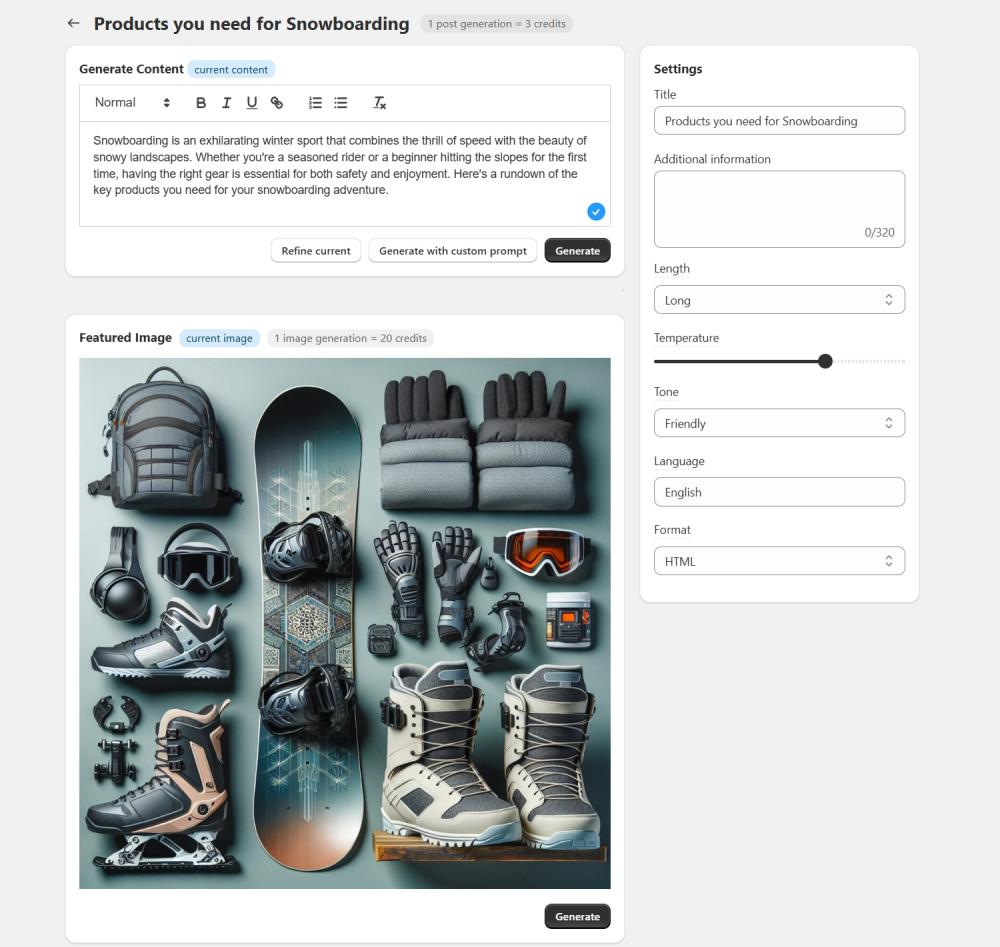
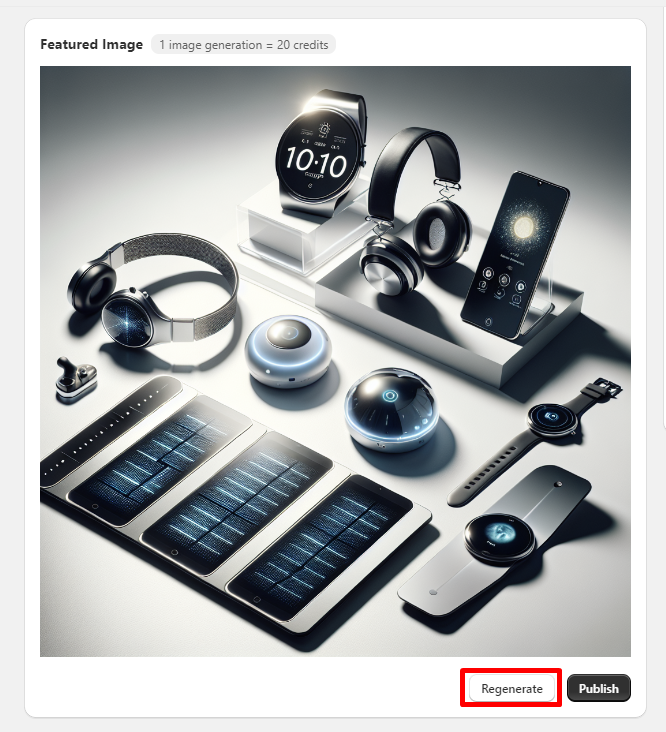
Here, you can Generate blog post content automatically or, to add your own instructions, click Generate with custom prompt and enter your prompt. You can also Refine current content or Generate a featured image for the blog post.
If you're not satisfied with the result, simply click Regenerate or Regenerate with custom prompt to try again. Save changes to publish them.

Note
Here’s how credit usage is calculated for generation:
1 post generation = 3 credits
1 refine = 6 credits
1 image generation = 20 credits.
Custom Prompt Templates
Create New Custom Prompt Template
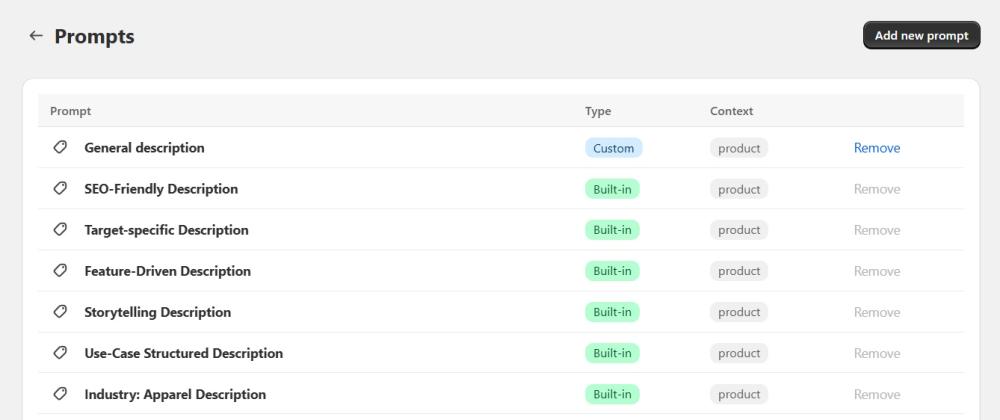
If you prefer using custom prompts for content generation, you can save frequently used prompts as templates to easily reuse them or use built-in ones.
Open Prompts. If you don’t see Prompts in the navigation menu, click View more.
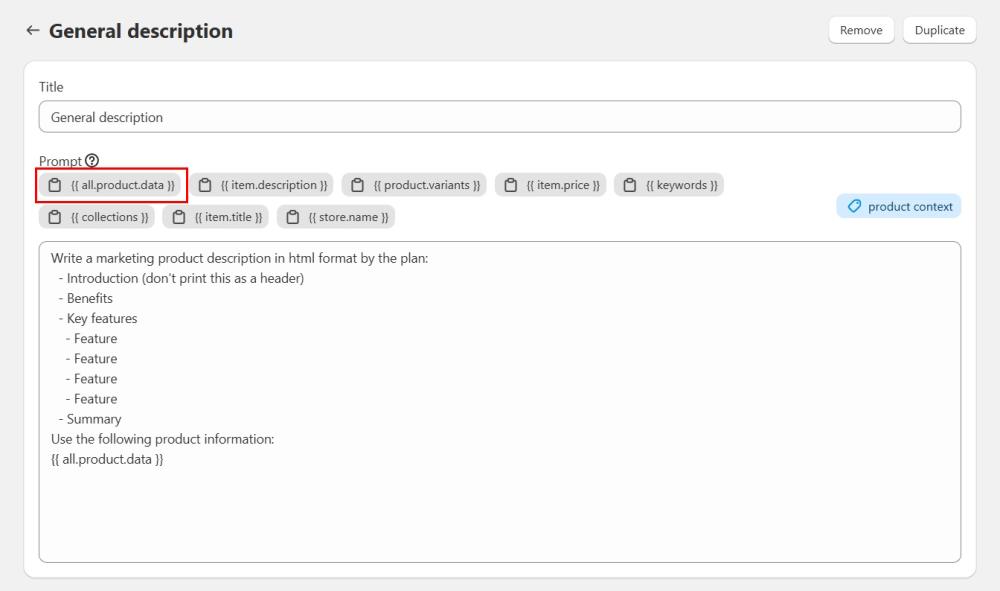
To create a new template, simply click the Add new prompt button, fill in the details, and write your prompt. You can specify the text structure, the type of content you want, key information to include, and any other details you want the AI to consider.
Be sure to use the all.product.data variable — it pulls information about your product directly from your product settings.
You can also use additional variables to make your prompt more specific (not all of these variables are available on all instances):
- item.description – includes context from your current product description (first 400 characters).
- product.variants – adds information about product variants.
- item.title – provides the product title for the AI to incorporate.
- store.name – includes your store’s name in the prompt.
- item.price – adds the product’s price to the context.
- keywords – helps AI generate and use relevant, popular keywords.
- collections – adds information about the collection the product belongs to.
Need ideas for custom prompts? Check out our blog post for inspiration!
Note
Built-in prompt templates are not editable. Please use the Duplicate function to create a new template and make the necessary changes.
Which Prompts to Choose and When
Depending on your goals, you can use the built-in templates or create custom ones. For example, you might want an SEO-friendly product description, a version tailored to a specific audience, or a description that combines both. Choose or customize prompts based on what fits your needs best.
How to use custom prompts or custom prompt template
1. Go to Products (or any other resource you want to generate content for).
2. Select the item you want to work with.
3. Click Generate with Custom Prompt.
A popup window will appear. You can either:
- Type your custom prompt directly, or
- Click the dropdown under Prompt Template to choose one of built-in or saved custom prompt templates.
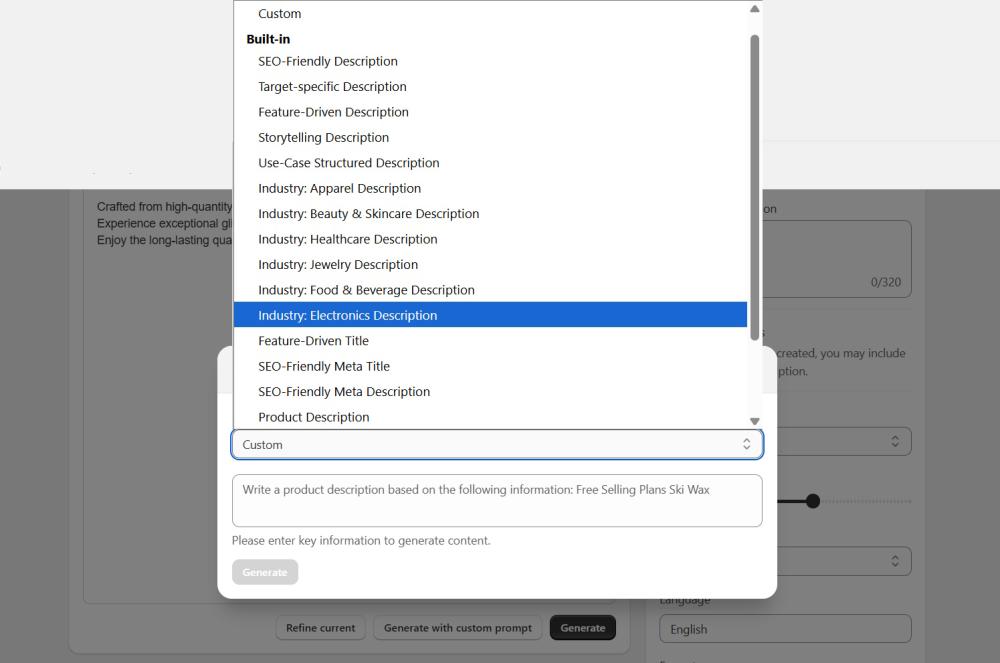
4. Once ready, click the Generate button to create the content.
History
If you want to restore the original content or revert to a previous version, simply go to the History page.
On the History page, you can view a timeline of your generation history. If you don’t see History in the navigation menu, click View more.
The search is conducted based on the generated content rather than the object for which the generation was performed. The history grid is sorted into Generation history and Published history. It allows you to effortlessly revert all publications back to their original versions. You can also filter by date for quicker access.
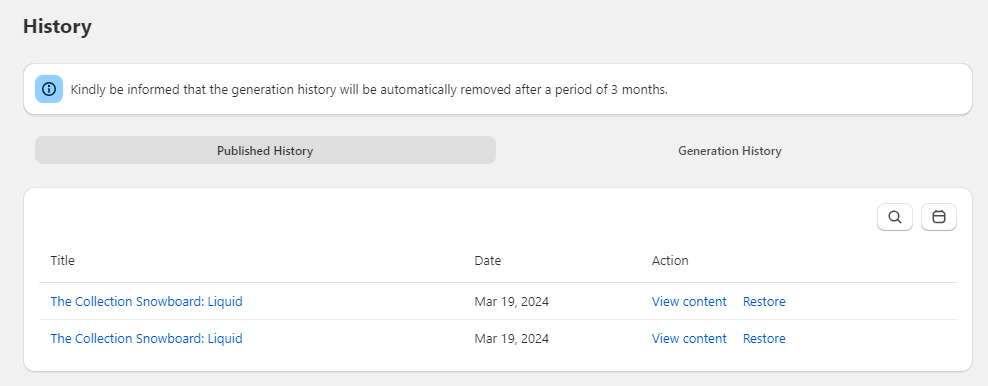
View content - click the link to view original and generated content.
Restore - click the link to recover previous versions of any content if needed.
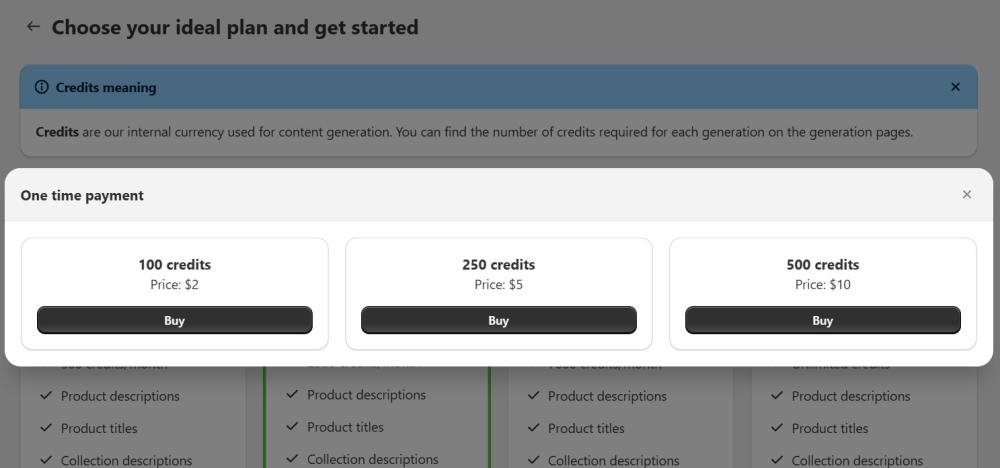
Buy extra credits for content generation
If you need more credits to create content beyond your current plan, you can easily purchase extra credits in the app.
To do this, go to Pricing, click the link to top up 100 credits for just $2 in your pricing plan tab. Choose from 100, 250, or 500 credits based on your needs, and click the Buy button.