General Settings Configure general settings, including price display, duration, markets and B2B catalogs price calculation, block rendering, text and design configuration.
Products Check the products and their prices on all assigned markets and catalogs, and customize each product price settings if needed.
Price History View the history of product price changes.
Dashboard View the dashboard of daily and monthly product price changes.
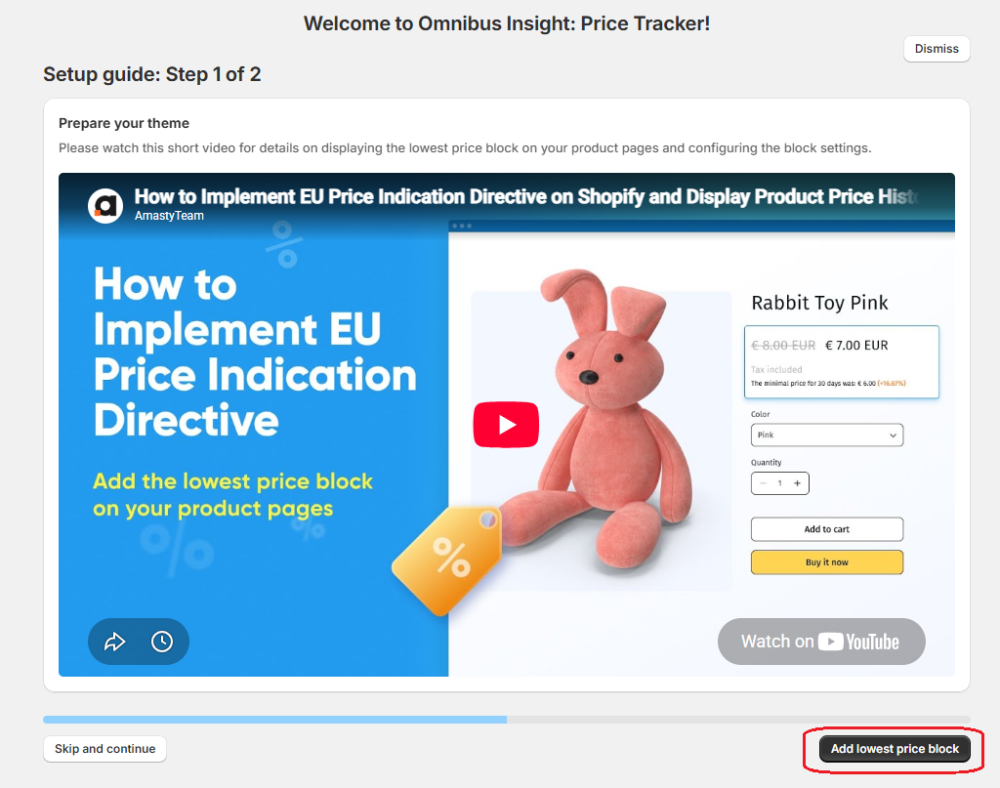
After installation, you’ll land to the Pricing page to choose a subscription plan. Next, you’ll go through a brief onboarding process. There you’ll find a detailed video guide and quick access buttons to “Add the lowest price block” to your Theme and sync your products. You can skip these steps during onboarding and complete them later from the app interface.
Note: Both steps theme customization and product syncing are required for the app to collect product data and display the lowest price on product pages. The syncing process may take a few minutes.
Initial Setup
Add the Lowest Price Block to Your Theme
To add the “Lowest price” block to your theme, click the “Add Lowest Price Block” button during onboarding.
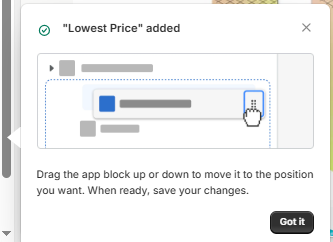
This will automatically take you to your theme's customization page and add the Lowest Price block to your product page template.
You'll see a notification confirming the block has been added to the end of the list of page elements.
Note: Some themes don’t support adding new snippets or blocks. If you encounter this, there’s a workaround to bypass the restrictions. Please refer to the Troubleshooting section at the end of this guide for more details.
The newly added block will show up in the sidebar.
Arrange its placement using drag-and-drop, positioning it where you want to display the "Lowest price" (for example, under the main product price).
Once you've positioned the block, click the "Save" button at the top right of the page. The changes will immediately be applied to all your product pages.
Return to the onboarding process to continue with the next step, which is synchronizing your products.
If the Lowest Price block is not yet connected to your store theme, the app will not work.
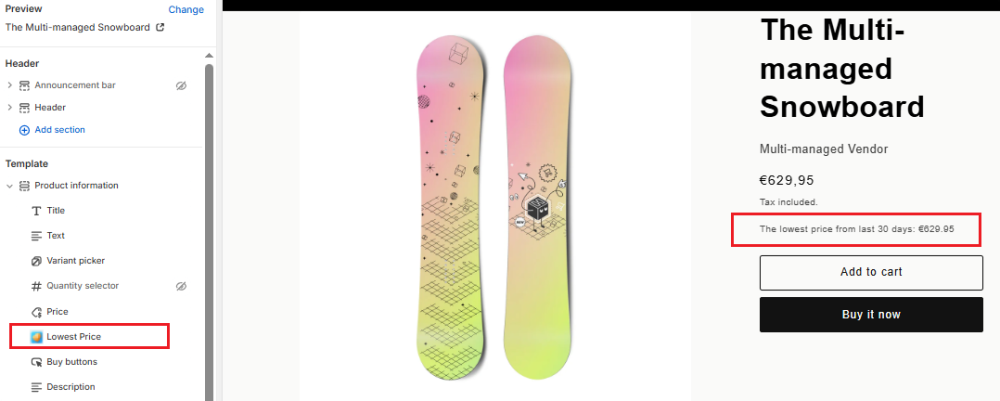
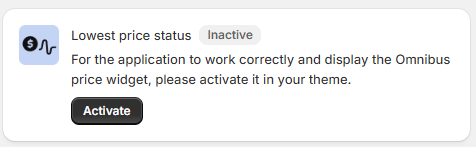
If you did not complete the setup during onboarding, you can activate the Lowest Price block at any time from the app's homepage. On the app's homepage, you will see an "App Status" bar. This bar indicates whether the lowest price block is currently active in your store.
If the status is not active, an "Activate" button will be available. Click this button to be automatically redirected to your theme's product page customization page.
Once on the customization page, the Lowest Price block will be automatically added to the list of elements. Simply drag and drop the block to your preferred position on the product page (e.g., under the main price).
After placing the block, click "Save". The status bar on the app's homepage will now show as "Active," confirming that the app is working correctly and the lowest price block is visible to your customers.
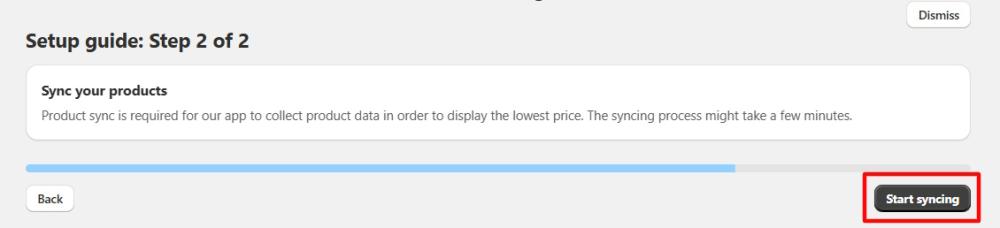
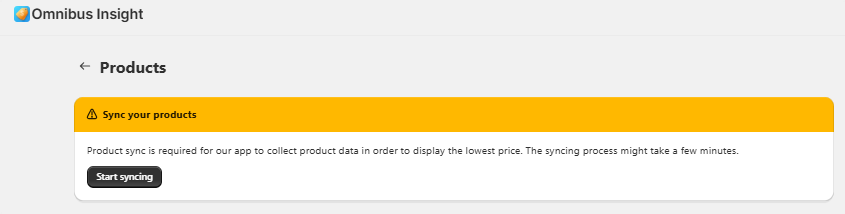
Sync Your Products
Once you've finished configuring the block, return to the Omnibus Insight app to synchronize the application with your products.
Open the Products page and click Start syncing button. Congratulations, the initial setup of the application is now complete!
General Settings
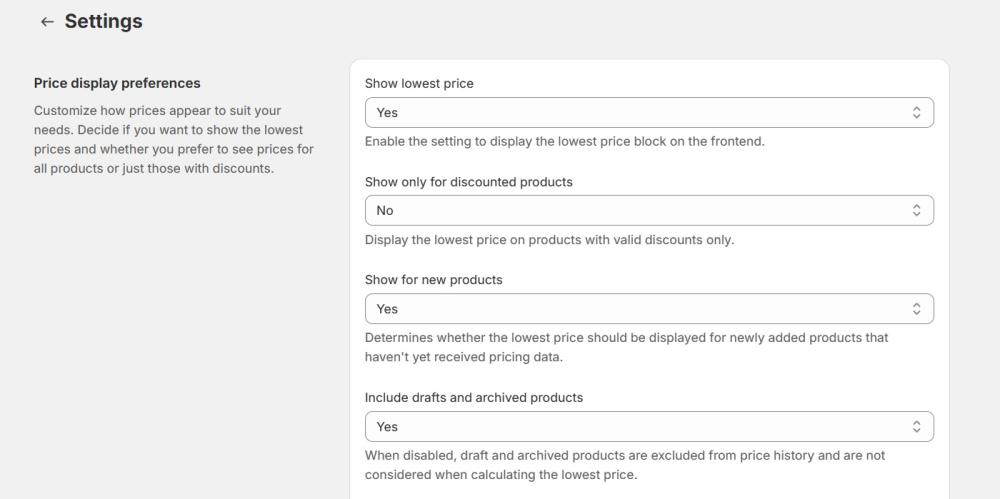
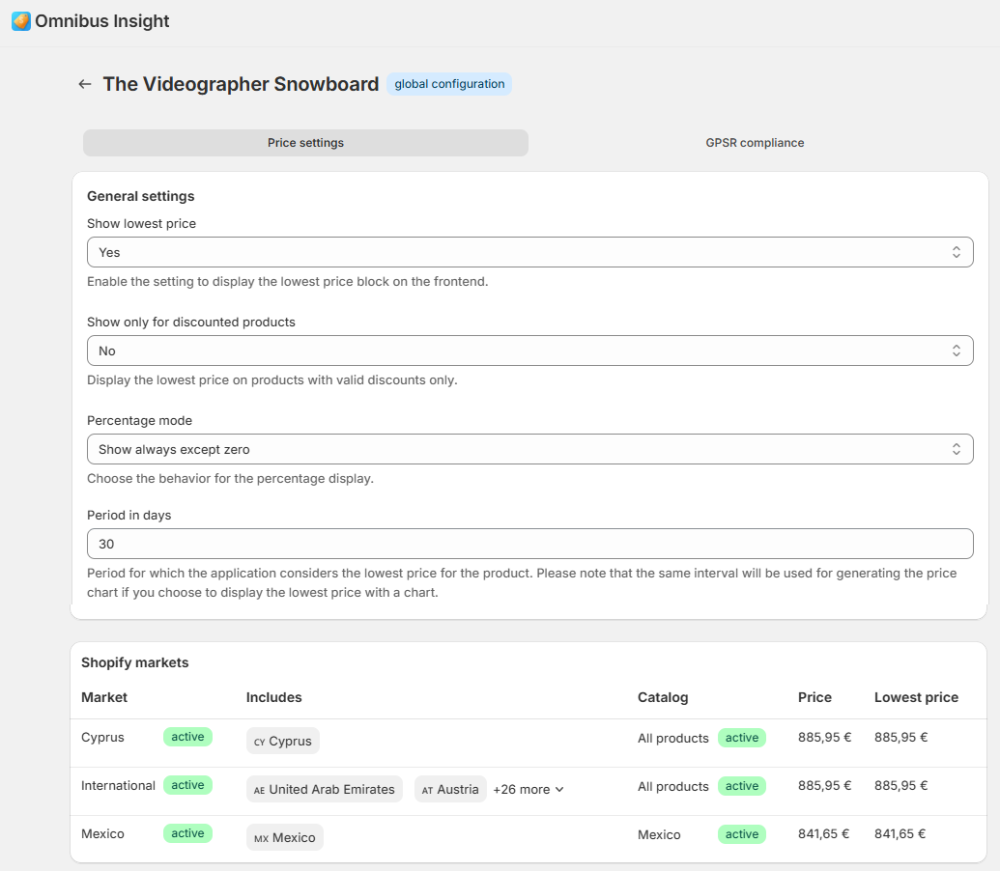
Price display preferences - customize how prices appear to suit your needs. Decide if you want to show the lowest prices and whether you prefer to see prices for all products or just those with discounts:
Show lowest price - enable the setting to display the lowest price block on the frontend.
Note: Please note that the block will only be displayed after it has been added to templates.
Show only for discounted products - display the lowest price on products with valid discounts only.
Yes: Display the lowest price only on products with valid discounts.
No: Display the lowest price on all applicable products.
If "Show only for discounted products" is set to "No," the following option becomes available:
Show for new products:
Yes: The lowest price will be displayed for newly added products (including duplicated ones). For these products, the current price will be shown as the lowest price until historical pricing data becomes available.
No: The lowest price widget will not be displayed for newly added products (including duplicated ones) until they have established pricing history.
Include drafts and archived products - set to No to exclude the price from being recorded in the lowest price history when the product is in draft or archived status. For example, if a product was previously priced at $3, archived, then updated to $1, and later published at $4, the lowest price block will show $3. The $1 price doesn’t count because it was during the archived state.
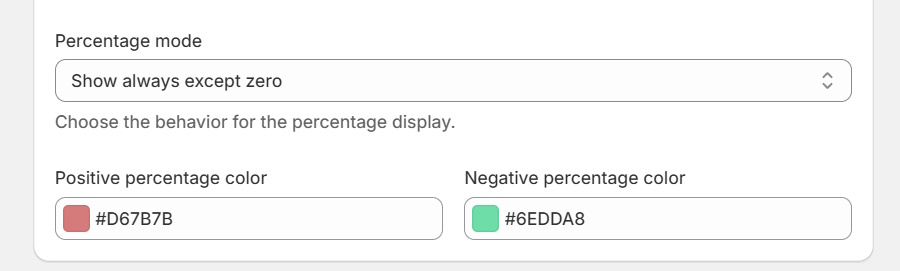
Percentage mode - choose the behavior for the percentage display.
Options:
Show always except zero
Never show percentages
Show only when positive
Show only when negative
Positive percentage color (available when ‘Show always except zero’ and ‘Show only when positive’ is selected) - choose the color for positive percentages in the lowest price block.
Negative percentage color (available when ‘Show always except zero’ and ‘Show only when negative’ is selected) - choose the color for negative percentages in the lowest price block.
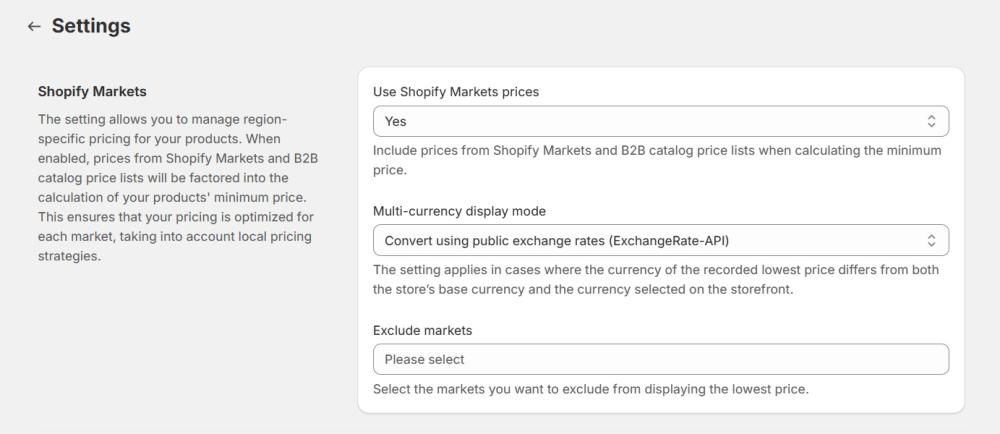
Shopify Markets - enable this setting to integrate your Shopify Markets and B2B catalog price lists into the calculation of your product's minimum price:
No: The application will calculate the minimum price based solely on your store's primary price list.
Yes: The application will regularly sync with your Shopify Markets and B2B catalog price lists to gather the most up-to-date pricing, including any market- or catalog-specific discounts. This means that the lowest price for each market or catalog will be determined independently, without referencing other markets or catalogs. Note: Marketplace syncing is hourly. Changes to market status, catalog status, or product pricing will reflect within 60 minutes, so if you don’t see changes immediately, please wait a bit.
Note: When the global "Use Shopify Markets prices" setting is enabled, a new section will appear within the individual product settings. This section will provide a detailed breakdown of your market-specific and catalog prices, with Regions tab showing market-specific prices and B2B tab showing catalog prices. This feature helps ensure that you can offer competitive pricing tailored to each market and catalog you serve.
Multi-currency Display Mode - defines how your product’s lowest price is shown when the recorded minimum price from a Shopify Market or B2B Catalog is in a different currency from both your store’s base currency and the storefront’s selected currency.
Note: This setting affects only how the lowest price is displayed. It does not influence your actual market or catalog pricing, nor the price logic used in calculations.
Hide lowest price - The lowest price will not be displayed if it cannot be accurately shown in the selected currency. Use this if you prefer to hide potentially inconsistent pricing information.
Convert using public exchange rates - The lowest price will be displayed after conversion using public exchange rates (ExchangeRate-API). While not precise, this option allows the price to be shown in the storefront’s selected currency.
Show in original catalog currency - The lowest price will appear exactly as recorded in its original catalog currency. This ensures full accuracy, even if the displayed currency differs from the one selected on the storefront.
Note: If the minimum price currency matches the store's base currency, the price will always be accurately converted and displayed in the selected storefront currency, regardless of the chosen multi-currency display option, as the store's native exchange rate can be utilized.
Exclude markets - select markets or B2B catalogs where the lowest price block should not be displayed. For tariff Plus customers, you can also exclude specific B2B catalogs.
Note: B2B catalogs linked to a location rather than a market will not appear as an option here.
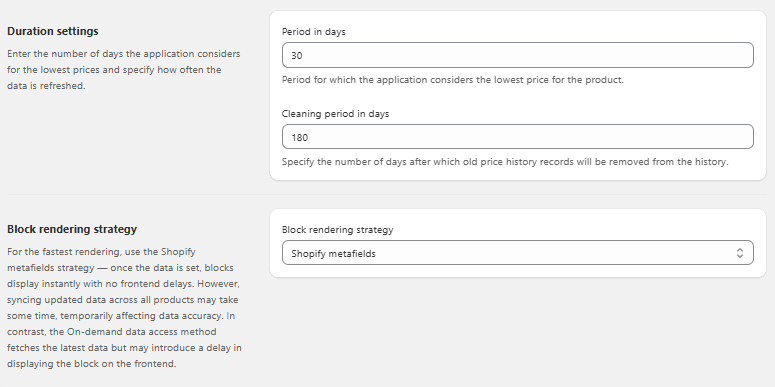
Duration settings - enter the number of days the application considers for the lowest prices and specify how often the data is refreshed:
Period in days - period for which the application considers the lowest price for the product.
Cleaning period in days - specify the number of days after which old price history records will be removed from the history.
Block rendering strategy - when displaying product blocks, you may notice a short delay depending on how many products you have. Here are two strategies you can choose from to manage how these blocks appear during that delay:
Shopify metafields (Recommended) - If you store your block information in Shopify metafields, it will show up without any delays. However, keep in mind that specific configurations — like text settings and customization — might take a little longer to appear on the frontend. Fortunately, this delay is only temporary and happens just once for a setup change. After that, updates will appear instantly without any delays.
On-demand data access - If you choose this option, the block will take a bit longer to show up on the frontend initially and each time you update the app. However, when it does appear, it will have all your configurations ready to go.
Note: These strategies only affect global settings and do not change how prices are calculated or how individual configurations are displayed.
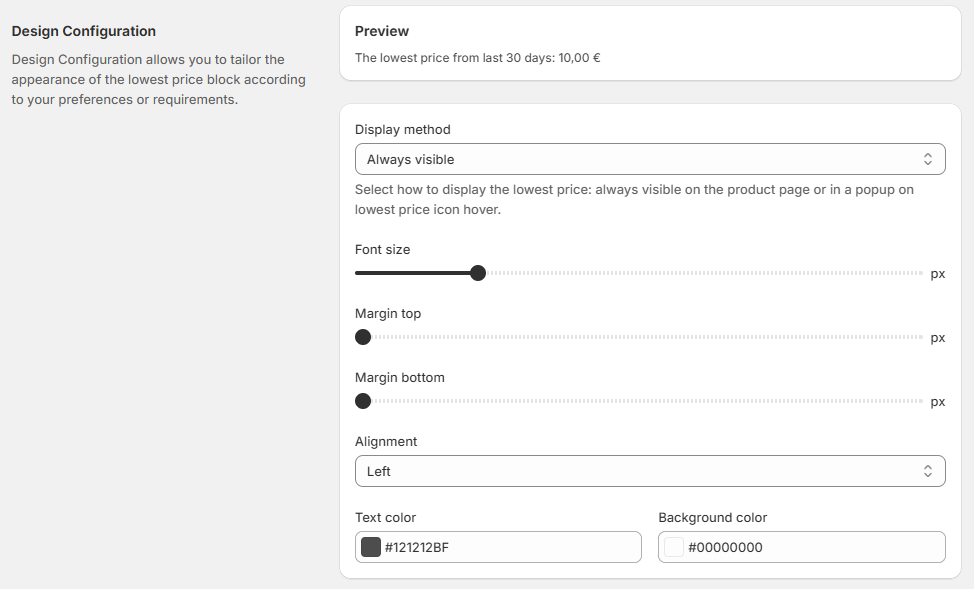
Design Configuration - these settings allow you to tailor the appearance of the lowest price block according to your preferences or requirements. You can also review your design changes right here, ensuring a seamless and personalized look that matches your preferences or requirements.
You can now decide how the lowest price information is presented on the product page via the Display Method setting:
Always visible (default): The Lowest Price is permanently displayed on the product page.
Via Popup: A compact option where the information appears only when a customer interacts with an icon.
When Via popup is selected, additional Popup content options become available:
Lowest price only (default) — shows the main Lowest Price text.
Lowest price and history — shows the Lowest Price text along with a list of the three most recent price changes.
Lowest price and chart — shows the Lowest Price text and a price-change chart for the selected Period in days.
The Font size setting controls only what appears on the product page:
For Always visible: the Lowest Price text.
For Via popup: the text next to the icon.
Note: Font size does not affect text inside the popup.
Other visual adjustments for Popups will also be available:
Icon size - Sets the size of the popup icon on the product page (17 - 34 px, default 20 px).
Chart color - Available only when Lowest price and chart is selected. Defines the color of the chart line and fill.
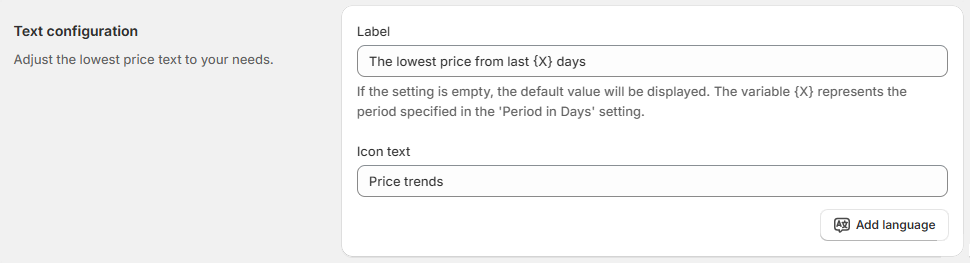
Text Configuration - Once your design is set, use the Text Configuration block to customize the labels. If left empty, the system will automatically display a default value.
Label - adjust the text that will be displayed on the front end. If the setting is empty, the default value will be displayed. The variable {X} represents the period specified in the 'Period in Days' setting. The variable ‘lowest.price’ outputs the lowest price recorded during that period - you can change the text or move the variable.
Note: Deleting the text or the ‘lowest.price’ variable will revert to the default value on the front end.
After choosing the “Via popup” display method, configure the text shown to customers:
Icon text - displayed next to the popup icon on the product page when the popup display is enabled.
To add translations of the label, click Add language, choose a language, enter the translated text, and click Add.
The translation will automatically appear for customers in the relevant locale. You can remove it anytime by clicking the trash icon.
GPSR compliance visibility - Geo-target safety warnings and manufacturer contact details based on customer location:
All countries
EU countries only
Save changes.
Products
Note
If you see a "Sync your products" notification, you’ll need to sync your products first. Syncing is essential for the app to gather product data and display the lowest price. Simply click the Start Syncing button to begin.
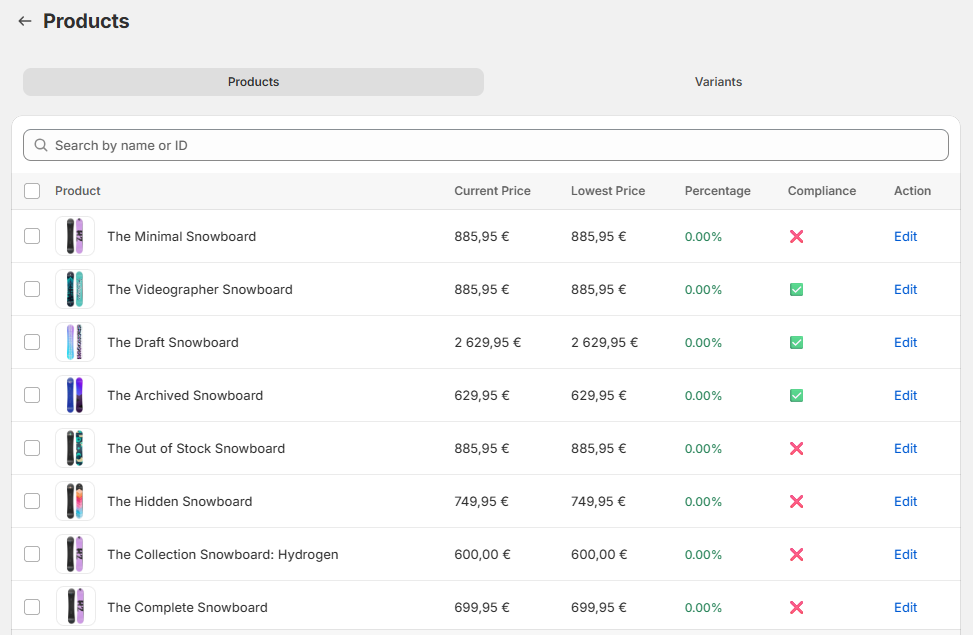
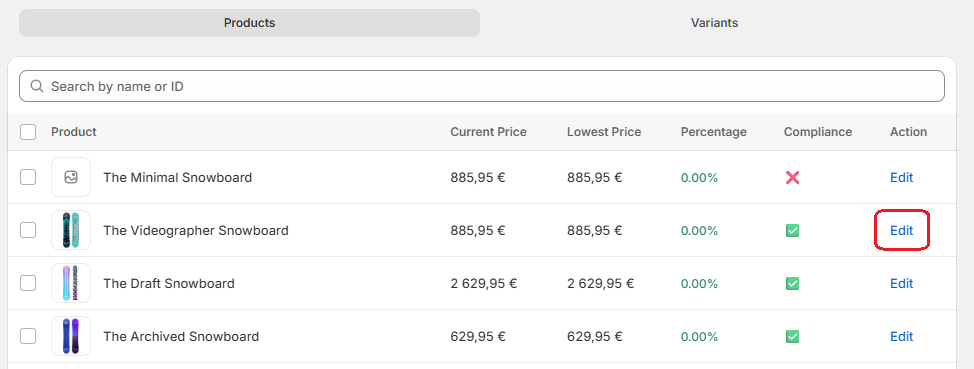
On the product grid, you can see all the products currently in the store, including their current price, lowest price, and percentage difference. And the Compliance column - Compliance status indicating whether a product meets all required General Product Safety Regulation (GPSR) information requirements.
Furthermore, you have the option to search for products by name.
Customize each product price setting right from the grid by clicking the 'Edit' button. Customized products stand out on the grid with a 'custom configuration' label for easy recognition and management.
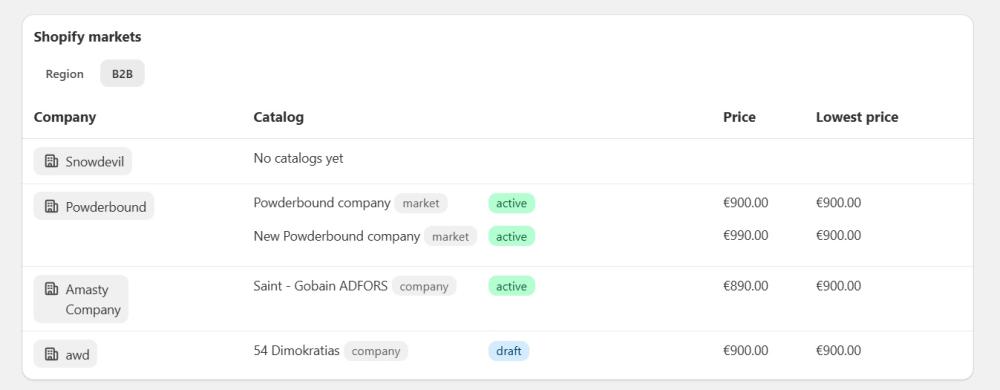
Shopify Markets - this table appears only when the global “Use Shopify Markets prices” setting is enabled. The section includes two tabs:
Region - the tab displays details for each active Shopify Market the product is assigned to, including Market Name, product Price in that market, Lowest Price in that market and Catalog where the price change originated.
B2B - the tab displays details for each active B2B catalog (available on Plus and Plus Unlimited plans), including Company the product is assigned to, Catalog name, product Price in that catalog, Lowest Price in that catalog.
Note: Prices for both "Current Price" and "Lowest Price" are displayed in the currency that Shopify provides for that specific market, so the currencies in these fields may differ.
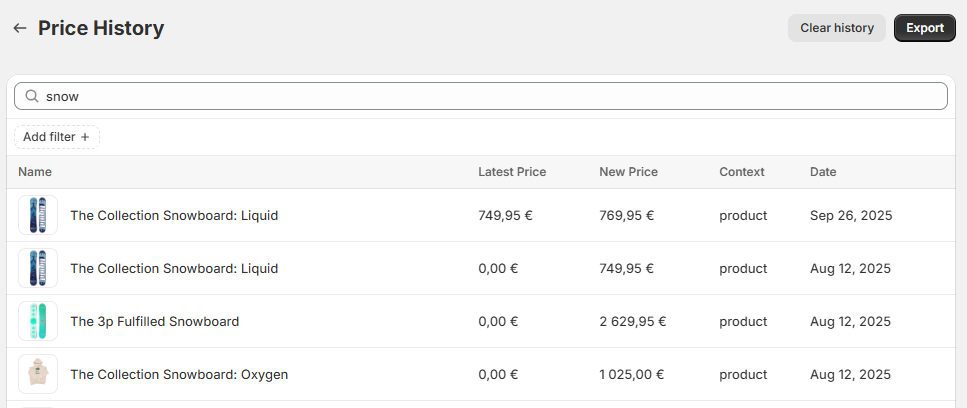
Price History
Within the price history, only products that have undergone price changes are showcased. You can access details about the product name, its most recent price, new price, context, the catalog where the change occurred , and the date of the modifications. This helps you quickly pinpoint not just what changed, but also where that change originated.
Note: the Price history begins accumulating data only after the installation and activation of the application; any prior changes are not included.
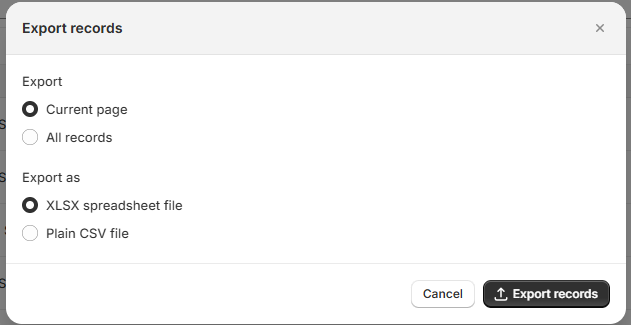
The Export button allows you to download the price change data for further analysis.
Click the Export button in the top-right corner of the grid. The Export records window will open, where you can choose:
Records to export: Current page (default) or All records
Export format: CSV for Excel (default) or Plain CSV file
Note: If filters are applied, only the filtered results will be exported.
Click Export records to download a file containing all visible columns and their values.
Note: The export will include column names and use UTF-8 encoding with commas as separators.
After the export is complete the file named price_history_export will automatically download to your computer, and a message appears at the bottom confirming the number of records exported.
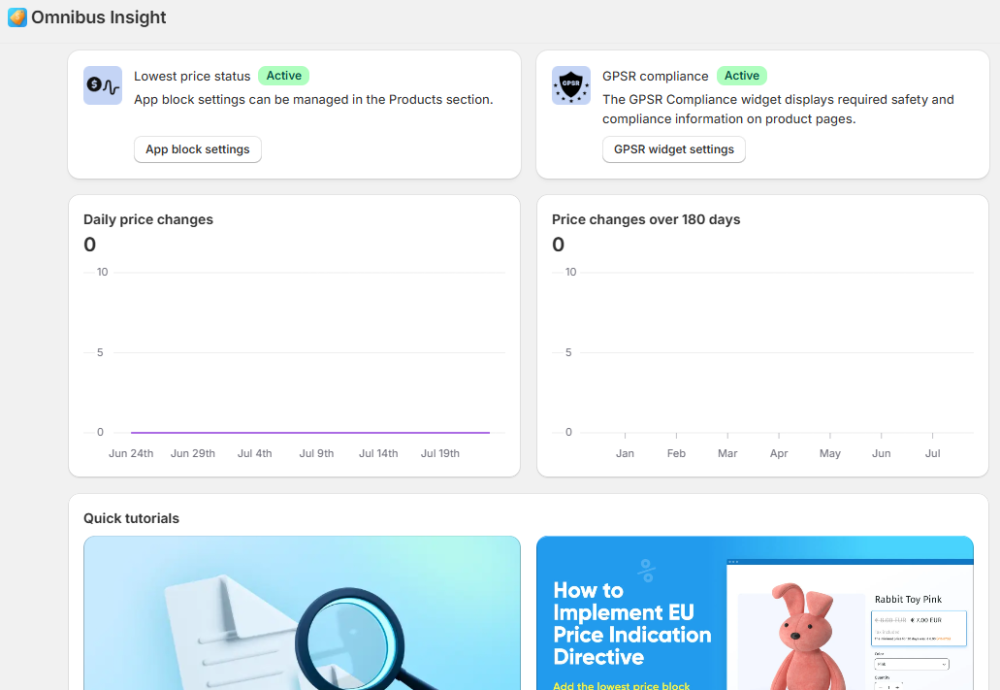
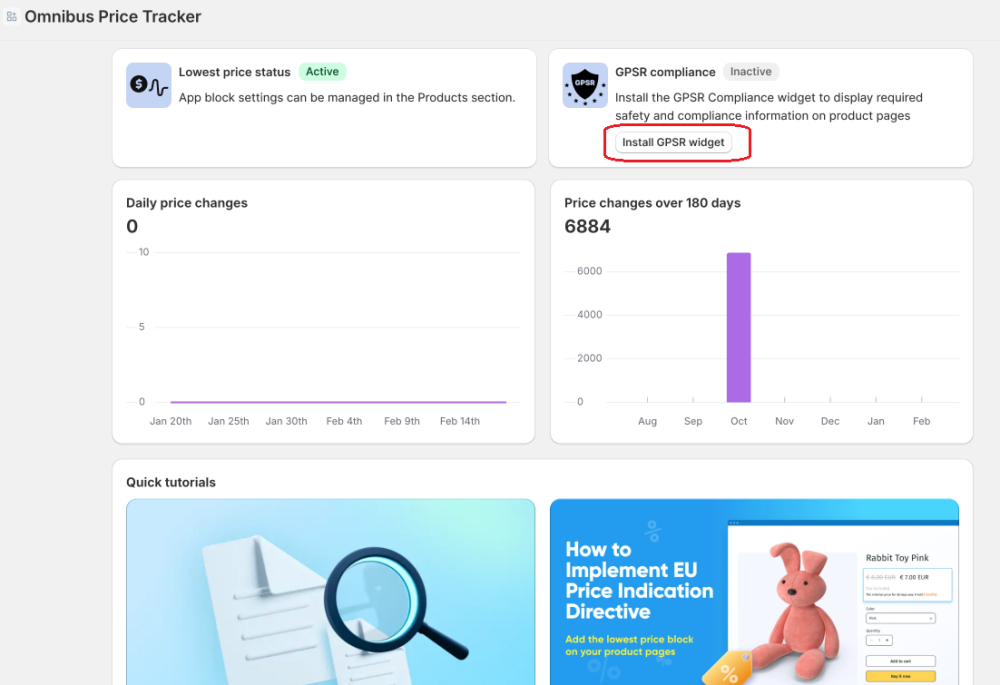
Dashboard
On the app's homepage, you will find two charts that give you a quick overview of your price change history.
Daily Price Changes: The first chart, "Daily Price Changes," shows the number of price adjustments made each day over the past 30 days. This chart helps you monitor your recent pricing activity on a day-to-day basis.
Monthly Price Changes: The second chart, "Price Changes over 180 Days," displays the total number of price changes per month over the last six months. This gives you a broader perspective on your long-term pricing trends.
Adding the lowest price block to non-product pages
Adding the lowest price block to Homepage and Collections
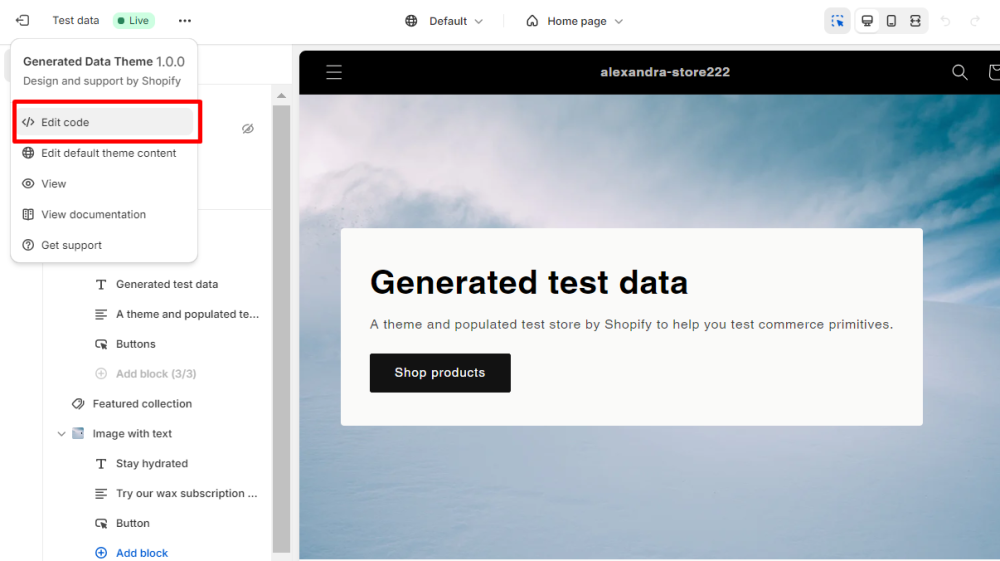
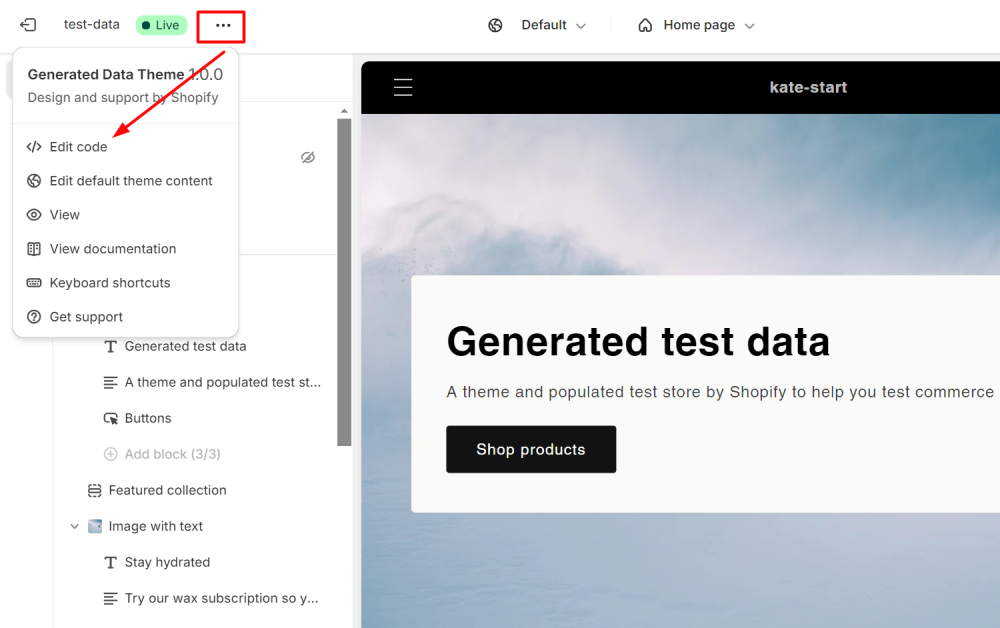
For the lowest price block, you have the option to include it on the Home page or Category pages. Here's how you can do it: head to the theme settings, and then click on 'Edit code'.
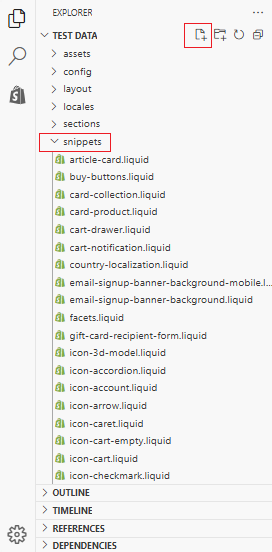
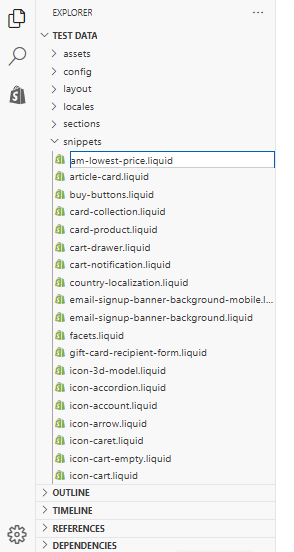
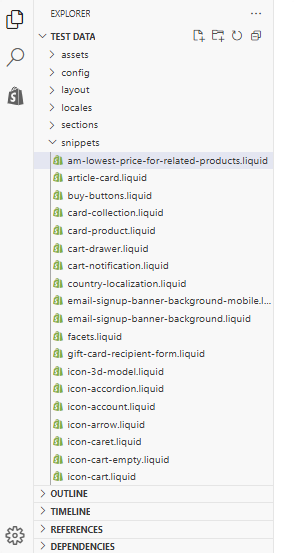
In the theme editor sidebar, find and click on the "Snippets" section to expand the list of existing snippet files.
At the top of the expanded list, you will see a button labeled "New File". Click this button to create a new snippet file.
A text field will appear where you can enter a name for your new snippet.
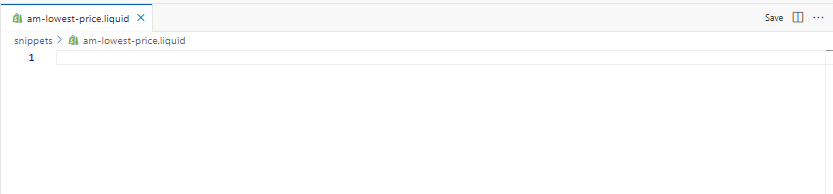
Name it 'am-lowest-price.liquid' and press 'Enter'.
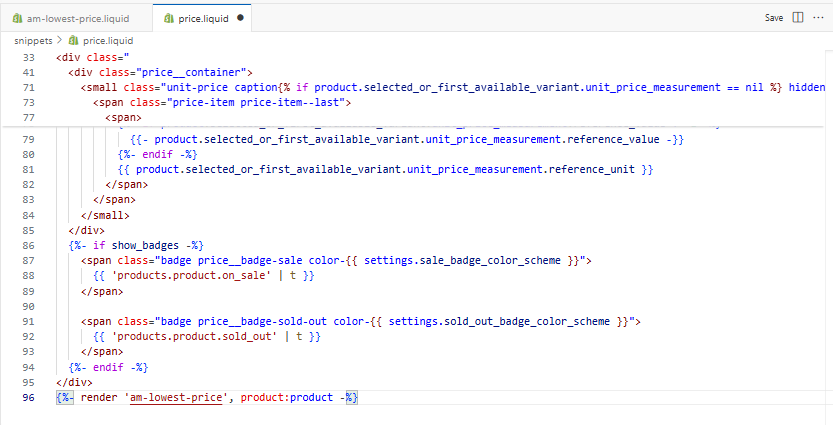
On the right side of the screen, in the tab corresponding to the new snippet, add the content below to the code text field and save.
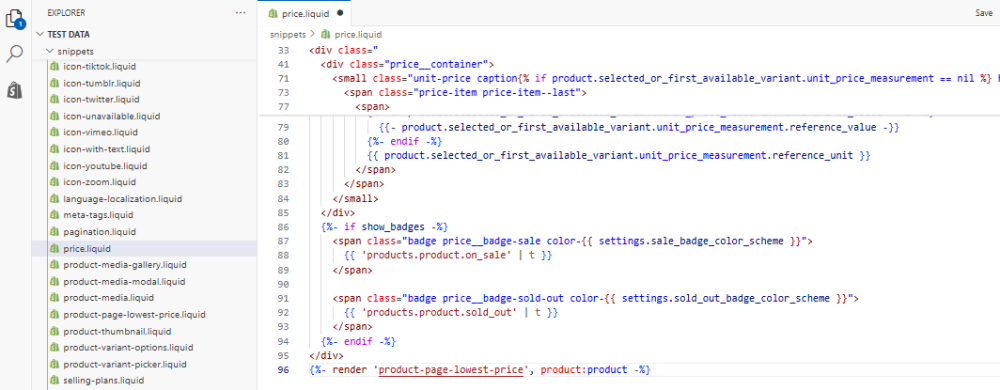
Then, locate price.liquid in the snippets, paste {%- render 'am-lowest-price', product:product -%} at the end, and save (we recommend using this snippet, since it is responsible for displaying the price).
Note: Some third-party themes may use a different product variable name, which can cause the price.liquid code to not work. If you encounter this issue, try {%- render 'am-lowest-price', product:target -%} , {%- render 'am-lowest-price', product:product_resource -%} or {%- render 'am-lowest-price', product:product_ref -%}. If none of these work, please contact us for assistance at help-center@amasty.com.
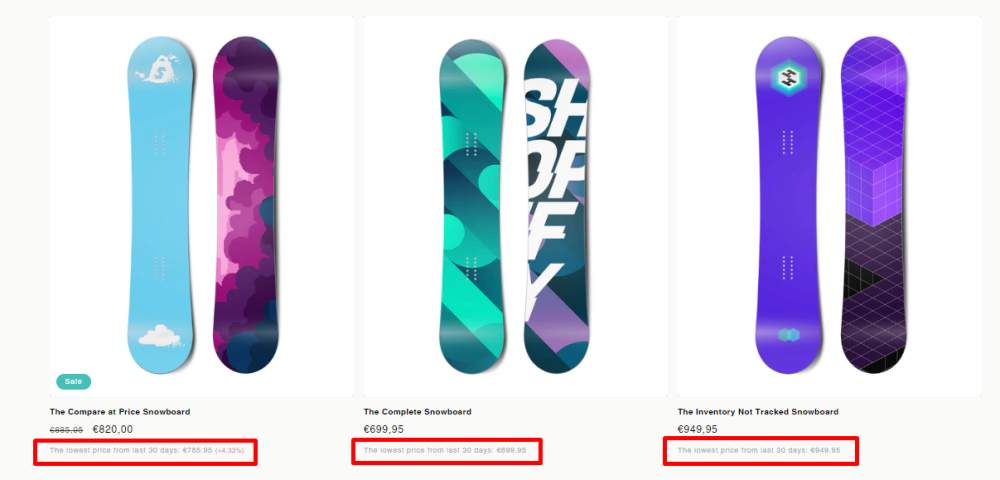
The result on the front-end:
Note: If you uninstall the app, it won't automatically undo the changes. You'll need to manually delete any unnecessary info or blocks.
Adding the lowest price block to Related Products Block
To add lowest price block on Home or Category page, head to the theme settings, and then click on 'Edit code'.
In the theme editor sidebar, find and click on the "Snippets" section to expand the list of existing snippet files.
At the top of the expanded list, you will see a button labeled "New File". Click this button to create a new snippet file.
A text field will appear where you can enter a name for your new snippet.
Name it 'am-lowest-price-for-related-products.liquid' and press 'Enter'.
On the right side of the screen, in the tab corresponding to the new snippet, add the content below to the code text field and save.
Open price.liquid in the snippets and paste {%- render 'am-lowest-price-for-related-products', product:product -%} at the end, and save (we recommend using this snippet, since it is responsible for displaying the price).
Note: Some third-party themes may use a different product variable name, which can cause the price.liquid code to not work. If you encounter this issue, try {%- render 'am-lowest-price-for-related-products', product:target -%}, {%- render 'am-lowest-price-for-related-products', product:product_resource -%} or {%- render 'am-lowest-price-for-related-products', product:product_ref -%}. If none of these work, please contact us for assistance at help-center@amasty.com.
Note: If you uninstall the app, it won't automatically undo the changes. You'll need to manually delete any unnecessary info or blocks.
Troubleshooting
If your theme doesn’t allow you to add the lowest price block during the initial app setup, there’s a workaround you can use to resolve this issue.
1. From Shopify Admin, go to Online store > Themes > Customize.
2. Click … > Edit code.
3. In the theme editor sidebar, find and click on the "Snippets" section to expand the list of existing snippet files.
4. At the top of the expanded list, you will see a button labeled "New File". Click this button to create a new snippet file.
5. Name it ‘product-page-lowest-price.liquid’ and press Enter
6. Insert there the following content and Save it.
Note: If none of these work, please contact us for assistance at help-center@amasty.com.
GPSR Compliance: Step-by-Step Setup Guide
Note: The GPSR features are available on the Advanced, Plus and Plus Unlimited Plans.
Step 1. Install the GPSR Widget
Before displaying any compliance data to your customers, you must activate the widget within your Shopify theme. If the widget is inactive, compliance information will not appear on your storefront.
Navigate to Omnibus Insight > Home.
Locate the App status block. This block is split into two sections: Lowest price status on the left, and GPSR compliance on the right.
The app will automatically open your Shopify Theme Editor and inject the GPSR compliance widget.
Drag and drop the widget to your preferred location on your product pages.
Once installed, the status in your dashboard changes to Active, and the button text updates to GPSR widget settings.
Step 2: Configure Global Settings
Control who sees your compliance data based on their geographic location.
Go to Omnibus Insight > Settings
Locate the GPSR Compliance Visibility dropdown setting.
Options:
All countries (Default) - GPSR information is displayed to every visitor globally.
EU countries only - Information is strictly displayed if Shopify identifies the visitor as being from an EU country.
Note: If a user's country cannot be determined (e.g., due to privacy settings or VPNs), the app defaults to safe mode and will display the GPSR information to ensure compliance coverage.
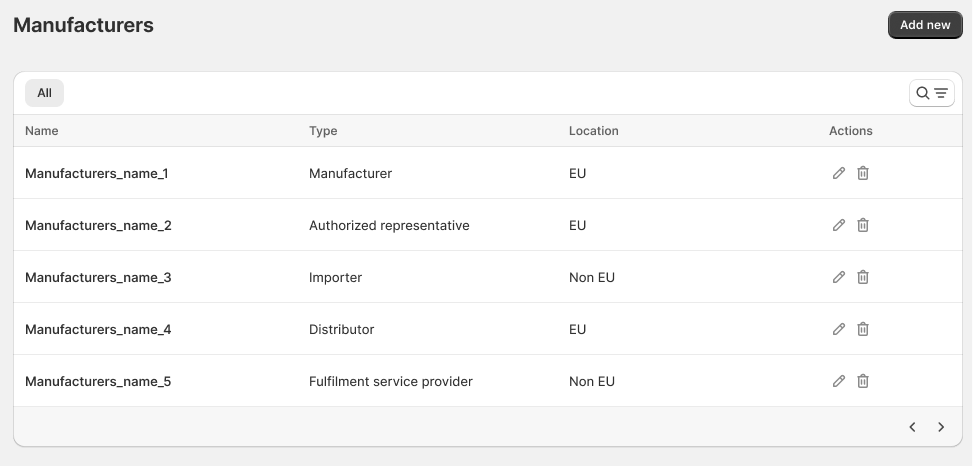
Step 3. Create Manufacturer Profiles
Before products can become GPSR compliant, manufacturer information must be created.
Navigate to the Manufacturers tab in your sidebar menu to view your master grid. Here, you can search for companies by name or filter the list by Type or Location.
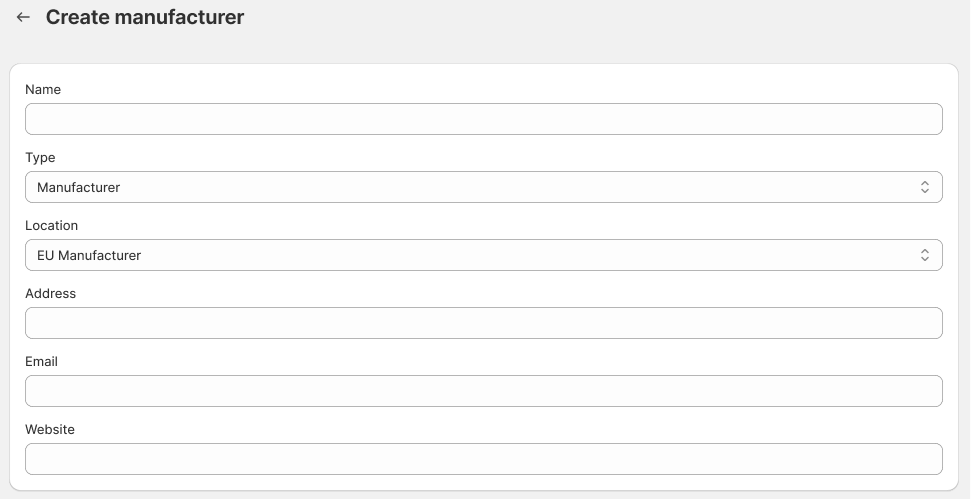
Click Add new to open the creation page and configure the following fields:
Name (Required): The formal name of the entity.
Type (Dropdown, Default: Manufacturer): Available manufacturer types: - Manufacturer - Authorized Representative - Importer - Distributor - Fulfilment Service Provider.
Location (Dropdown, Default: EU Manufacturer): Choose EU Manufacturer or Non-EU Manufacturer.
Address (Optional): Physical street address.
Email (Optional): Contact email address.
Website (Optional): Corporate URL.
Click Save. After saving, the manufacturer profile becomes available for assignment to products.
Note: If you delete a profile from the master grid, it is automatically unassigned from all linked products and hidden from the storefront.
Note: Changing a profile's Type instantly propagates across all assigned products on the front end.
Step 4. Assign Manufacturers to Products
To manage compliance data on an individual item, navigate to Products > Products tab
Click Edit on a product.
The product edit interface is split into two tabs. By default, it opens to Price settings.
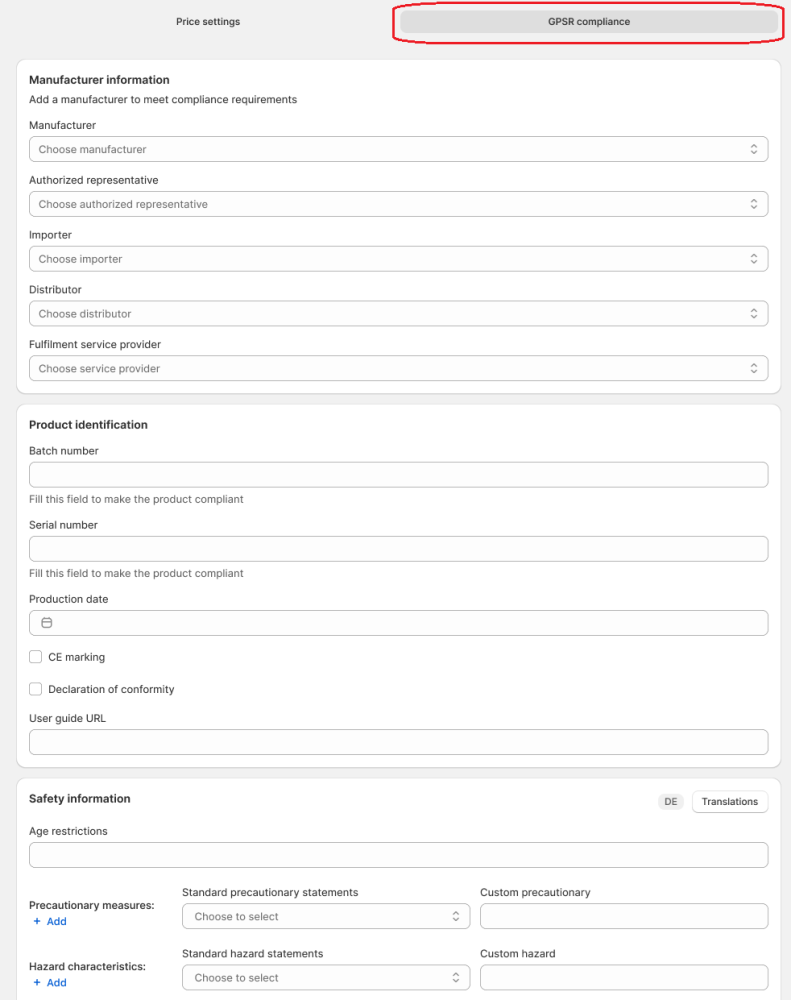
Click the second tab: GPSR compliance.
The GPSR compliance page is divided into three distinct sections.
1. Manufacturer Information
This section adds a Manufacturer tab below the product photos on your storefront. Select the appropriate profile for each applicable supply chain role:
Manufacturer
Authorized representative
Importer
Distributor
Fulfilment service provider
To remove an assignment, simply click Unassigned next to the dropdown.
2. Product Identification
This section adds a Product tab to your storefront.
Batch number & Serial number Note: Fill this field to make the product compliant.
Production date
CE marking
Declaration of conformity
User guide URL: Link to external digital manuals.
3. Safety Information
This section adds a Safety tab to your storefront to communicate risks.
Age restrictions
Precautionary measures & Hazard characteristics (Combined Searchable Fields): - Select a predefined statement from the searchable dropdown OR type a unique warning into the Custom precaution/hazard field. - Click + Add to instantly generate a new pair of fields. There is no limit on how many warnings you can stack. - Remove any unwanted warnings by clicking Delete next to the statement line.
Disposal instructions
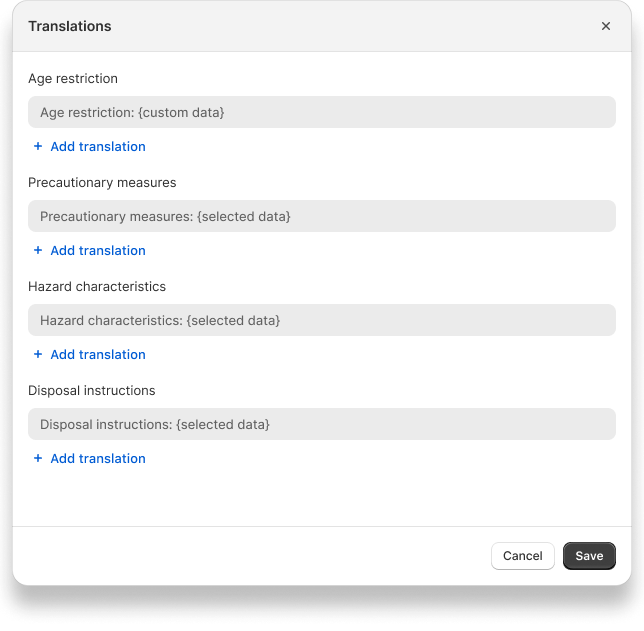
Translating Safety Information
Translations are handled manually for your custom text, while standard safety statements translate automatically based on system configurations.
Click the Translate button in the Safety Information section to launch the Translations popup.
The popup lists all currently entered custom text fields (Age restrictions, individual Custom precautions, individual Custom hazards, and Disposal information).
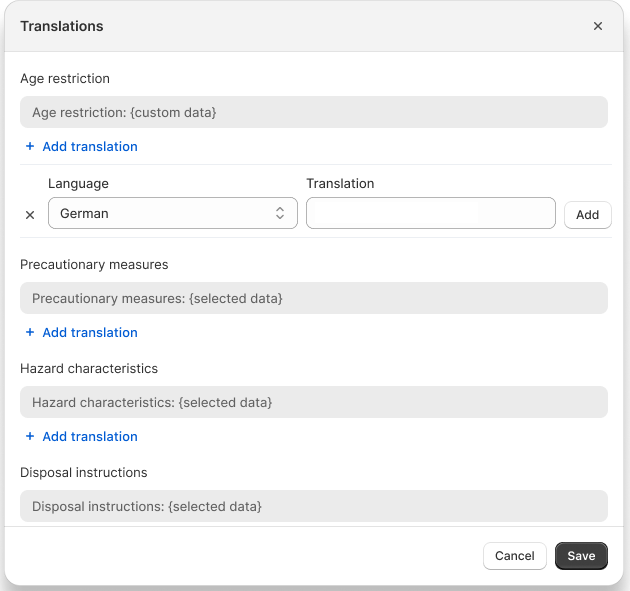
Click + Addtranslation under any text field.
Select your target language from the Language dropdown, enter your translation in the text field, and click Add.
Click Save to apply your changes.
Upon saving, an icon displaying the two-letter country codes of your added languages will appear to the left of the main Translate button.
Note: The storefront displays the translation that matches your customer's active locale. If no matching translation is provided, the system defaults to your original source text.
Understanding Compliance Labels
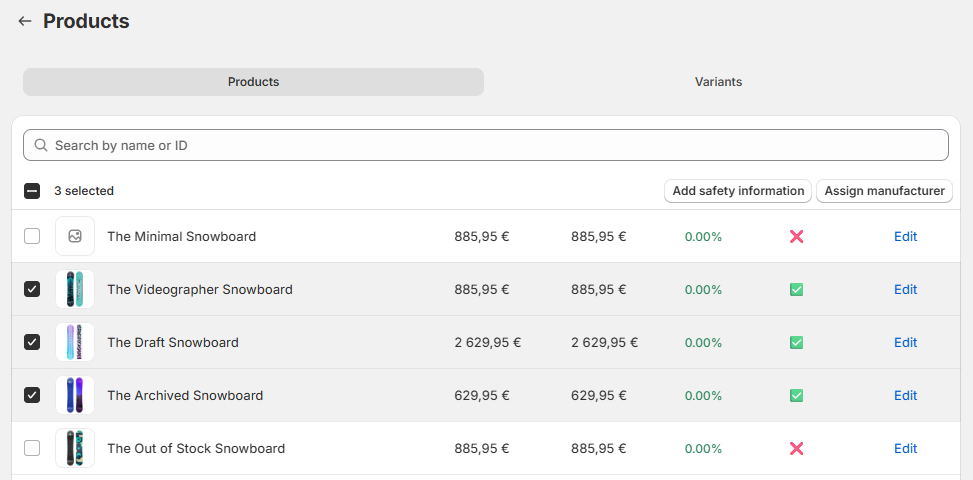
The app automatically tracks your catalog's readiness via a Compliance column on your main product grid.
Compliant (✅): The product successfully maps to at least one manufacturer profile and contains a tracking variable (Batch number or Serial number).
Non-Compliant (❌): One or both requirements are missing. The item will remain marked with a red cross until the gaps are addressed.
Step 5: Bulk Actions
For large catalogs, safety information can be assigned to multiple products simultaneously.
Select your target items using the checkboxes on the left side of the grid to reveal two bulk action buttons.
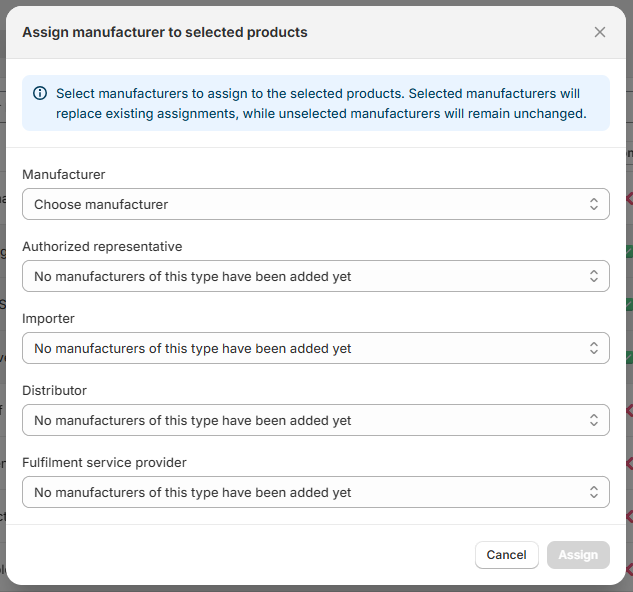
Bulk Assign Manufacturer
Click Assign manufacturer to open the multi-assignment menu.
Check the boxes for the manufacturer types you intend to apply (e.g., Manufacturer, Importer).
Click Select to open the modal: Assign manufacturer to selected products.
Map the profiles using the dynamically generated dropdown menus.
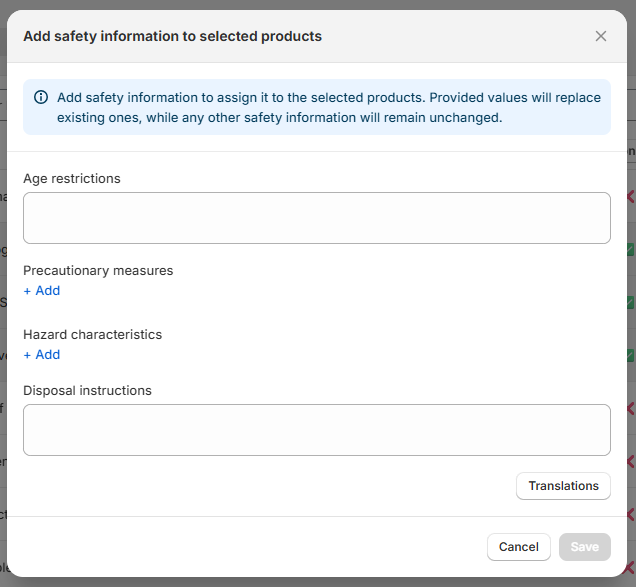
Bulk Add Safety Information
Click Add safety information (located to the left of the assignment tool) to open the Add safety information to selected products popup.
Fill out your uniform safety fields (Age restrictions, Precautionary measures, Hazard characteristics, or Disposal instructions).
Use the inline Translations button to configure multilingual translations for this batch if necessary.
Click Save to update all selected products.
Note: New submissions do not merge with old parameters; they replace them entirely.
Example: If a product is individually configured with an Age restriction and a Standard hazard statement, and you subsequently target it with a bulk safety update containing only a Custom precaution, the system will completely erase the old age restriction and hazard data, leaving only the new custom precaution.
Always verify your selections before clicking Save.