Table of contents
- Home page and quick setup
General information about the app and quick setup guide. - Product feeds creation via integrations (The easiest)
Integrate the app with your shopping platform account for quick feed generation and automatic upload on schedule.- Google Integration
Create, manage and upload feed to Google Shopping in a few clicks. - Meta Integration: Facebook and Instagram
Create, manage and upload feed to Meta Commerce in a few clicks.
- Google Integration
- Product feeds creation via templates
Create, manage and upload feed using templates designed for your preferred platform. The configuration includes the following:- Select the feed template
Select the template of your preferred platform, or use 'Custom' if you don't find one. - General
Specify the general information for the feed: name, products, shipping options, image resizing, etc. - Items
Preview the list of products included in the feed (not available for Amazon and eBay). - Template
Configure template if you want to include/exclude additional attributes - Template configuration for Google, Facebook, Pinterest, TikTok, and Instagram
- Template configuration for Amazon and eBay
- Upload
Configure SFTP/FTP for automatic feed upload. - Schedule
Set a schedule for automatic feed upload via SFTP/FTP. - Google Analytics
Configure UTM parameters for your feed to track it in Google Analytics.
- Select the feed template
- Filters
Create filters to specify products included in your feed. - Mapping
Match your collections to marketplace categories. - Calculation fields
Meet the specific needs and requirements of different marketplaces by performing calculations with numeric metafields and attributes. - Pricing
Understanding FeedFusion pricing. - Settings
Configure general settings for your feeds. - Upload feed
Configure general settings for your feeds.- Upload feed to Google Merchant Center:
Explore three ways to upload your Google feed. - Upload feed to Meta Business (Facebook and Instagram)
Learn how to upload your Facebook feed.
- Upload feed to Google Merchant Center:
- FAQ
FeedFusion is a Shopify app that helps you create product feeds for selling on popular platforms like Google Shopping, Facebook, Instagram, Amazon, eBay, TikTok, and Pinterest.
Once installed, you’ll arrive on the Home page, where you can follow the onboarding steps with quick-access buttons for easy setup. Here’s what you can do:
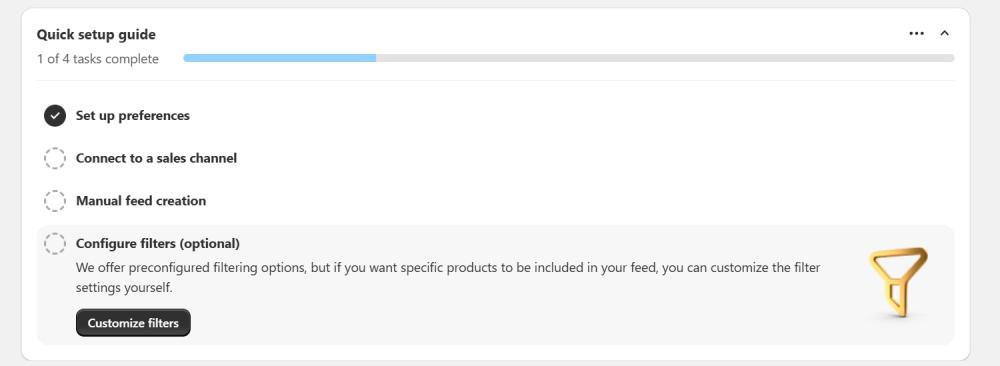
- Set up your preferences in feed settings (optional, but highly recommended).
- Connect your sales channels (currently available for Google and Facebook) to create a feed effortlessly and automatically upload it to your Google Merchant and Facebook Business accounts.
- Manually create feeds if you prefer not to connect accounts or need feeds for other platforms (Amazon, eBay, Instagram, TikTok, Pinterest, etc.). Use templates and upload them to preferred platform via SFTP/FTP. Also, you can export the feed to your computer or copy the link.
- Configure filters to specify which products to include in your feed. Create filters and apply them to your feed for a more targeted selection.
Let’s explore each configuration option in more detail!
Product feed creation via integrations
The Integrations section lets you connect the app to Google Merchant Center and Meta Commerce Manager. This activates Feed Wizard, a simple method for creating, managing and uploading Google Shopping, Facebook Shop and Instagram Shopping feeds.
Note
If you don’t want to connect your Google Merchant/Meta Commerce account or don’t plan to create a feed for Google, Facebook or Instagram, you can skip this step and create feeds in the Feeds section.
Google Merchant Center Integration
Click the Connect to Google Merchant Center button. You'll need an active Google Merchant Center account for this. If you don't have one, you can sign up.
Note
If you try to connect a Google account that's not linked to Google Merchant Center, you'll see an error.
Login to your Google account to proceed with configuration.
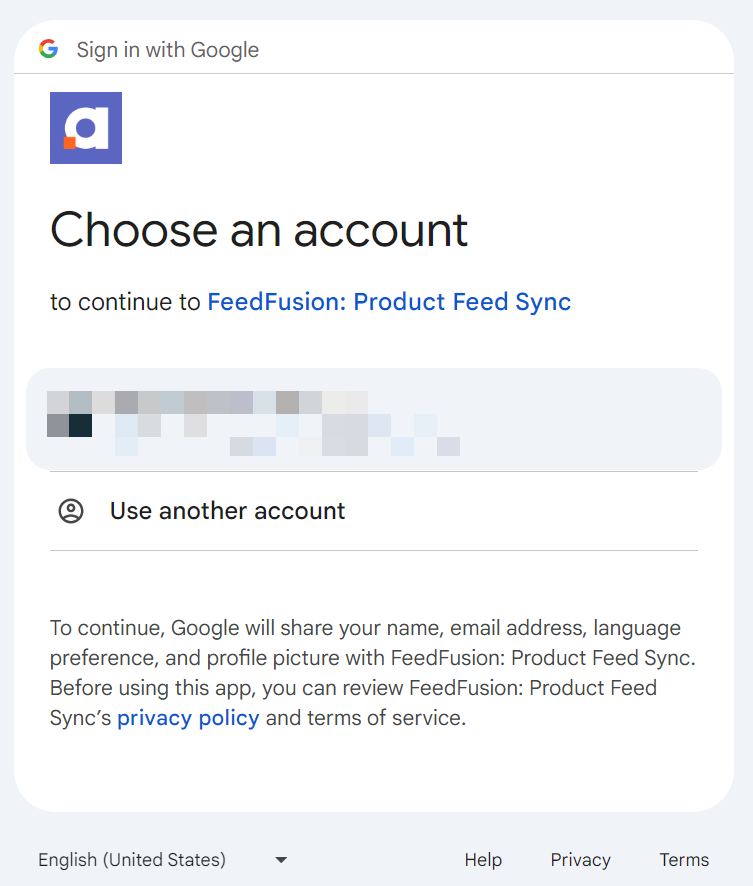
Click Continue and Allow FeedFusion app to manage your product listings and accounts for Google Shopping.
Once connected, you’ll see the status "Connected" along with the name of your Google Merchant account. If you have multiple accounts, you can add and connect another one by clicking the Add Account button.
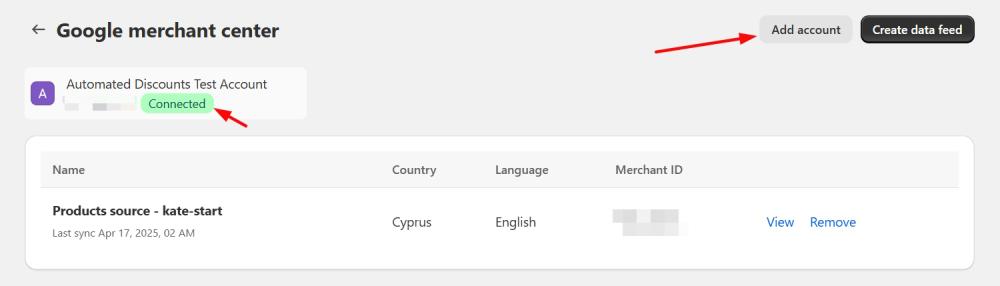
Then, click the Create data feed button to create a new feed using Feed Wizard, a simple one-page method for creating Google feeds. Fill in the following information:
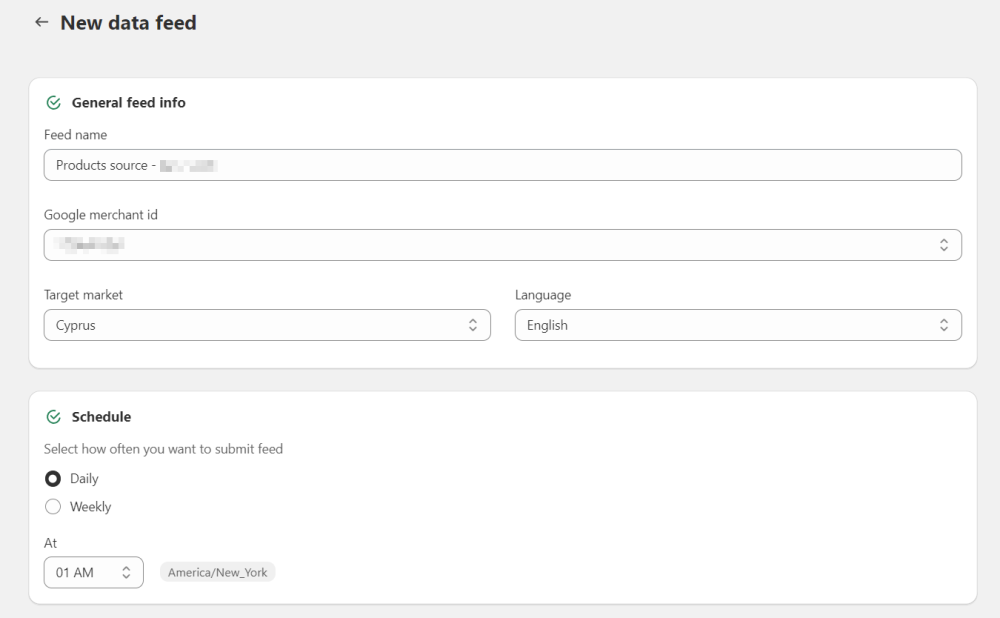
General feed info - this section displays general information about your feed (Feed name, Google Merchant ID, and Language) pulled from your Google Merchant Center and Shopify. Also, you’ll need to select Target market from the dropdown menu.
Schedule - select how often you want to submit the feed and specify the submission time (based on your store's time zone).
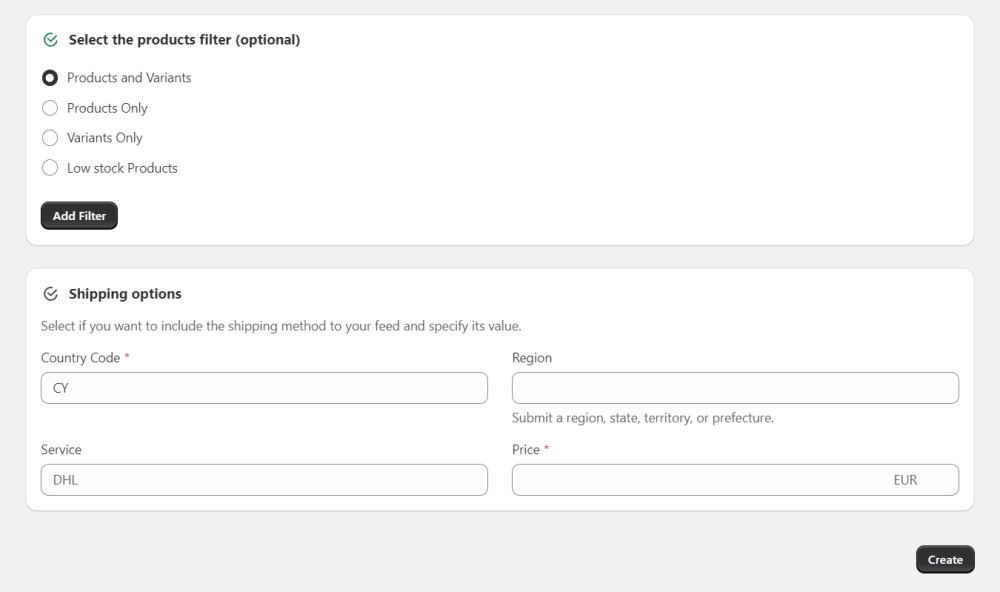
Select the product filter (optional) - choose a premade product filter for your feed, or click the Add Filter button to create a new custom filter.
Shipping options - adjust the general configuration and specify the Country Code, Shipping Service, and Shipping Price for the feed.
Click Create and wait a few minutes for sync to complete.
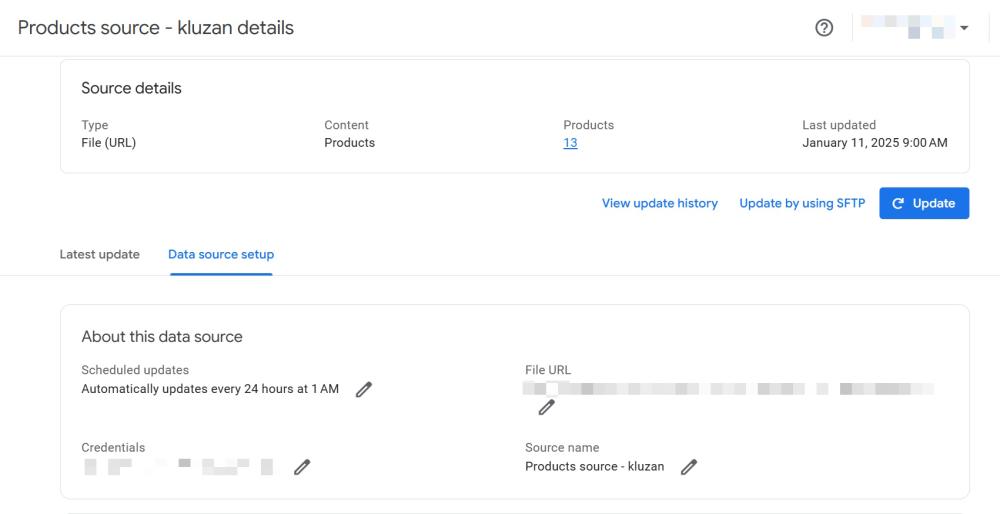
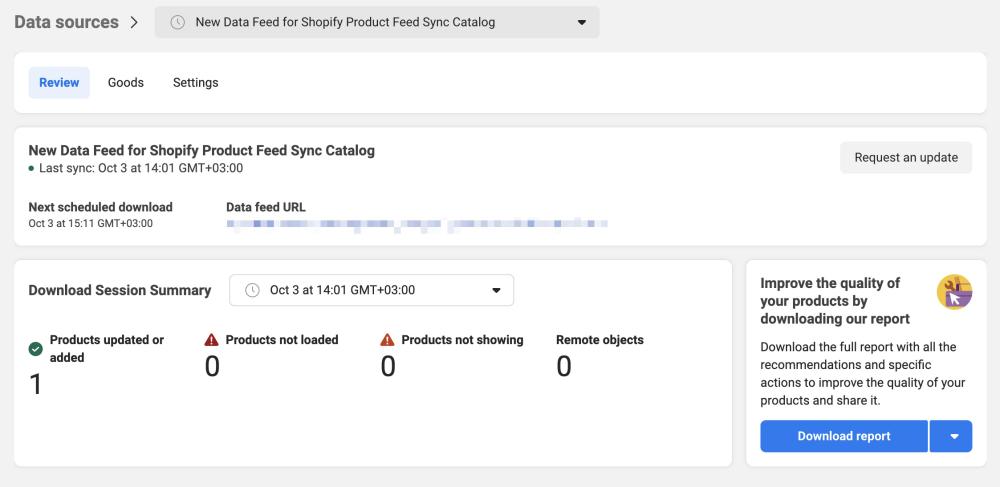
Once completed, a feed overview page will open. Here, you can edit information, view the sync schedule, copy the feed link, and download the feed.
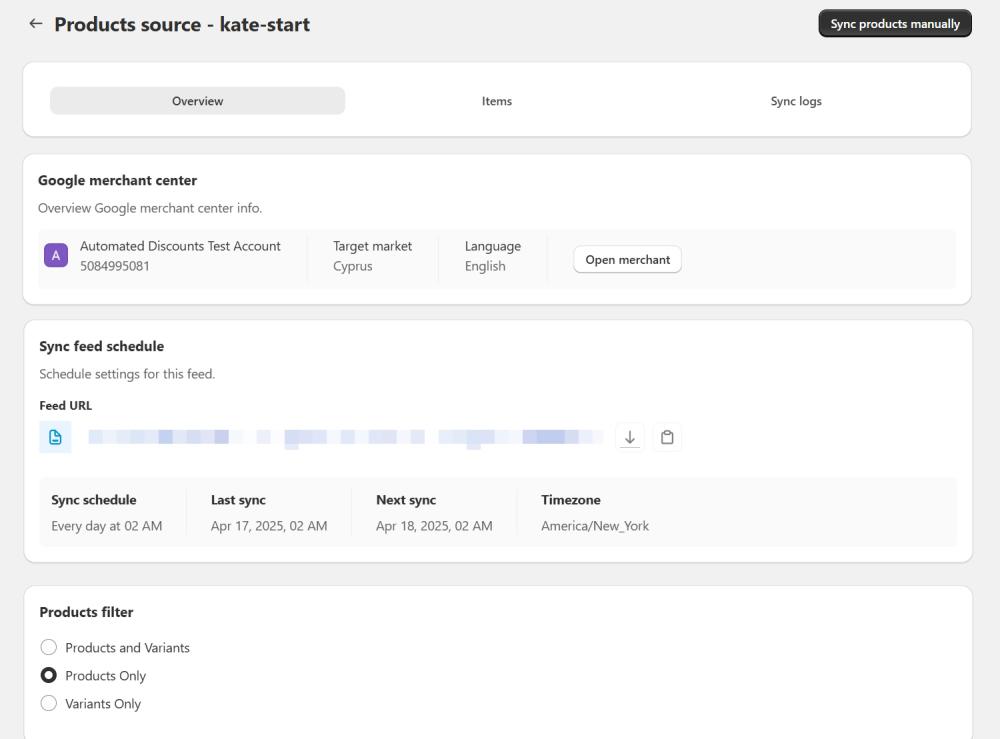
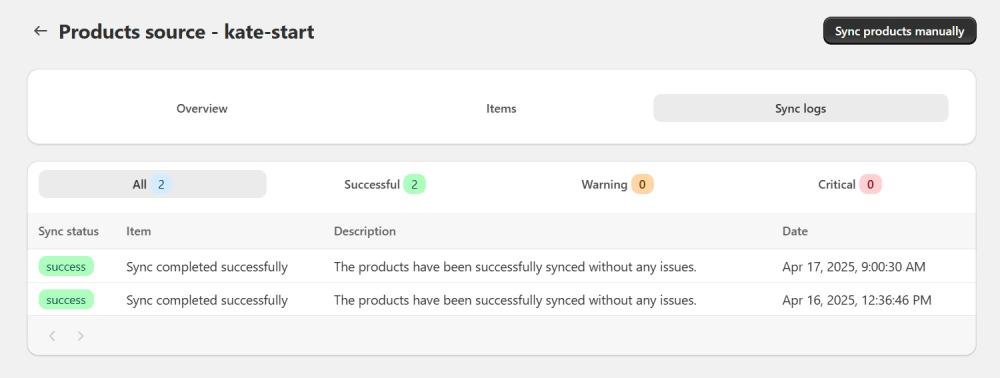
You can also preview the products included in the feed in the Items section.
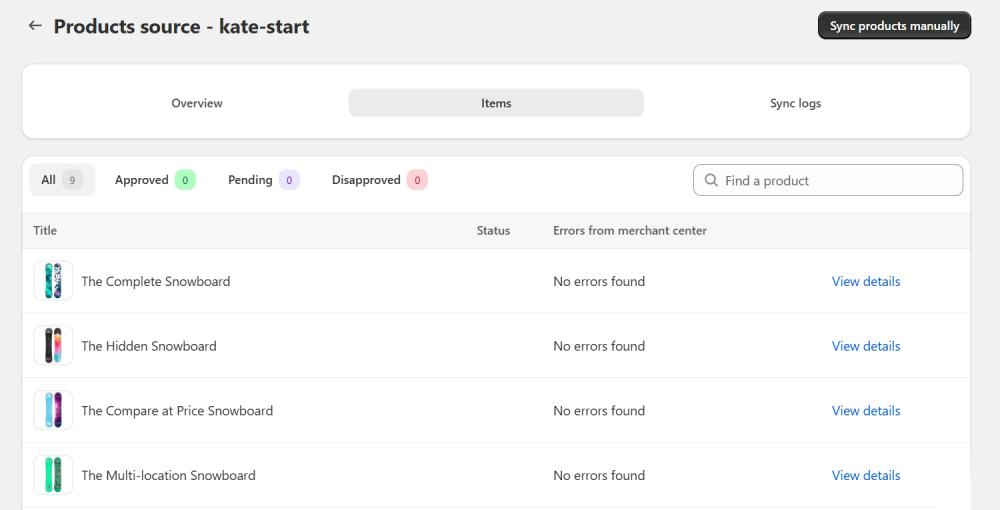
You can also view the sync history, including successful syncs, warnings, and critical issues, in the Sync logs tab.
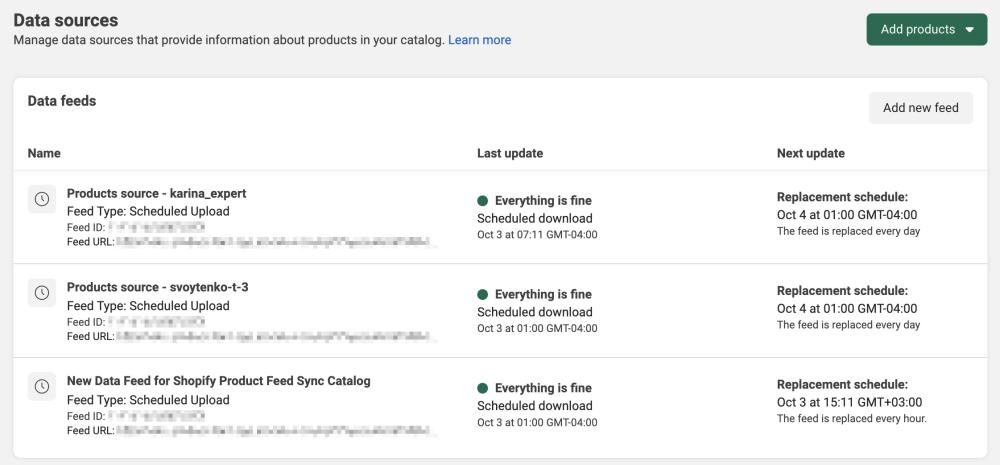
In Google Merchant Center, you'll see all connected feeds.
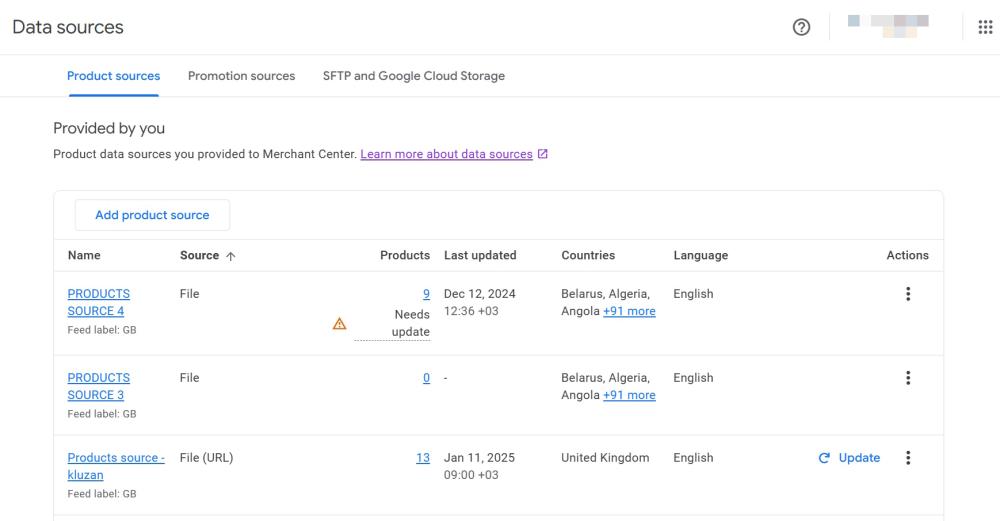
Each feed contains details about the products it includes, the last update, the scheduled update, and more.
Meta Integration: Facebook and Instagram Feed
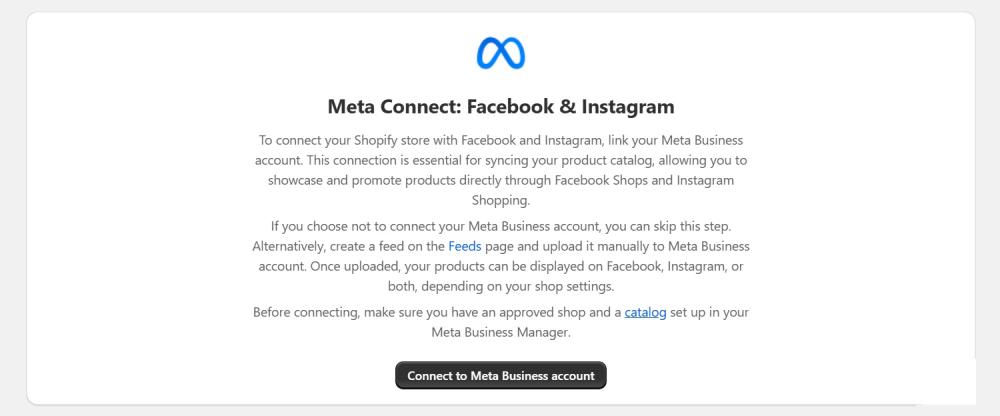
To easily create a feed and publish your products on Facebook and/or Instagram, connect FeedFusion to your Meta Business account. On the Integrations page, click the Connect to Meta Business Account button. Make sure you have an active Meta Business account. If not, you can sign up.
Note
If you try to connect an account that is not a Business account, you'll see an error. Additionally, you’ll need to have your Commerce Manager set up with a Shop and a collection for it. Then, create a feed with FeedFusion to easily upload your products to the Commerce Manager to sell them via your Facebook and/or Instagram Shop and promote them via Facebook/Instagram ads.
Log in to your Meta Business account. Manage optional cookies as needed, then click the Connect button to link the FeedFusion app with Meta Business.
Once connected, you’ll see the status "Connected" along with the name of your Meta Business account. If you have multiple business accounts, click Add account to connect another one.
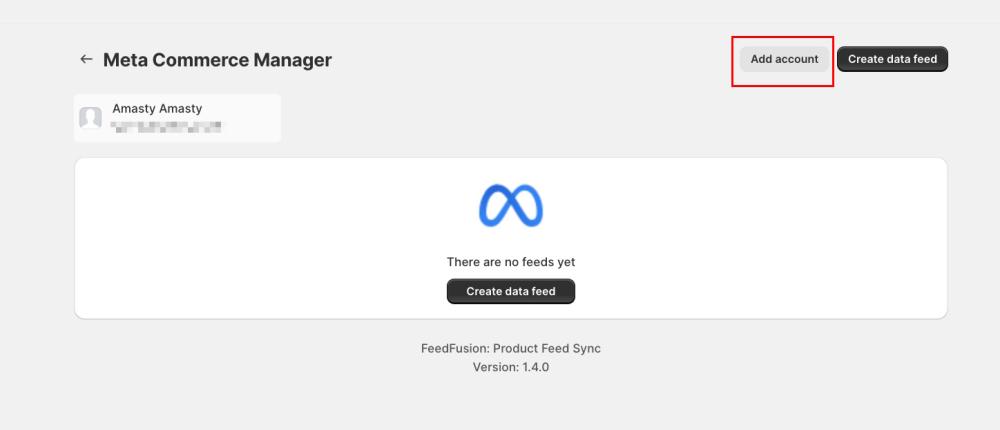
Then, click the Create data feed button to create a new feed using Feed Wizard, a simple one-page method for creating and uploading feeds for Facebook and Instagram. In the opened page, fill in all required fields:
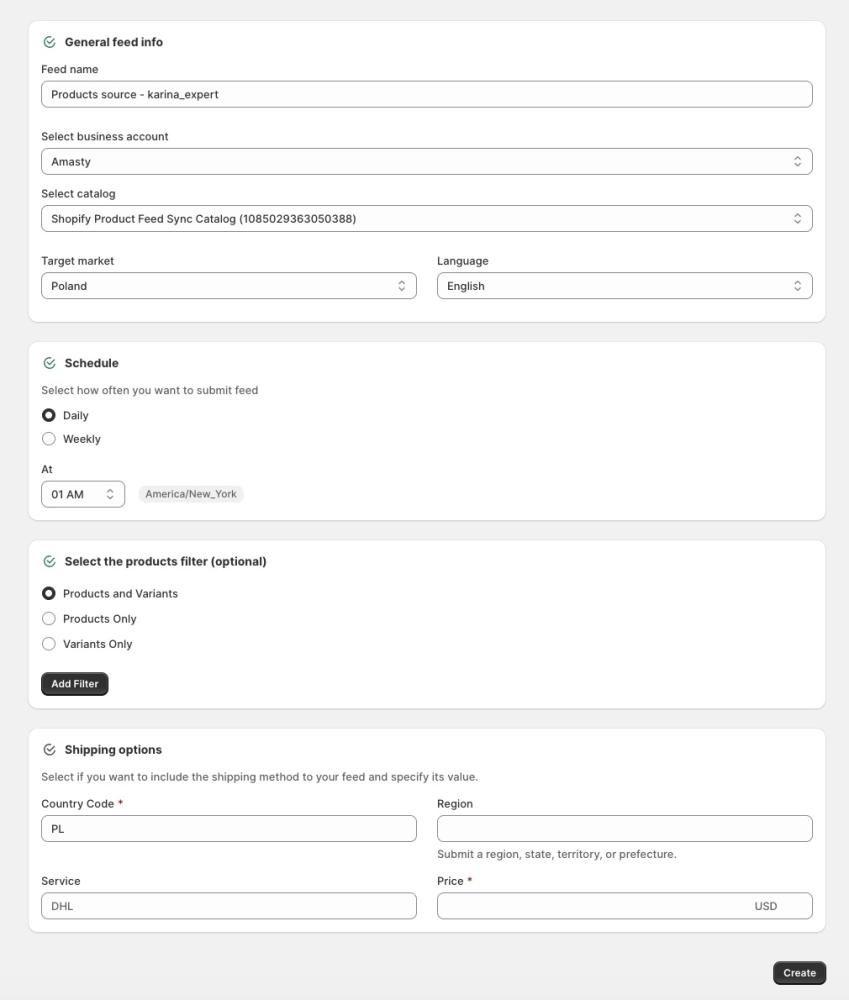
General feed info - this section shows general information about your feed. Here, you can:
- Set the Feed name
- Select business account (if you have multiple)
- Select catalog where products will be uploaded and synced
- Specify the Target market and Language
Schedule - select how often you want to submit the feed and specify the submission time (based on your store's time zone).
Select the product filter (optional) - choose a premade product filter for your feed, or click the Add Filter button to create a new custom filter.
Shipping options - adjust the general configuration and specify the Country Code, Region, Shipping Service, and Shipping Price for the feed.
Click Create and wait a few minutes for sync to complete.
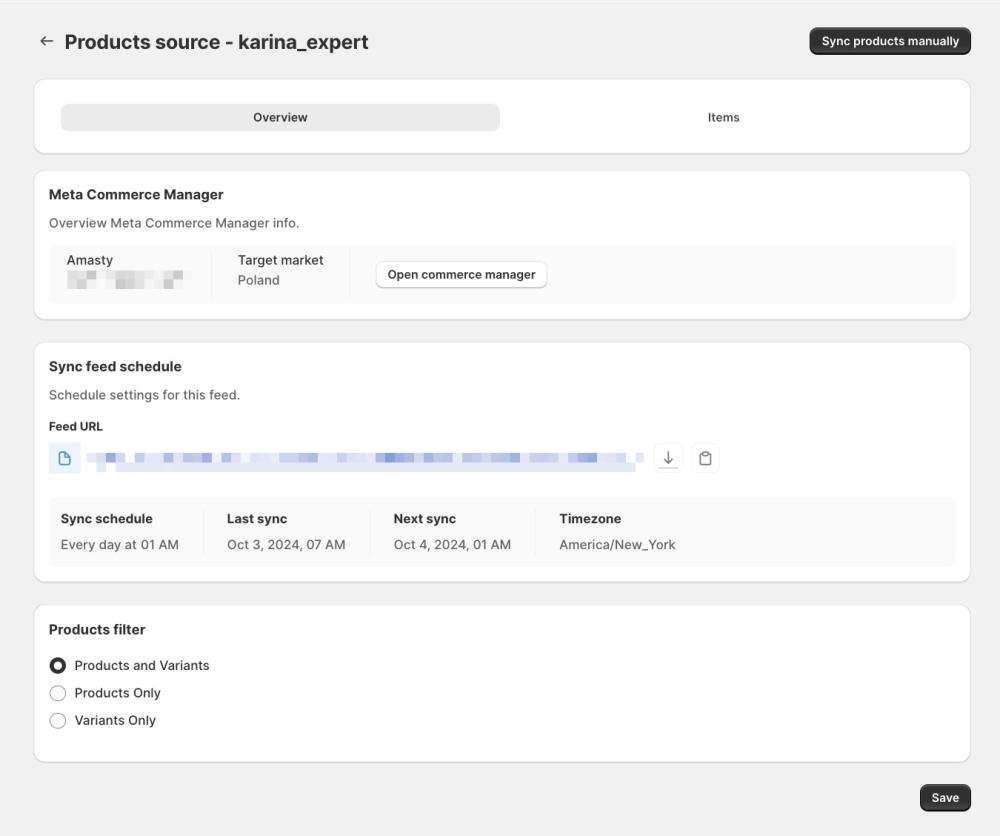
Once completed, a feed overview page will open. Here, you can edit information, view the sync schedule, copy the feed link, and download the feed.
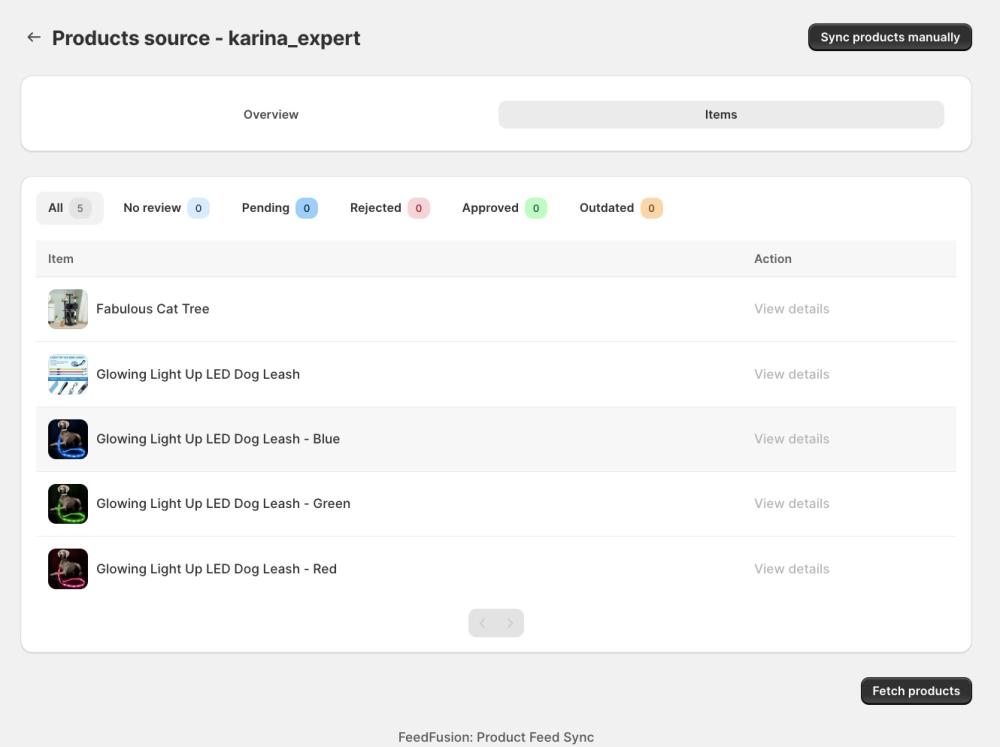
You can also preview the products included in the feed in the Items section.
sync-logs-fb
Additionally, you can view the sync history, including successful syncs, warnings, and critical issues, in the Sync logs tab.

In your Meta Business account, you'll see all connected feeds.
For each feed, it displays the last and next scheduled downloads, as well as the number of products updated, added, or removed.
Product Feeds Creation via Templates
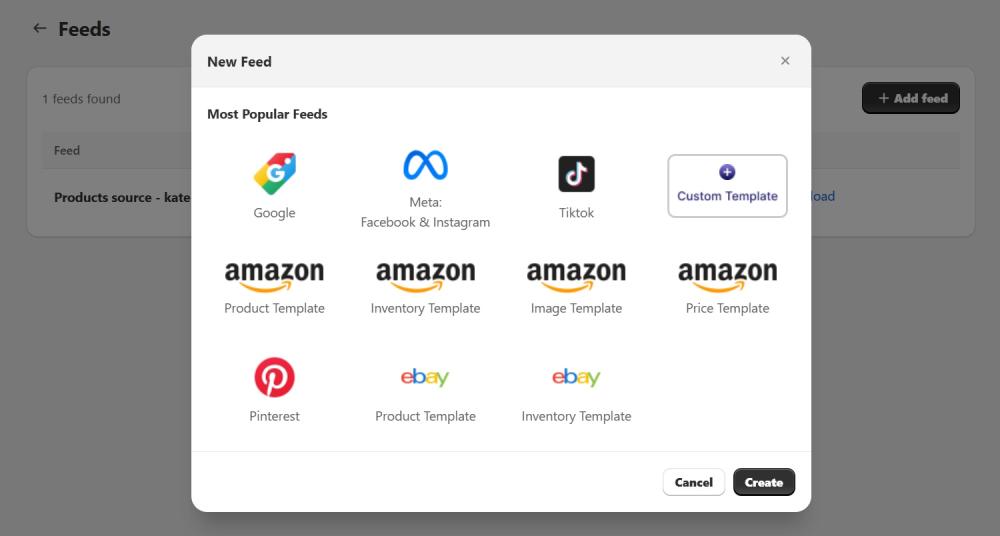
If you want to create a feed for a shopping platform other than Google, Instagram or Facebook or don’t want to connect your Google Merchant and Meta Business account, you can create a product feed in the Feeds grid. This process will require more configurations but gives you more control over feed content.
Click Add Feed, select a ready-made or custom template, and then click Create.
Note
Ready-made templates differ by the tags they include. Select a template based on the data you want in the feed. For example, to upload only prices to Amazon, choose the Amazon Price template. To upload product stock data, select the Amazon Inventory template. You can also add or remove tags from any premade template as needed.
General
Specify the General Information about a new feed.
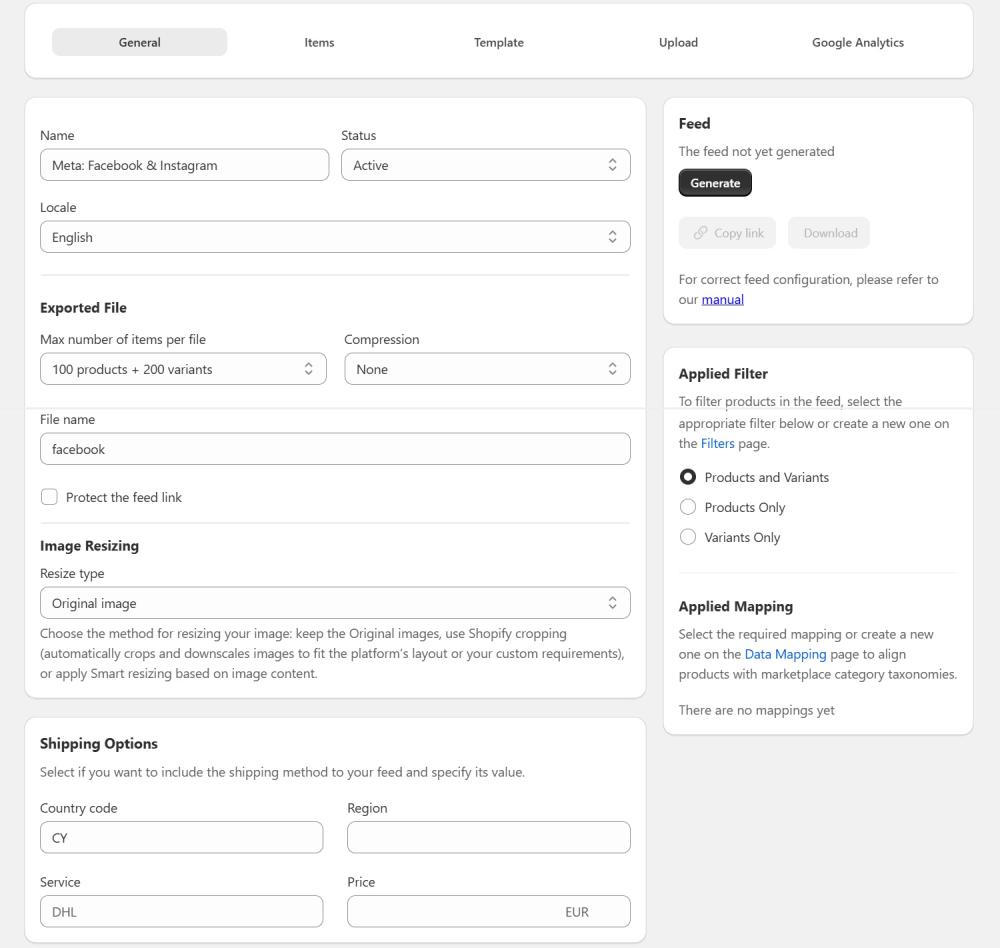
Name - specify feed name.
Status - here you can activate or deactivate the feed.
Exported File:
Max Number of Items per File - the setting allows you to limit the number of items included.
Compression - you can set to compress the feed to Zip format when it generates and uploads to the server.
File name - set the name for the exported file.
Protect the feed link - here you can add a custom password to protect created feed.
Image Resizing - choose the method for resizing your image.
Resize Options:
- Original images - keep your images as they are, without any modifications.
- Shopify cropping - use a default Shopify resizer that automatically crops and downscales images to fit the platform's recommended layout or your custom specifications.
- Smart resizing - use AI-powered tool that detects the main objects in the image and automatically crops it to your custom specifications to maintain the same alignment as the original image, ensuring the subject stays properly framed.
Image size (available for Shopify cropping and Smart resizing):
- Platform-specific - automatically resize images according to the platform's recommendations.
- Custom - specify the width and height for resizing, and adjust the Crop alignment (available only for Shopify cropping).
Shipping Options - here, you can change the general configuration and specify Country Code, Shipping Service and Shipping Price specific for the feed.
Feed - click Generate to create a feed. Once generated, you can Copy the link for the feed or Download it in XML format.
Note
You can generate a feed immediately with default settings or you can apply your own customizations (in the Templates section, Filters, Mapping, etc.). Regenerate the feed at any time, by clicking the Generate button in the header of the feed's configuration page.
Applied Filters - select the items to include in the feed: products, variants, or both. You can create more filters on the Filters page.
Applied Mappings - choose the created feed mapping between your collections and shopping engine categories. You can configure mapping on the Mapping page.
Items
In the Items section, you can preview the items included in the feed. To view products included in the feed, you need to Save and Generate the feed first. Only then will the products appear in the Items section.
Note
Currently, the Items section is not available for Amazon and eBay feeds. Instead, you can preview the feed with all items included as an XML file by clicking the Preview button in the header.
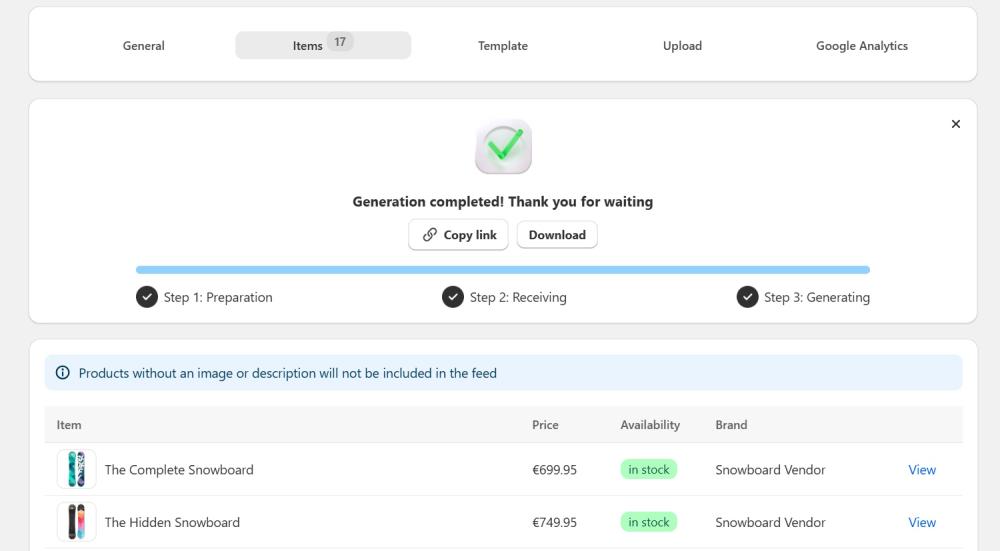
Note
Products without an image or description will not be included in the feed and won't appear in the Items section.
Template
In the Templates section, you can choose which tags to include in the feed and match XML tags with Shopify attributes.
The configurations differ depending on the platform. Google, Facebook, Pinterest, TikTok, and Instagram share one configuration, while Amazon and eBay use another. Let’s look at both.
Template configuration for Google, Facebook, Pinterest, TikTok, and Instagram
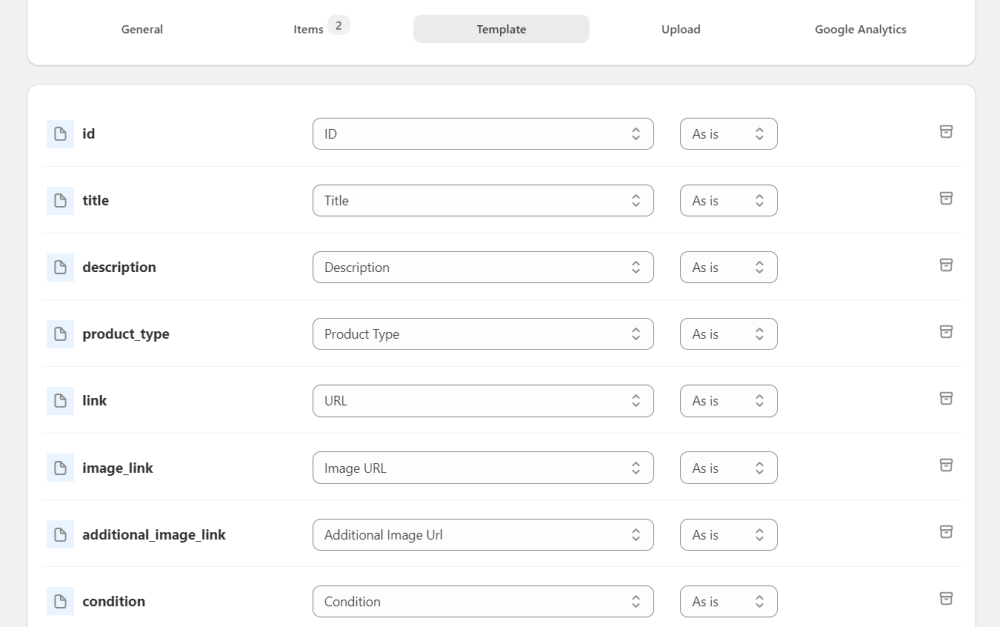
The template configuration page is divided into four columns:
- First Column: Displays commonly used tags for the shopping platform you chose (e.g., id, title, image_link, etc.).
- Second Column: Contains a dropdown to select Shopify attributes or metafields that match the platform tags (e.g., for Facebook's "brand" tag, you can select Shopify's "Vendor" attribute or a custom "product.brand" metafield).
- Third Column: Allows you to specify the format of the attribute. For example, Google Shopping requires currency for the price, so selecting "Price format" will add the currency. The available formats are:
"as is" (no changes),
"price" (adds currency),
"date" (ensures the correct date format). - Fourth Column: Provides an option to delete tags you don't want to include.
If you don't find the desired tag in the pre-made list, you can add your own tag manually at the bottom of the page. To do this, specify the XML tag name, select the corresponding Shopify attribute or metafield from the dropdown, and click the Add Field button.
Leveraging product and variant metafields directly in your feed templates enhances flexibility, improves feed accuracy, and allows for precise data customization.
Example: Google recommends including a color for each product. You can create a "color" tag and select the "variant.color" metafield from the dropdown.
Similarly, If you have the material information as a product metafield called "product.material" you can create a "material" tag and select the corresponding metafield from the dropdown.

Template configuration for Amazon and eBay
For Amazon and eBay feeds, you can configure the feed header, footer and product information.
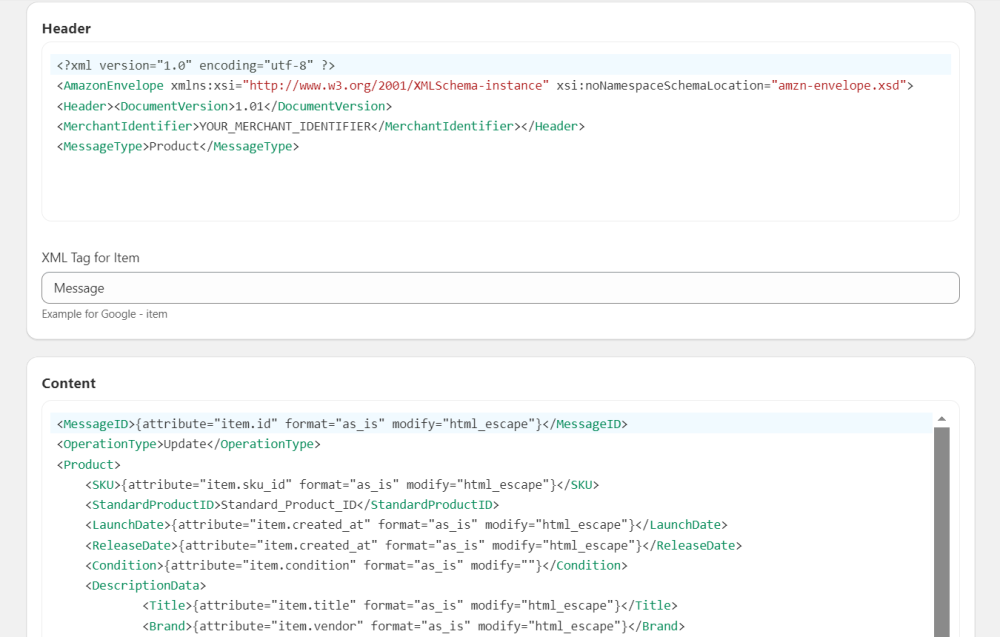
Header - used to place some info into the XML header.
XML Tag for Item - a tag which will wrap each product in the feed.
Content - an XML editor where XML tags and attribute codes are inserted.
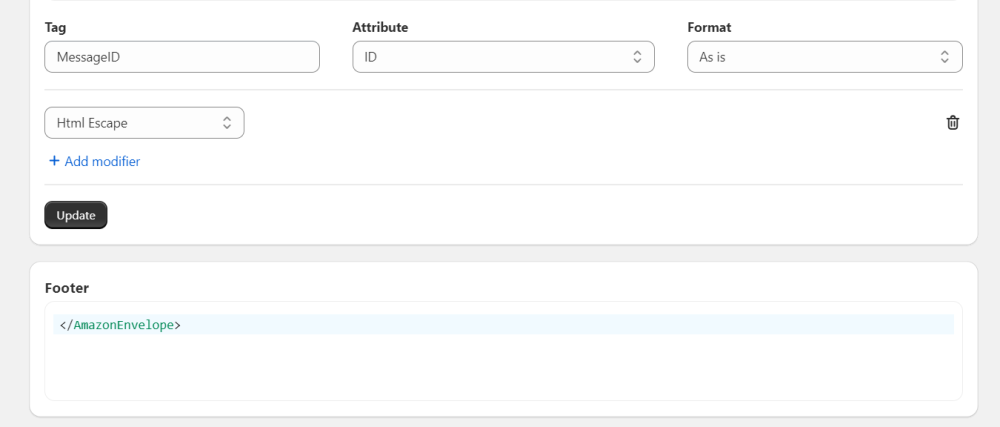
Tag - XML tag for the attribute used by the shopping platform (e.g. for Amazon, XML tag will be Message).
Footer - used to place some info into XML footer.
Also specify the Attribute and Format.
It is possible to add modifiers for cases when you need to modify the original values of an attribute. To do this, use Add modifier action; select one action from the available range:
- Strip tags - delete HTML and PHP tags from the line;
- HTML escape - escape special symbols from the product description;
- Google HTML escape - escape special symbols within an HTML string and trimming any leading or trailing spaces if they exist;
- Lowercase - convert all attribute letters to lower case;
- Uppercase - convert all attribute letters to upper case;
- Capitalize - make the first uppercase letter;
- Capitalize Each Word - make the first letter of each word uppercase;
- Integer - convert values to whole numbers, for example, 5.2 will be converted to 5;
- Length - remove symbols and numbers without rounding, for example, 33.75 will be truncated to 33;
- Prepend - add text before the value in the column. The text is specified in an additional field that appears when this modifier is selected;
- Append - add the text after the value in the column. The text is specified in an additional field that appears when this modifier is selected;
- Replace - after choosing this modifier, 2 fields appear: in the first one we indicate the word that needs to be replaced, and in the second one - the word to be replaced with;
- Round - round the number down to a whole following the mathematical rounding rules (0.5 - upwards to 1);
- If Empty - specify the value to use instead of an empty attribute's value;
- If Not Empty - fill in the value that will replace the original attribute's value;
- To secure URL - replace http with https;
- To unsecure URL - replace https with http.
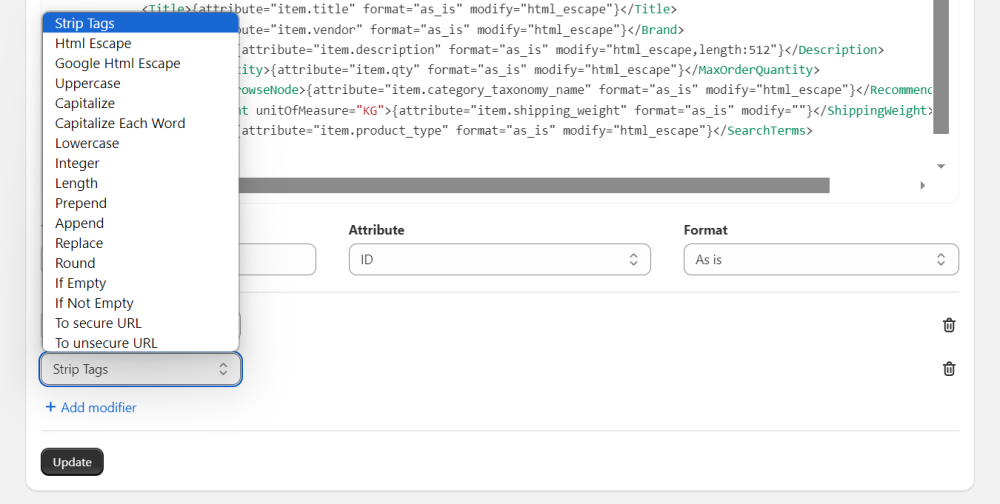
When you've chosen the modifier, click the Update button to apply it.
Upload
Here you may enter FTP account credentials where the feed will be uploaded.
Note
Find detailed instructions for Google feed upload and Facebook feed upload in their respective sections at the end of this guide.
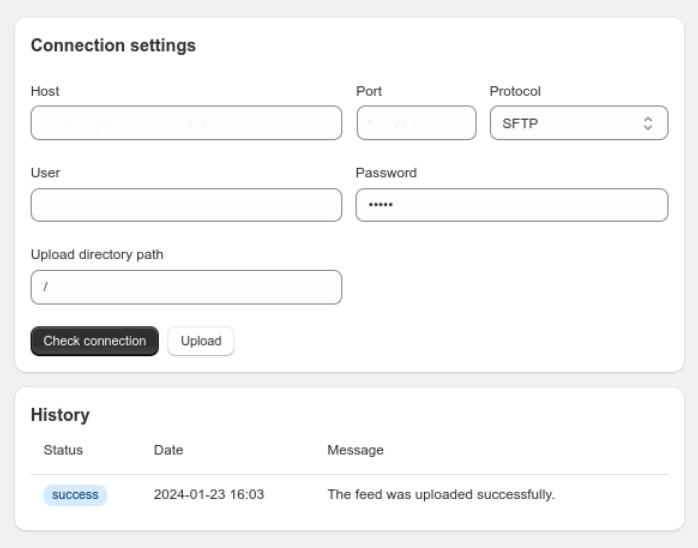
Host - FTP\SFTP server hostname or IP address.
Port - server's port number.
Protocol - network protocol for transmitting files.
User - FTP\SFTP username.
Password - FTP\SFTP password.
Path - path to directory on FTP\SFTP server.
Click the Check connection button to check whether the data for the FTP\SFTP connection is correct.
History - this section provides detailed information regarding the uploading of a feed.
Schedule
Decide whether to generate feed manually or by schedule. When you choose to generate feed by schedule, also specify the precise day or several days and time of its generation.
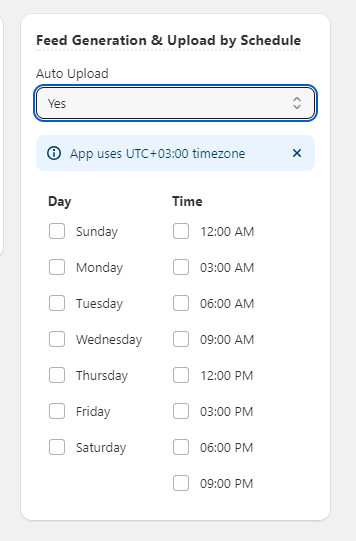
To schedule feed generation without uploading, choose the time and day, but don't fill in details in Connection Settings.
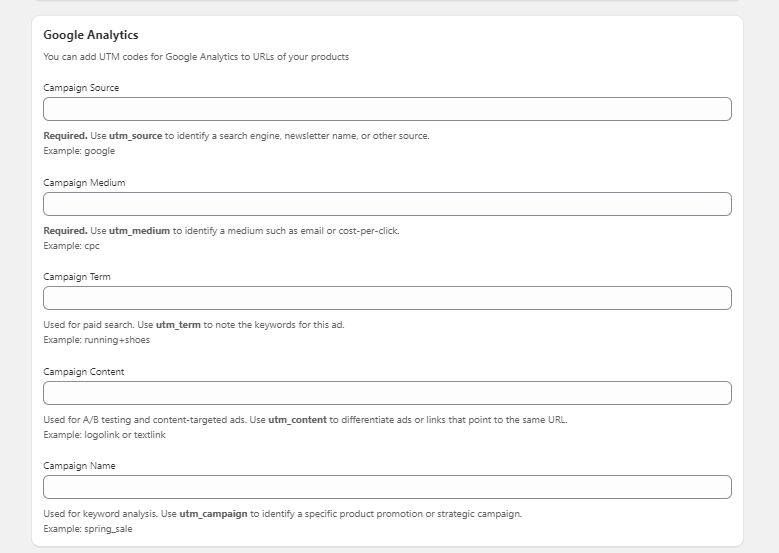
Google Analytics
These settings allow you to set utm-parameters that will be added to the urls in your feed. Thus, you can collect all the sales statistics to your Google Analytics account.
Configure Filters
Filters allow you to specify which products should be included in the feed. You can filter out disabled products, include products from specific collections, and more.
In the Filters grid, you can find the built-in filters. Here, you can also create custom filters by clicking Add Filter.
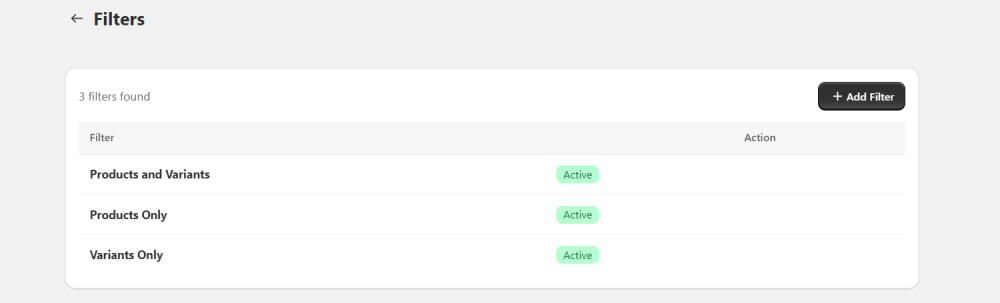
Specify filter name and click Create to proceed with configurations.
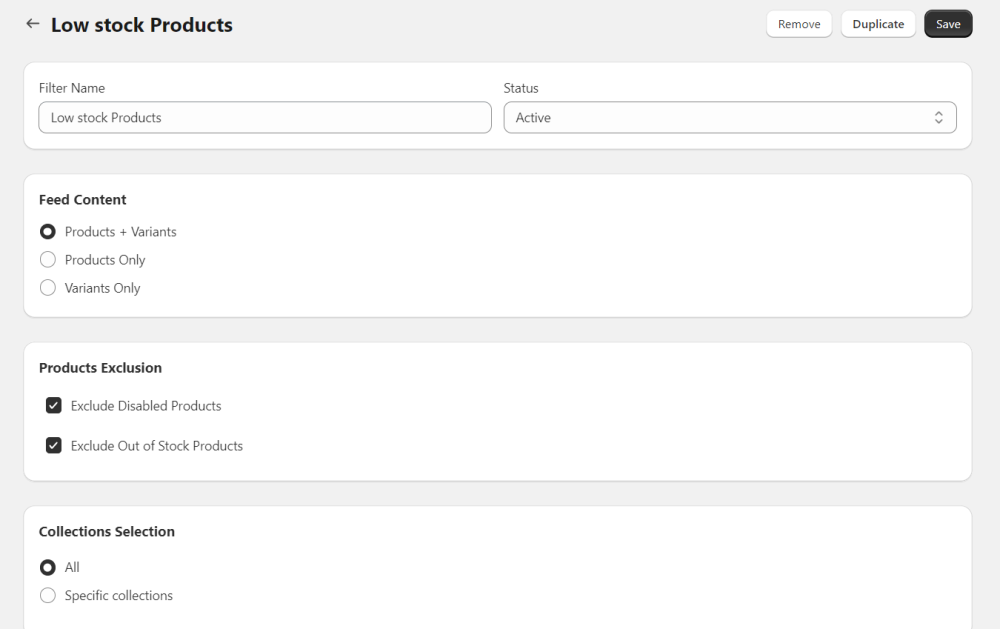
Filter Name - add or edit the filter name for easier navigation.
Status - here you can activate or deactivate the filter.
Feed Content - select what should be added to the feed: products, variants, or both.
Products Exclusion - exclude disabled and out-of-stock products from the feed here.
Collections Selection - specify which collections should be included in the feed.
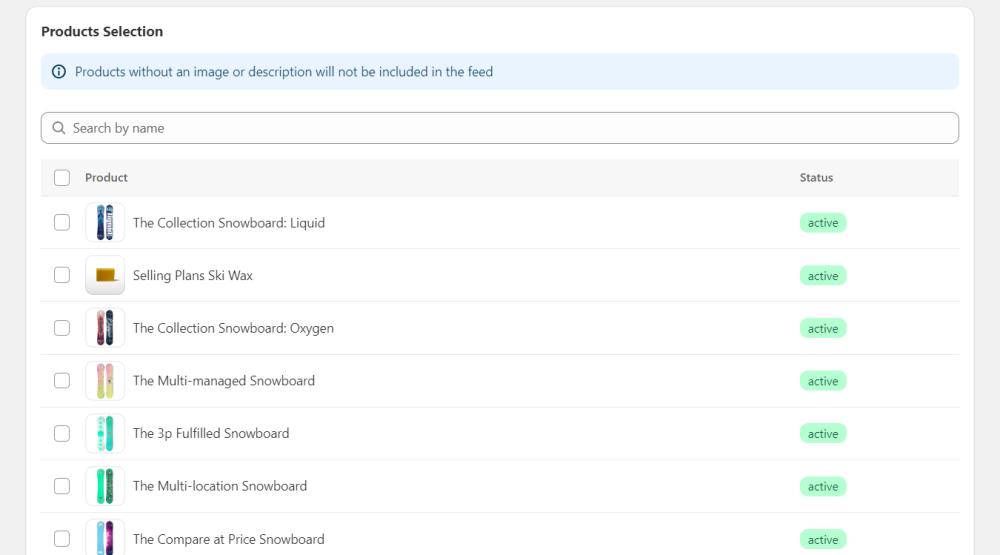
Products Selection - select specific products to include in the feed.

Applied to Feeds - select the feeds to which the filter should be applied.
Configure Mapping for Shopping Platforms
To adjust your store’s collections and product types for platform requirements, use the Data Mapping grid. This helps match your products to marketplace categories.
For example, Google Shopping requires Google Product Taxonomy. Data mapping makes it easier to align your Shopify store collections with Google's categories. The same applies to other shopping platforms you create feeds for.
To create a new category mapping, please hit on the Add Mapping button.
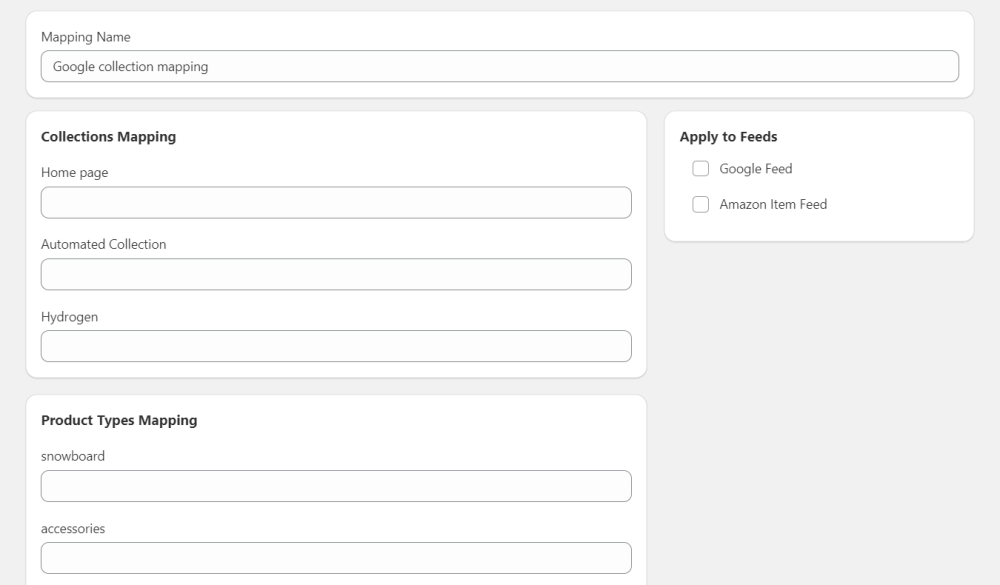
Mapping Name - specify mapping name for easier navigation.
Collections Mapping - map your collections with shopping platform categories.
Product Types Mapping - map your product types used in Shopify store with shopping platform product types.
Applied to Feeds - choose the created feeds to apply the collections mapping.
Calculation Fields
The Calculation Fields section allows you to create and manage calculated fields, which can then be used in feed templates as tags. This feature enables you to meet the specific needs and requirements of different marketplaces by performing calculations with numeric metafields and attributes.
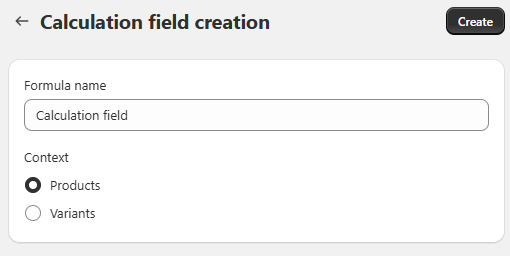
Creating a Calculated Field
- Click the "Create" button.
- Configure the parameters of the calculated field:
• Formula Name: Assign a name to the formula so you can easily find it in the feed template’s drop-down menu.
- Formula Preview: Displays a preview of the formula as you construct it.
- Formula Components: Build the formula using available numeric attributes, numbers, and mathematical operators.
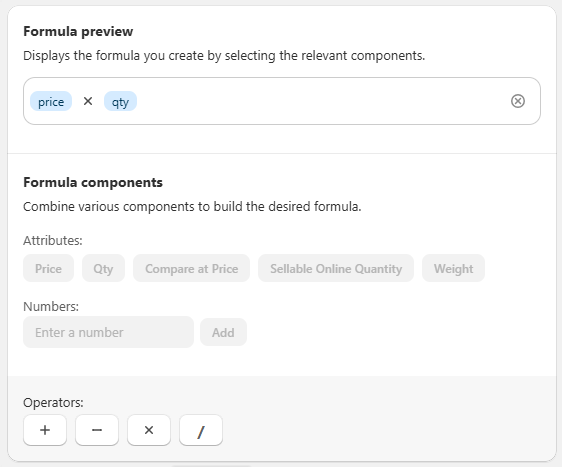
Note: If there are many available attributes or their names are lengthy, those that do not fit will be accessible via the "More Attributes" drop-down menu.
3. Save the formula.
Once saved, the formula will appear in the Calculated Fields section under the name you specified.
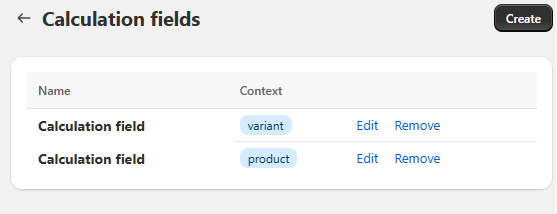
You can Edit or Remove the formula as needed.
The calculated field will also be available in the feed creation Template drop-down list of attributes.
Important Considerations:
- Only numeric metafields and attributes can be used in formulas.
- If a formula contains an empty field, the resulting value in the feed will also be empty.
- If a formula is created and used in a feed but later deleted, the feed will still display an empty value where the formula was applied.
By leveraging calculated fields, you can dynamically generate values tailored to marketplace requirements while maintaining flexibility and control over your feed data.
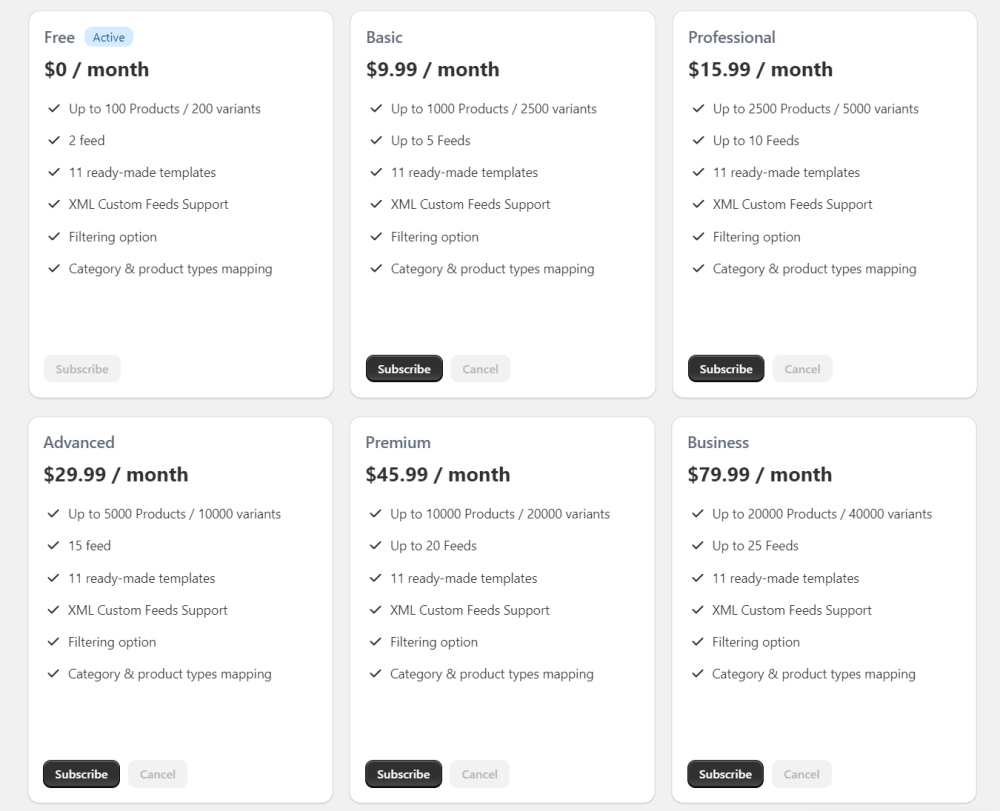
Pricing plans
Settings
To add general information about your store in the feed, we recommend specifying the following settings:
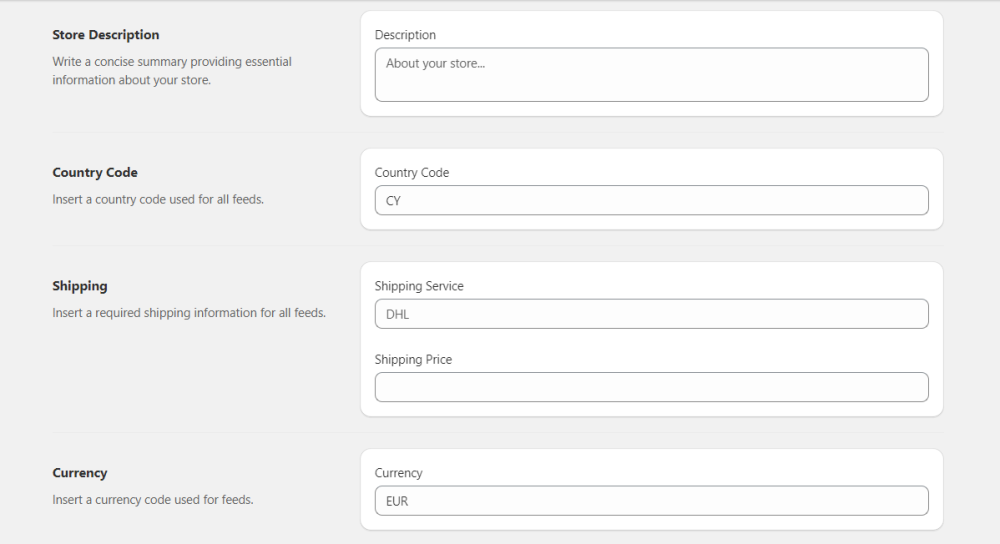
Store Description - here, you can write a concise summary providing essential information about your store. You may add the store description attribute to the feed header. It's automatically added to the Google feed header by default.
Country Code, Shipping Service and Shipping Price may be specified here as global settings and used for all feeds. Alternatively, you can set them individually for each feed.
Shipping - insert a required shipping information for all feeds.
Currency - specify the currency code used for feeds.
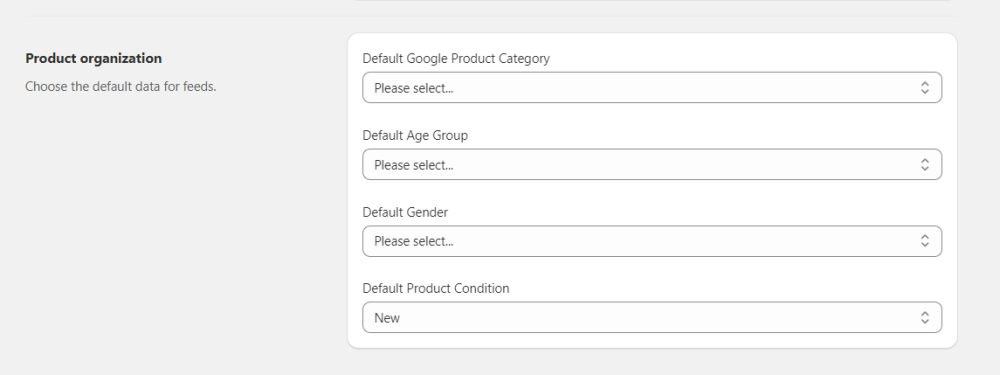
Product organization - choose the default data for feeds.
Upload Feed
Google Merchant Center
If the app is connected to your Google Merchant account, the feed will be uploaded automatically according to the schedule you set. You can also check the status of each sync and view any issues in the Sync logs tab. If you’re not using the integration with Google Merchant Center, you'll need to upload the feed to your Google Merchant account manually or via SFTP.
Upload via FTP/SFTP
To upload the feed via FTP/SFTP, first, you need to add a product source in your Google Merchant account:
1. Go to Settings & Tools > Data Sources.
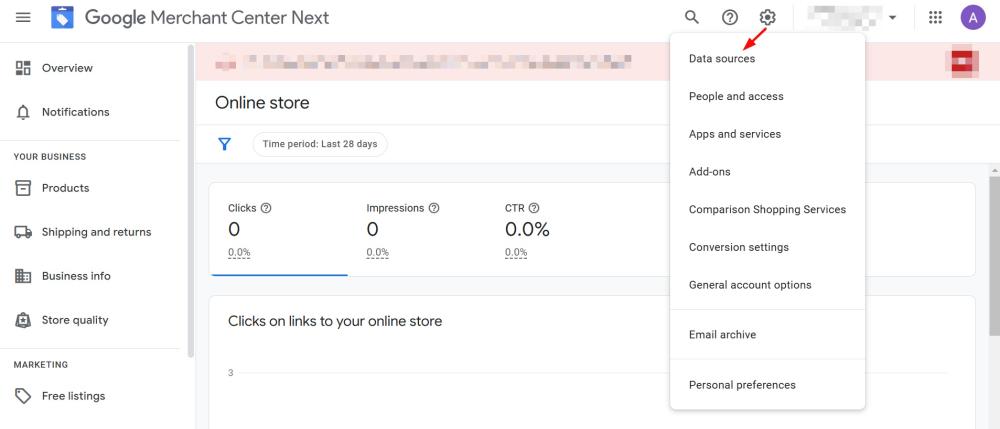
2. Click Add product source button.
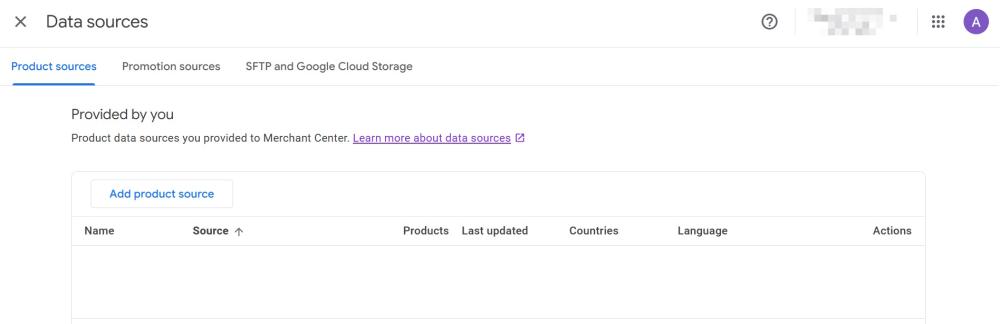
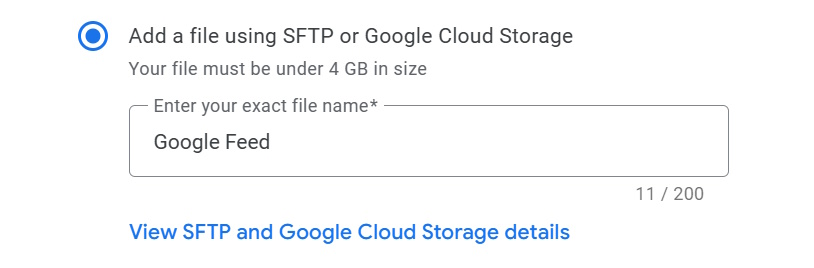
3. Add products from a file > Add a file using SFTP or Google Cloud Storage.
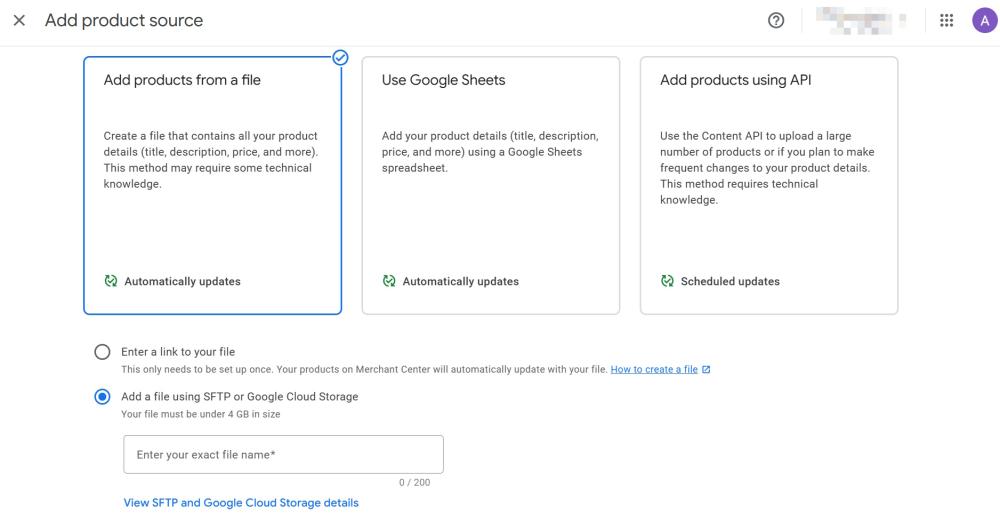
4. Enter the exact file name of the feed you created in FeedFusion.
5. Click View SFTP and Google Storage Details.
6. In the dialog window, you’ll find the credentials you need to copy.
7. Click Continue.
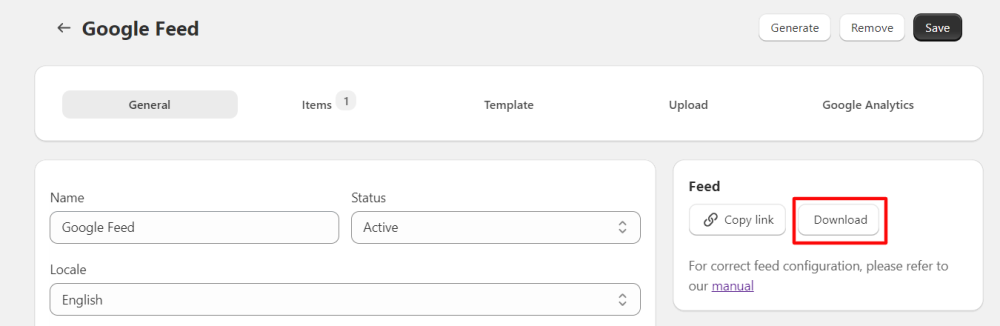
8. Return to FeedFusion, open Feeds > Google Feed > Upload.
9. Select the protocol (in our case, SFTP) and paste the credentials you copied from Merchant Center.

10. Click Check connection to make sure that connections go through.
11. Click Upload or schedule automatic feed upload in Feed Generation & Upload by Schedule section.
Upload Manually
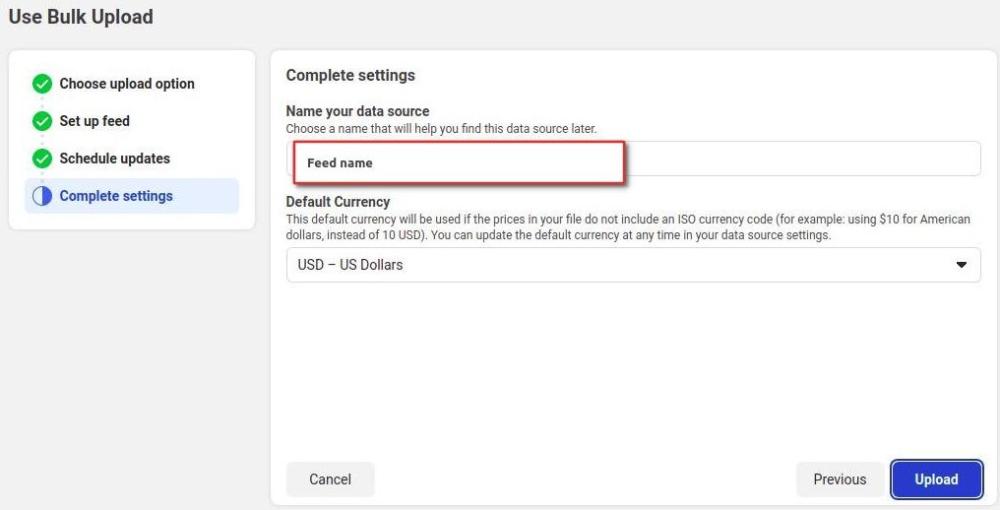
You can upload the feed file manually, but keep in mind that this method requires you to update the feed manually as well. For it, you’ll need to download your feed in FeedFusion and then upload it in Google Merchant account.
1. In FeedFusion, go to Feeds, open your Google feed and download it.
2. Then, open your Google Merchant Account, navigate to Settings & Tools > Data Sources.
3. Click Add product source button.
4. Add products from a file > Upload file from your computer.
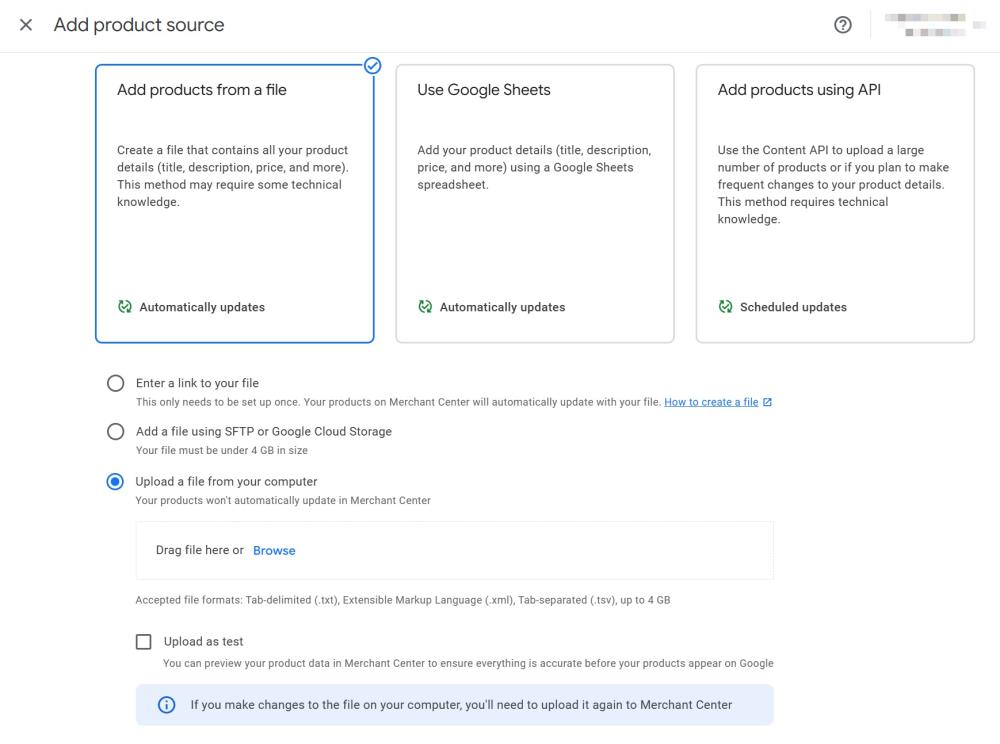
5. Click Browse and upload your feed file.
6. Click Continue.
Facebook & Instagram
Upload via Integration
If the app is connected to your Meta Business account, the feed will be uploaded automatically according to the schedule you set. You can also check the status of each sync and view any issues in the Sync logs tab.
Upload Manually
Set up the initial product catalog in Facebook business account in Data Sources > Data Feed > Next.
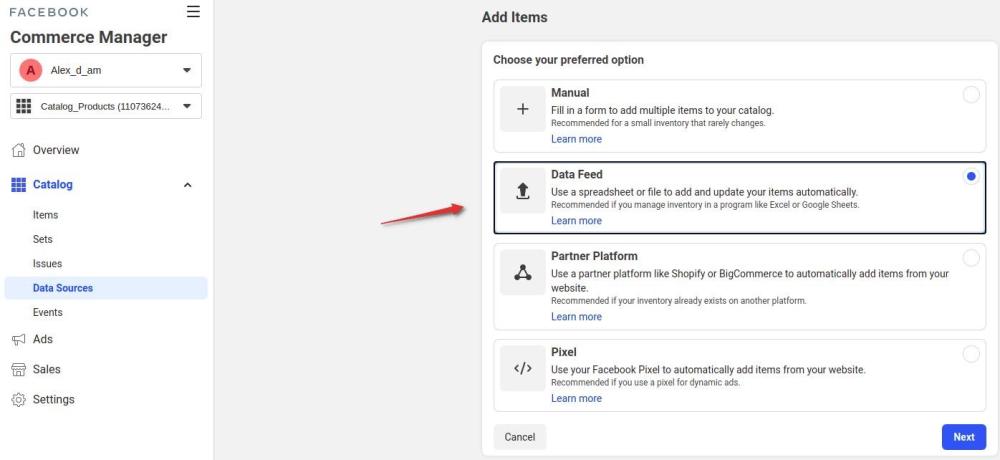
2. Choose upload option.
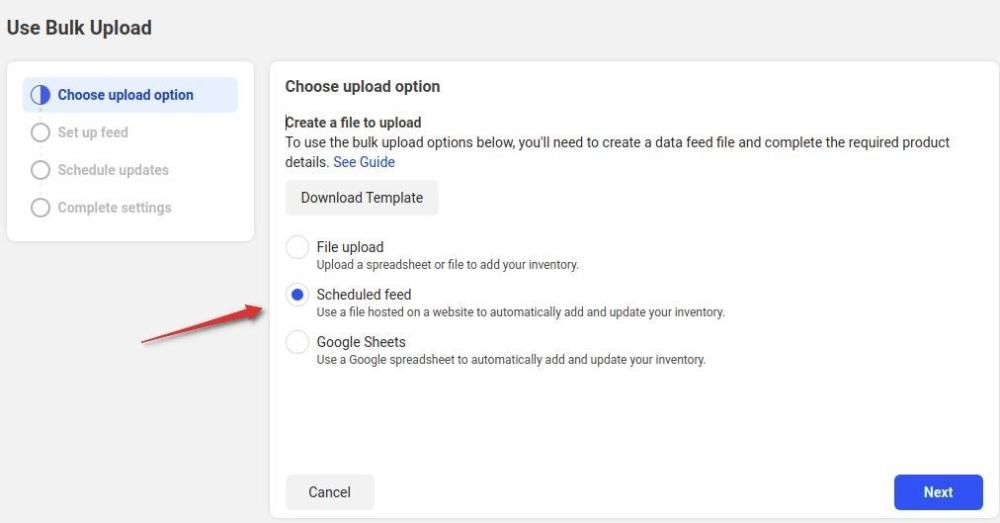
3. Provide the feed file URL, which you can copy from the Feed’s configurations in FeedFusion.
4. Configure a schedule for the feed.
5. Name your feed and click on the Upload button.